
Hello, this is KasumiLover with another guide I've been silently working on and have been slowly revising and making from the original Mai Shiranui guide in LR!
Having been in the original DOA5LR game as its final DLC character, Mai has returned in 6 with more ways to play her and alot more new additions and tweaks to further flesh out her style! This guide will give you a nice hot take on what she has to offer from her jumping stance, to her special moves, throws and holds and much more!!
Latest guide notes:
°5/19/21 ~ Base guide finished.
°5/21/21 ~ Added in rope wall tech notes.
°6/25/21 ~ Added in KKK force tech notes.
°4/22/23 ~ Added in an additional section that highlights Mai's stun starters.
-Before we start the guide off, if you're a beginner you should know the basics about reading frame data and inputs. I will use actual button macros throughout this guide, but here is a picture that shows you what the directional inputs are numerically:
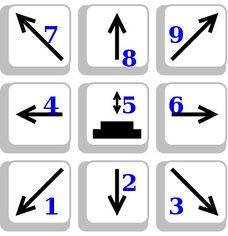
1 ~ Down Back
2 ~ Down
3 ~ Down Forward
4 ~ Back
5 ~ Neutral/No Direction
6 ~ Forward
7 ~ Up Back
8 ~ Up
9 ~ Up Forward
-Next you should know the basics regarding how to read and interpret frame data. Here is an example: 20(4)25. The first number is the start up frames, which shows how many frames it take for the attack or throw to actually begin. The second number in parentheses is the total active frames during the attack animation, and finally the last number is the recovery, which shows how long it takes for the attack to recover so you can begin another attack. Worth noting is that the longer it takes for an attack to start up, the more likely you are to be jabbed or hit out of it, and the longer it takes for the attack to recover, the more likely you are to get hit or thrown afterwards.
-Another key thing you need to know is MOVE SAFETY. Move safety is how safe or unsafe an attack is on block, and you can see for yourself how unsafe an attack is by enabling the move details in training mode and looking at the move advantage. +1 or better frames means you have a frame advantage, meaning in this situation you're able to move first and the attack you use afterwards in that instance with no delays will be faster by that allowed advantage!(Example: If you perform an attack and gain +4, the attack you use immediately afterwards will be virtually 4 frames quicker than normal in that instance). +0 to -5 is safe, meaning you can not be throw punished after the attack, with the only exception being 5i neutral throws if you are left at -5. -6 to -7 is semi-safe, meaning you can be thrown if an opponent uses a quick throw, but longer framed throws will not get you, and -8 or worse is unsafe, meaning you can be thrown, so watch out when you use her unsafer attacks.
-Throughout this guide, to cut some corners and to eliminate text bulk, I will use the "i" symbol in place of the term "frames'. An example would be 23i, which basically is the same as saying 23 frames. Keep this in mind as you read this guide.")
-Finally, another thing I will mention throughout is whether Mai's attacks track, meaning if your opponent attempts to sidestep it, it will follow them, while if an attack has no tracking, it will not hit when sidestepped. Now that all the basic stuff is covered, let's transition to her pros and cons.
°Very fast; Has a 9i high punch strike, 11i mid punch and a 13i low punch making her amongst the quickest fighters in the cast. Her kicks are swift as well, having a 12i high kick, 13i mid kick and a 14i low. Very quick oriented neutral.
°Relatively easy to pick up and play, being low execution and having a pretty decent sized move kit meaning you won't have to worry much regarding a large move set or complex combos.
°Virtually all of her cancels are some of the easiest in the roster since she doesn't require specific conditions like needing a normal hit to be able to chain into them besides her one that leads into her jump stance.
°Has great delay in her strikes, useful for throwing off opponents when free canceling or fishing for a counter hit.
°Somewhat above average combo damage output and counter damage. Her combos are also relatively lower execution making it easy to perform her max damage set ups.
°Very versatile, having good mix ups from her strings that have varying hit levels. Also has her cancel specials from specific strings that allow a cancel into a special move which further adds an edge to options in and out of stuns!
°Very good at close quarter range, being able to quickly overwhelm and score counters against slower opponents. Also fairs well against characters who are about her speed as she has the quick tools to keep up with them easily!
°Has great reach from most of her attacks, having a great mid range when dealing with opponents who aren't within close range! Useful when you wish to fight your foe outside of close quarters especially if they struggle at that range. Has several attacks that actually become safe and or can avoid throw punishes with the pushback.
°Great at far and long range, having a number of useful approaching and keep out tools to either blast back reckless foes or to hone in on them.
°Has a projectile attack, a high fan that can be used from anywhere on the screen to either hit the opponent or to keep them out and waste their time by forcing them to crouch, free step, or use attacks with crouching properties to avoid it. Can be a major nuisance to foes who already have a tough time moving in.
°Pretty good mid range pokes that are generally safe. Quite a handful of her attacks also benefit from max range spacing as they can avoid certain throws from max or tip range, and her on block safety and advantage can also change vastly from this as well making her even more rewarding for players who can space and zone well.
°Good evasion, having attacks that can crush those of her opponents, and having moves with crouching and jump properties that can easily evade and crush highs and lows in defending situations.
°Can move in and out quickly thanks to her jump; also has quick walking and retreating speed.
°Has a fatal sit down stun in her kit, giving her an additional way to pursue potentially guaranteed damage when not wanting to use her universal fatal rush attack.
°Can cancel into her special attacks from the third hit sequence of her fatal rush string, giving her more an edge in combos and in stun!
°Great stuns; has deep lift stuns, a blind stun, and also has a mid punch and mid kick stun that crumples in stun or from counters, forcing the opponent to hold in these situations or else they will fall to the ground, quite similar to her fatal stun and fatal sit down stun!
°Very counter oriented, alot of her attacks benefit from hitting her opponent before they do you, making her counter hit game very dangerous!
°Great carry, very adept at carrying her foe across the stage and into danger zones with very little effort.
°Good throws; has quick throws, a punish throw that does good damage and also has a quick 10i launcher throw. Also has an air throw that can be used to score less scaled damage when needed in shorter juggles.
°Decent tracking; Has useful moves that can easily punish reckless sidesteps if carefully predicted.
°Virtually no pressure tools or positive guard breaks besides her Break blow on block and her close hit attack at max range. Has to rely more on mix ups and counter hits to open her opponent up offensively.
°Generally an unsafe character, having only a handful of safe attacks, and the ones she does have tend to be linear or easy to avoid.
°Risky lows; while her sweeps can score quick advantage, they tend to be easy to react to. May be difficult to open up turtles when not wanting to risk a throw. Some of her lows are also vulnerable to both standing and low throw punishes since some leave her "squatting", which makes all throws be able to grab her.
-Generally very counter hit oriented, and needs openings and good interrupts to get her deadlier stuns going as alot of her kit will only cause stuns on successful counter hit or crouch punishes. Overall needs counters as catalysts to get her deeper stuns going which have the best properties when used before her foe attacks her.
°Relatively slow launchers, as she lacks any swift quick launchers in her kit, meaning she'll need deeper stuns to get the most optimal launcher options for mix ups as her fastest launch speed is 15i. Virtually no in string launchers as well unless you utilize her special move launcher from her attacks that allow it, and even that launcher is particularly predictable and punishable. Overall has a very honest launch game that's very dependent on deeper stuns to make use of.
°Very risky tracking game; Most of her best tracking moves are lows, and her mid tracking attacks tend to be unsafe and can be throw punished. Also lacks in string tracking moves, she can use special cancels after certain ones to remedy this but this is often unsafe.
°Her smaller moveset can be a hindrance at higher level unless you play her carefully.
°Average hold game; Doesn't have any expert holds, and her holds tend to have limited environmental reaction.
°Her special attacks lack much versatility; 2 of the 4 are mid punches, 2 of the 4 track, and 3 out of the 4 are unsafe up close.
°Her DOA6 bound set up is probably one of the more limited in the game, having very little use outside of stun launch set ups since doing it from her standard mid fan launcher is predictable, and she can do it from roll back bounds in stun or on counter hit or after fatal stuns but this isn't useful since her rollback bound attacks can interact with walls. Because of this, it's damage potential with regard to danger zones is more tame compared to other characters like Kasumi who are able to do much more before they can end their set up with a bound into a close hitter.
°Lacks any real way to go backturned and doesn't have any strings or cancels that allow her to be left backturned either. Not truly a hindrance but this makes using her backturned kit harder since she has quick tools from it like a launcher, her 9i, 11i, and 13i punch jabs still, and she can cancel into her special moves from her backturned K attack.
°Is a lightweight so juggles are especially effective against her and can lead to far more health loss compared to mid and heavy weights who can't be juggled as long.
-To summarize this, Mai is amongst the fastest characters in the roster, having a 9i/11i/13i high-mid-low jab speed for her punches and having a 12i/13i/14i one for her kicks making her very good at close quarters. Her attacks are mostly quick, and she is very counter oriented with a lot of her attacks causing more lethal stuns when used to interrupt her foes, and her damage output is good as well. She also possesses a great wall carry, and she has one of the best ranged games in the DOA6 roster as she has numerous attacks that cover a multitude of different ranges, making her deadly from all ranges if you want to either play keep out, zoning from mid range, or if you want to be a pest up close! Her throws are decent too, having quick ones, a launcher one that's swift, and she also has a punish one that deals good counter damage and she also has an air throw for unscaled damage, and an a throw sequence from her forward body lunge jump attack at the proper height.
Defensively, she has attacks that can easily crush highs and lows, and her range can make it difficult for opponents to safely touch her if they struggle moving toward the aggressor. Her projectile fan also can waste time as the opponent must free step or duck to avoid it if they don't properly hold it, and her jump stance also has other ways she can move in as well. Finally, she has a great array of stuns, including a blind high stun, a mid punch and kick stun that can crumple forcing the opponent to risk a hold to stand, and she has good versatility in her kit which is already a decent size and easier to pick up, making her useful for all skill levels. Her specials will also add an additional edge to the strings she can cancel them from making it a risk to just randomly hold her.
While she's pretty solid, she does struggle a bit since alot of her attacks demand a counter hit in order to stun, and her lows aren't that great as its only her slower sweeping lows that give her a stun, meaning that she'll struggle somewhat to open an opponent who plays careful and doesn't easily give in to counter fishing. She's also amongst one of the unsafer characters in the game, and has virtually no way to gain any real advantage against blocking foes, meaning she'll have to play the neutral poking and counter hit baiting game more honestly compared to other characters who have ways they can gain advantage on block. Her tracking is also not that great, as she lacks in string quick tracking and nearly all of her standalone tracking moves are slower and unsafe, making them vulnerable to throw punishment. Her launchers are also mostly slow and require a counter hit to get the most optimal damage, and her holds are fairly limited in regards to interacting with the environment. Her bound set up is also pretty limited as well too, as the damage potential from it is way more tame compared to characters like Kasumi who can easily get more damage and wall carry from it.
Although Mai has her weaknesses, this doesn't take away the fact that she's amongst the more dangerous characters to fight in the game, and her speed and range can prove to be a high fire wall to extinguish when mastered. Being one of the more unique characters since she's based from a 2D fighter, this guide will help you learn her thoroughly so you can show your friends and rivals why she's Japan's best!!
~What's wrong?: This mini section will give a brief rundown on what her LR vs 6 changes are! Compared to LR, I feel like Mai is far more easier to use in LR since she was generally safer and her damage was also higher too, but in DOA6 she has to generally work harder for her damage since alot of tools were toned down. Some attacks no longer stun on normal hit and some stuns were also changed from crumples to more normal stuns, this means she has to play more honestly compared to LR where she had stuns and options to really keep her foe's guard up. She has had some safety changes as her Ryu enbu is no longer safe, her Shinobi-Bachi now is and certain moves now are different and don't give her advantage; her new fatal stun attack is an example, as it's now an unsafe attack rather than a positive guard break like before.
Despite these changes, Mai is still a strong character as she's had numerous buffs, like her old fan lift throw now causing a launch, her combo game is now more varied as she can now go for bound set ups and besides the mentioned moves, her stun game is still quite threatening, as she keeps her original critical burst attack in 6 as a crumple stun, and her original 66K is now 46K and also stuns for a crumple like before too! Mai all in all is still a threat, but she's been mellowed down so that way she's more an honest character rather than the cheaper one she was in LR, you'll now have to work harder for damage and openings but Mai is still threatening enough to not let this hold her back.
and . The first one we will address is . It's very evasive, and allows you to jump closer to your opponent while evading lows, and can also be used to get over to the opposite side of the arena when your opponent is down on the floor. Here are the possible follow ups you may use if you want to get feisty! Also please keep in mind that both her punch and kick follow up are 30i and have 24i recovery.
Please note: If you are coming here from my LR Mai guide, this should be quite familiar to you, but do keep in mind that attack properties and frame data may have changed in terms of advantage and safety. With that in mind let's begin:
~ Her high downwards swatting high punch fan attack, virtually the same as in LR. It tracks, making it a useful go to when moving in on foes who are quick to sidestep. It also covers a decent distance thanks to the initial jump, although the attack itself has somewhat poor range. The attack can be crouched, but it's been buffed, as its safer at -1 on hit, rather than the -4 it was in LR, making it a relatively safe way to continue pressure against slower foes as you'll be 10i/12i/14i in neutral punch frames and 13i/14i/15i in go to neutral kick frames, meaning you're not at much of a risk if you want to continue to pester slower foes!
~Play with Me??: If this attack is done at max tip range, you'll be +1 on block! It's tricky to get this since the attack has very poor range, but this makes it a useful way to reset the neutral when moving in and done correctly!
~ Her mid knee kick follow up, it has a few adjustments from LR to 6; Because it now has another attack ender, it'll now give you +20 on normal hit instead of +25 which is a slight nerf. It no longer wallsplats at all, and it is still -11 when blocked and doesn't track.
In 6, it's follow up has been adjusted as well, with her still being able to cancel into, but the catch is it can't be delayed anymore, you'll have to commit to the ender or else it won't come out. The attack is also unsafer at -7 on block up close, but is -3 to -6 depending on distance when done at max range, making it more suited as a distance safe move when moving in. A new buff is that if the attack by itself or the string is done against an airborne opponent, she'll perform a damaging air attack throw sequence that floors her opponent before jumping a safe distance away, making it both a useful combo ender in launches or as an anti-air against characters who are prone to be in the air like Nyotengu! Can be low throw punished on block or whiff.
Another new string ender option is from the this attack after the mid kick hits on hit or block, she'll perform a dramatic dual knee drop with her fans open as it floors the opponent. Unsafe at -13 and doesn't track, but it can bound airborne opponents after the appropriate juggles, or by itself if used as an anti-air! The normal knockdown also allows you to go for a force tech to force the opponent up if they don't tech up quickly as well.
- The standalone lunging attack previously mentioned performed by itself, virtually the same although it has more utility without the string being tacked on, however it's slower at 38i. Avoids lows and covers a great distance and is -3 to -7 depending on max distance block. Doesn't track and can be low throw punished.
-I will cover it more in depth in the full move kit break down, but in DOA6 Mai is now able to cancel into the forward jump from her counter hit launch attack that is by simply pressing when it hits! However, it MUST hit in order for the cancel to work, and it won't work on block. Can be used as a feint as well which leaves you +2 on normal hit if the opponent doesn't attempt to hold.
-Now to address her backwards jump, for those coming from the LR guide, this section has remained pretty much the same as there are no changes in DOA6 besides the frame data on hit or block and etc. as mentioned earlier!
- This is similar to her forward jump, except this actually retreats and creates distance to move away from your opponent. If done near a wall, she will briefly grab on to it, allowing you to jump from it by pressing if you wish. When you jump from the wall, you will be able to perform all the follow ups from her forward jump stance, but take heed they'll be somewhat slower because of the prior maneuver. Her punch and kick follow ups will now be 60i and her P+K will now be 54i. The jump itself is also especially useful for retreating away from attacks, ideally wake up kicks since the jump can help you evade both kicks so you can reset your spacing again.
-In conclusion, don't underestimate the power of her jumps, they can be very useful in moving in on or retreating away from aggressive opponents. With that being said it is now time to move into Mai's special moves breakdown!
-This next section will cover Mai's main mechanic she brings from the 2D fighting game genre: The cancel mechanic. This is the act of quickly canceling normal move or string into one of her four specials. The following attacks can be cancelled from:, , , , and back turned and .
~This is gonna be hot!: Mai can also cancel into her Specials from her fatal rush after the third hit! Keep this in mind for potentially guaranteed damage!!
-These are the following specials she can cancel into and what they can do. Also be aware you can perform these specials by themselves too:
~ This cancels her attack into her signature "Kachousen", her high projectile attack that hurls an 18i fan at her foe. Being a projectile, it is full screen and can only be evaded by crouching, or free stepping to evade it, that or sidestepping. Doing it at max range nets you +26 via a stun, but because of how far you are and the 46i recovery, it can't actually be used. Up close, it'll give you a +4 stun advantage, but the stun will vary vastly from a distance, where the range will change the hold to an "evade" hold(a hold that makes the opponent avoid the attack with a slow motion effect, leaving you open to a backturned combo set up in most cases), while doing this up close will result in a normal high hold punish if held.
Gameplay wise, I regard this as her worst cancel attack since it'll only leave you +4 at the most up close in stuns or max damage thresholds, it's best when used at a range to waste the opponent's time, especially when the clock is ticking and you have the life lead. You'll however be left -22 on block, and this will also generally leave you a safe but negative disadvantage when performed on foes facing away. If done as a cancel in a juggle, it'll cause a knockback that normally would be useful for pursuing a no timing force tech but because the recovery is so slow, it can't be used really for anything besides as a way to scare the opponent into standing up.
~ Another returning special from LR, This is Ryu-Enbu, a 12i twirling jump attack that summons a 2-in-1 fire attack that ends with an 11i jailing attack that jails on block(Jail means that if the first strike hits on block, normal hit, or counter hit in most cases, the opponent won't be able to block, duck, or hold the second attack in this case. The only way to bypass this is to ensure the first attack doesn't connect). Having 33i recovery and being -9 when blocked, it's no longer a safe attack or ender like in LR where it was safe to use, and as a result it was somewhat easy to abuse since it also tracks as well and is her ender from PPPP, 8PP, 6PKPP, 1KPP, and 3PP, meaning you don't have to cancel into it from these strings. The first attack part avoids lows with the jump but has poor reach while the 2nd part has decent mid reach, making it useful for mid close range situations. If the attack hits, you'll score a +16 spin stun, while if just the 2nd part hits, you'll get a minor +11 stun that limits you to you only using P to continue a stun. The attack is also a good refloat, especially near walls since the attack does not wallsplat! When done on a back facing for, the first part of the attack will briefly cause a limbo back stun that would normally cause a fall, but the second hit will quickly change the stun to a +7 one that leaves them standing.
~ One of Mai's most unique special, this is Hissatsu Shinobi-Bachi, a long ranged 20i 2-in-1 attack that begins with a flipping forward mid kick attack into a 20i high jumping elbow finish. Like her previous special, it's useful since it jails on hit and block, mean if the opponent guards the first hit, it'll force them to block the high elbow, which is -6 up close and about -3 at max range, but getting max tip range is a bit tricky since the elbow pushes you forward quite a bit. Although this is a safe special and ender from her strings 3PK and PPPK, if the first attack whiffs, you'll be able to easily be crouched by the opponent since the elbow is very telegraphed besides that, and if the opponent ducked the elbow, you'll be roughly -11 due to the 29i recovery, about the same as if the opponent sidesteps the attack, making you open for a very easy throw punish... The attack also doesn't track, but compared to LR, it's far safer and you won't have to worry about a 10i throw punish! The attack covers a good range to begin with, and will lead to a quick "launch" into a good knock back with the elbow part. The move also looks deceptively unsafe, and it's common for foes not experienced with the match up to try to throw you after they blocked the move, be sure to quickly hi counter this attempt if they use any throw that's slower than 6i, but be wary against the grapplers who have very quick throws that can easily make using this move a huge mistake. A good whiff punish as well as a good ranged keep out move and combo juggle ender! Will also cause a special +49 to +52 rope wall rebound stun in stages like Sweat that sends the opponent hurling back towards you as a major disadvantage!
~ Her final special which is Kagerou no Mai, a 28i fire summoning move that has Mai use her ninpo to summon a 3-in-1 hellish fire blaze that engulfs her in beautiful flames. The 2nd and 3rd part of the move both have 6 active frames and a quick 1i start up that jails on block and hit, and the swift start up makes it absolute suicide to try to hit her since up close, you're gonna lose out against her 1i flames. The attack will launch on normal hit and will launch higher in stun, making it useful to launch foes although the start up in stun can make it easy to hold, and a successful hold results in an "evade hold' type that'll have the opponent evade the attack as if stepping it and you'll be left a shocking -27 due to the 24i recovery and the opponent will wind up behind you, making you vulnerable to all character's limbo back stun set ups if they know what they're doing, that or a simple attack will prove dangerous since you're wide open.
If blocked up close, you'll be left at -12, while if only the first strike hits at a distance and the two following fire attacks don't connect due to the poor range, you'll be left at -26. If only the first two strikes hit from a distance, you'll instead be -19. The attack tracks and can also act as a refloat but be wary since it's refloat use will depend on the situation and what was used to launch the foe. This attack overall has the worst reach out of all her specials and is the slowest as well.
-This covers all of Mai's specific special moves, please note that you don't have to always cancel into them from strings, throw them out when you think your foe has let their guard down! Now let's move on to the break system!
-This section will be a brief explanation of the Break System of DOA6. Let's begin:
The meter in DOA6 is divided in 4 parts, and the meter fills up quickly as you attack, but it also slowly fills from defending and receiving damage.
/- You can use ¼ of the meter to perform a side step attack. This is a 27i mid kick strike with 30 frame recovery that knocks back the opponent full screen. Unsafe at -15 and doesn't track.
- You can use ½ the meter to perform a Break Hold. A break hold is a hold that will hold any attack but does very low damage. This will also provide +5 advantage and reset the positions to round 1 fight distance, resetting the neutral. These are also the only way to escape a fatal stun from attacks or a break blow cancel.
- You can use a full meter to perform a Break Blow. Mai's break blow and break blows in general are a powerful attack with Sabaki type properties, meaning it'll interrupt strikes if timed right, allowing you to unleash a damaging blow that'll send the opponent flying backwards, clothes tattered and bruised. The attack is also able to be used after certain launches, after bounds, and even after certain wallsplats. The disadvantage is that it can be shut down with a simple low strike and can be hi counter thrown and the move can be stepped and held. +4 on block.
~PLAY WITH ME??: There's more to the Break Blow than you think: if you press H once it hits, Mai will perform a Break Blow Cancel. A cancel will stop the full blow from coming out and will leave the opponent in a fatal stun state. While in fatal stun, the opponent will be unable to do anything unless they have ½ a meter available to break hold to escape the stun, meaning you can use the cancel as an opportunity to go for more damage than the Break Blow may do in set situations, especially in certain environments with the right conditions. Be wary since if your opponent has meter, they can use the meter escape the fatal stun, but you can also use this as a way to go for a hi counter throw set up if you anticipate this. Also be wary that the opponent is only limited to break holds for escape as long as you don't use any normal attacks to continue the stun, since after that the opponent will not be in the fatal stun anymore; in this case they can regularly hold which although is a risk, you can use to pursue even more damage or a hi counter throw set up. This however can be avoided if you use her 8H+K to "extend" the fatal stun since it will put the opponent into a fatal fall stun that can be used to get the max launch height before going a juggle set up or bound set up.
There's other attacks you can use that involve the new button, but don't cost meter:
/- This lets you avoid linear or non tracking attacks at the press of a button. You can use this to avoid specific attacks and punish the recovery with a throw, but be wary since sidesteps lose to throws and will result in a counter throw. If you have meter, you can use ¼ of it to follow up a step with a side step attack. If the sidestep attack is done near walls with rope properties, it'll cause a +48 to +50 wall rope rebound stun that leaves the foe at a major disadvantage. This is possible in stages like Muscle, Sweat, and the Colosseum from a certain distance. Be wary for fatal rush attacks since the first hit will turn the opponent backwards in a fatal stun, which can lead to some deadly back turned situations. The side step attack also has no tracking so your opponent can step you for it as well.
Another thing is a fatal rush: a string that puts the opponent in a fatal stun, and finishing it can lead to quick damage, but you can also stop part way through and make a custom combo using the fatal stun:
- The first hit is the only one that can be done unless it hits. This is a 18i tracking high punch with 28i recovery. On hit, it'll result in a fatal stun which you can then follow with the other 3 attacks(the frames and the hit level don't really matter since only break holds can stop them and they can't be done unless the first strike hits). You can also use it in stun since the fatal stun eliminates the worry about opponents using normal holds and it'll force them to use their meter if they don't want to risk guaranteed damage. attacks with close hit properties will also have their close hit damage added on again in fatal stuns as well too! Because Mai however is doing a flurry of attacks, it'll do a total of 8 hits, the first one hitting once, the second hitting twice, the third hitting 4 times and then the final one hitting once with a knockback. As mentioned before, Mai can cancel into one of her specials during the third fatal rush string hit during the 4 hit part, making it useful for combo enders but be wary about the 30 hit combo limit, as reaching 30 hits will cause any other hits afterwards to whiff, ending the combo.
When the full string hits, it'll knock back and can wall splat. The string can also be used in juggles and after certain launchers as well if the height is high enough. If done on block, you'll be unsafe at -12, and be careful since the string can be ducked and low crushed. The string is also strong against side steps as it will cause a fatal stun that leaves them back turned and open to a guaranteed back turned set up. The string will also cause a +37 rebound rope wall stun in stages like Sweat or Muscle that have wall rope properties, but only from a certain distance.
If you have a full meter and do the string, you'll automatically transition into your break blow, but if you wish to save your meter, do so that you won't waste meter. DOA6 is a game where meter management is important, so be sure to save it and stock up for when you'll need it. Avoid wasting it on random sidestep attacks and nasty break blows and use it when the time's right and when it's absolutely necessary since sometimes your opponent will attempt to force you to discard it and bait reactions to make you waste it which is the last thing you want to do. Make every time you use the meter count!
Now that we've finished the rundown of the Break System and you better understand it, let's ease into her moveset!
-This section will cover all of Mai's moves in her kit, from strings to moves and even back turned strikes, and I'll explain everything from it's frames to it's stuns and safety as well as usage!! Please refer to the directional inputs section so you know what direction is what, and I'll be sure to to use special symbols for various move types. To begin, let's cover a few notable changes in her inputs from LR to 6:
-4P+K is no longer a command move in 6, in LR this was her jumping mid kick PB attack that not only avoided lows but had great reach and pushback making it basically safe. No longer an attack in 6.
-Her old LR 66KK attack was removed briefly in 6 and replaced with 66K which is her new close hit attack. It was later added in a recent patch as 46KK.
-Her old PPK is no longer possible; in LR, this was a string that had her perform her 9i punch strikes before ending with a high kick that launches on counter hit and stun and just lift stuns on normal hit. It no longer is in her kit, with her 8K being the only way to use the ender as a standalone, which means she no longer has a real in string launcher which is a slight nerf. However to compensate, it was replaced with her new 4H+K as the ender, which is a somewhat slower spinning mid kick that tracks, although it's unsafe and the stun is worse than before.
-A few of her moves have been removed and been reworked to be used for different attacks. For example, her old high punch which was a beautiful fan barrage is now basically her fatal rush during the 2nd and 3rd portion of the attack, and her old flinging butt attack is now her break hold attack.
-That sums up the main highlights that you should know about her kit! I'll touch base more when certain moves are mentioned, so now let us begin!
°P- Mai's neutral jab, a 9i strike that hits high and only has 13 recovery frames. -2 on normal hit, and is +1 to +2 depending on distance on counter hit, and a hi counter hit or using it in stun will cause a +36 stun, giving her varied follow up options. Is also -2 on block making it safe poke, and it causes a +11 on hit vs a backturned foe. Does not track and can be ducked, but it's a useful attack for punishing unsafe attacks and is her quickest command move, making it a go to when facing characters who are far slower than she is, or to rival a character who's also about the same speed of her up close.
°PP- Her follow up to p, which is another dual high punch 9i strike that has her use her closed fan which 15i recovery. Has slightly better reach and is -4 to -5 on normal hit, and is also -4 to -5 when blocked making it another safe option. The attack jails on block and normal hit, perfect for tick throw pressure or to scare your opponent into preparing for a string ender, which may leave you capable of attempting a mix up or free cancel. On counter hit, you'll be +0 to +1 on hit if the strike hits by itself, but you'll be -4 to -5 again if it jails when both strikes hit. Use in stun or counter hit will give you a +34 stun, and the attack will cause a +9 stun when the foe is backturned, allowing you to continue the stun if you use the string enders like PP2K, PPP, and PPK. Does not track and can be ducked.
*PPP- Follows up the previous strikes with a mid punch upwards 15i open fan lift jab with 24i recovery to it. Not very useful on normal hit or block as you're left -13 when free cancelled, but if done on a counter hit or in stun, you'll gain an easy +31 lift stun, leaving you with ample option to work with! Will also shut down crouches as you'll gain a great +36 making it dangerous when does are crouching you, and you can also use this to hit backturned foes, since if the strike hits by itself, it'll give you a +16 crouch keel stun. Does not track but has decent range.
*PPPP- Ends the string with the special cancel move previously covered before, 214P or Ryu-enbu. Virtually the same frames, just slightly better reach. Useful as a string refloat for an additional follow up and it tracks but is still unsafe. The 2nd attack from it evades lows too. Can be delayed to throw off opponents nicely.
*PPPK- Ends the the string with her 236K special Shinobi-Bachi, virtually the same frames and all, just slightly better reach. Her safe string ender although if the first initial part of the 2-in-1 doesn't hit, your foe will be able to duck the high elbow leaving you at an unsafe disadvantage... Also doesn't track. Can be used as a string ender to knock back the opponent after the right launches and refloats but you'll likely find better enders as you learn her better with her cancels.
*PPP2K- Mai ends the string with a somewhat swift 23i low sweep with 27i recovery. This is one of her few lows in her kit that can help gain advantage when trying to open up opponents who are playing very defensive, as you'll gain a brief but good +8 foot stagger stun that puts the momentum in your favor! If done in stun, on hi counter hit or against back facing foes, it'll knock down outright, and you'll be able to pursue a force tech situation if they don't get up quickly.(A force tech is performing an attack to a grounded foe to force them up, which if done twice in quick succession, will force them up with you at am advantage, however only true mids and lows can do this and how quick you do it and the positioning of the stage also factor into it since certain attacks may push the opponent out of reach unless a wall "cages" them.)
If done on counter hit, the stun will cause trip fall stun that leaves you +9 to +10 depending on distance! The sweep also tracks, Counter hits will also be applied to foes who are sidestepping as well too making it a useful way to pest those quick to step you. If done in stages like the Road Rage or Lost Paradise stages that have slippery floors due to the water streams or the snow on the ground, it'll cause a more dangerous slip stun on counter hit that leaves you +45 as the opponent helplessly tries regain the footing, making it a very great opportunity to go for a nasty stun set up or throw attempt if you feel the opponent will try to hold or break hold. The only downside to this low is that it's unsafe at -15 when blocked, and you're left squatting in the recovery meaning both standing and low throws can be used to punish you... Be very cautious when using this. It's range is also barely average but the attack does have tip range properties, meaning it can be used while about mid range but tip range hits will result in halfed damage.
*PPK- A new revised command as previously mentioned earlier, a 20i spinning mid kick with 32i recovery. It tracks, and a normal hit will cause a +11 stun that can be used to further poke at the foe or you can use P to continue it into an actual stun set up. If done on counter hit or in stun, you'll gain a +16 forced spin stun, but besides using strings as a follow up, it can't be used really for launchers as her launchers tend to be slower and require longer lift stuns or longer stuns in general to be used from. Unsafe at -10 to -11 on block depending on distance, but max range hits on block can avoid most neutral throws and throws that lack range if spaced correctly. If done against a foe facing away, you'll gain a +7 stun putting you on the offensive.
°PP2K- Another useful string ender to help open up guarding foes, a 23i low vaulting kick with 26i recovery. It's relatively sneaky since it can be delayed nicely, and it covers a good distance, as well as causing a +8 low foot stagger stun that's good for turning the momentum back to you! Counter hits will result in a low trip fall stun that gives you a +10 advantage, while a close hit on high counter will result in a fall, however if done at tip range it'll just cause a regular counter hit stumble. If done in a stage with slippery surfaces or water areas, the low will cause a nasty +45 trip stumble stun on counter hit too!
Tracks, but is -15 on block and because it has tip range properties, the damage will be halved when done at max range.
°PK- Ends her high jab with a 12i high kick with 24 recovery frames. Being quick and blunt, it's good for using when at an advantage as it will jail on counter hit guaranteeing the kick. Will cause a +10 stun on normal hit and counter hit as well if both the strikes hit. If only the kick hits on counter hit or if the string is done in stun, it'll cause a +25 stun, and if done on a foe facing away the string will cause the +25 stun while only causing a smaller +16 one if the kick is the only strike to hit.
While the attack has its uses, it's not reccomended in corners since the kick will wallsplat in stun or on counter hit if only the kick hits. The move also doesn't track and is -11 on block, but it's actually possible to evade certain throws that lack reach if the kick part is properly spaced. The move is also endowed with good delay and can be used to throw off guarding foes who are quick to try to throw you!
°6P- Her fastest mid attack, an 11i mid punch elbow with 24i recovery. Being a swift mid, this attack is very well suited for scoring counter hits up close, but it suffers from short range meaning you'll have to be close up to get it to connect. It's -13 on block and normal hit but a counter hit or using it in stun will score you a +20 stun to work with, useful for mix ups since the move has both a mid tracking punch with special cancel options and a low with mid follow ups to watch out for! If done on an opponent facing away, it'll cause a brief +16 stun.
Doesn't track but it does have a tracking mid follow up to watch out for, and it will cause an outright +20 stun on crouching foes as well as somewhat higher damage.
~Play with me??: As a heads up, all of Mai's string options as well as all of her string ender cancel options except for 214P+K which is too slow are guaranteed against a backfacing foe!! Hot right??
°°6PP> -Her 15i follow up twin mid elbow with 27i recovery. This tracks, has somewhat better reach and allows you you to cancel into her specials at any time! The move will only cause a +17 stun on counter hit and in stun because of its already good traits, but the string can be delayed nicely to throw off defending foes. Will cause a +13 stun on back facing foes and as previously mentioned, because of how the opponent is still forced to be backturned from the 6PP string, it'll guarantee all string enders and special cancels except for her slower 214P+K special cancel. Will cause a +14 stun to foes crouching on normal hit.
*6PK- Transitions into a low 20i vaulting kick with 27i recovery. The kick has great reach making it perfect for using at mid long range, although the tip range properties will hurt it's damage at max range. The crouch will also avoid highs easily but the move doesn't track and is -14 on block and hit, making it one of her worst lows to use since even its string enders are unsafe and don't track besides her Ryu-Enbu which is a slower ender to get before a sidestep attempt. Using it in stun or on counter hit will cause a minor +6 low stagger stun that can't be used much besides with her string enders but the advantage can be used to further poke and pester the foe with mix ups. If done on slippery surfaces or water areas, the low will cause a +16 low stagger stun on counter hit, which while not as major as her other lows, it can help get a quick stun set up going.
The low is also good for refloats that involve using its string enders, making it a good go to for lower launch juggle enders.
*6PKP- Follow up the previous kick with a vicious 17i downwards open fan mid punch strike with only 24i recovery. It's unsafe on normal hit and block at -13 compared to LR where it did stun, but it will cause a +20 stun on counter hit and in stuns, and will cause a +17 stun on foes foolish enough to crouch. If the strike is also done at the very limit of a critical stun threshold, it'll also cause a generic bound that can be used as a way to end with various attacks to push the opponent backwards or you can even end it with your go to string enders or close hit attack!
The strike is also a true mid, meaning it'll hit foes lying on the ground, and it'll also hit characters in special stances that avoid normal mids. Does not track but has good reach and can be delayed nicely.
*6PKPP- Ends the string with her Ryu-Enbu attack without having to actually special cancel. Identical frames and all, just a miniscule amount of better reach. Tracks, but is unsafe. 2nd part of the 2-in-1 avoids lows.
*6PKK- This ends the string with a very flexible looking angled 17i mid kick with 32i recovery. Will always cause a +23 lift stun on normal hit and counter, as well as in stun. Because she's considered squatting, this can actually evade highs when delaying it unlike her 6PKP follow up ender, and it's perfect as both a juggle ender or wall splat as it will interact with walls on normal hit as well. Does not track however and is -11 on block, and due to its squatting properties, both high and low throws will be able to punish it... However it can avoid throws if properly spaced at max range.
°4P>- A swift 15i high open fan jab with 24i recovery. One of her better attacks, this will always cause a lengthy +35 blind stun, and you can also cancel into her specials from this move! The move is unsafe at -13 on block but you can use her safe ender to bandage this, and although it lacks tracking, it's quick Ryu-Enbu cancel can help mask this as well besides being unsafe. Can be ducked and doesn't track. Useful as good refloat. Will cause a +16 stun when done against a backturned foe.
~This is gonna be hot!: When 4P is done on normal hit, all special cancel options will be guaranteed except for 214P+K! The same goes for if they're facing away!
*8P- Standalone attack from the string ender 6PKP, except faster at 15i and slightly stronger damage. Far less reach and is still unsafe but frames and all are virtually the same. Does not track. Also a useful standalone true mid. Can be used as a force tech, with it providing +20 advantage when used as the 2nd strike to force the foe up.
*8PP- Same as the ender from 6PKPP, ends with Ryu-Enbu. Tracks and second 2-in-1 avoids lows due to the jump but is unsafe.
°2P- Mai's quickest low poke, a 13i low punch fan strike with 20i recovery. The move -1 up close, which in that instant makes Mai a 10i/12i/14i in punch neutral strikes and a 13i/14i/15i in kick neutral which can act as "pressure" against slower foes but makes it a bit of a risky position against characters about your speed, although the attack is +0 at max range. When used on counter hit or in stun, you'll gain +5 stun advantage, and using it on slippery surfaces on counter hit or as the final attack when you're about to exceed the critical stun threshold, you'll get a whopping +9! The attack is -3 to -4 on block but doesn't track and has poor reach.
Can also be used as a force tech although the pitiful reach requires you to be near a wall to "cage" the foe due to the pushback. Two 2ps in a row or using it as the second strike after a first tech strike will force them up giving you +24 advantage!
°3P- The standalone version of the ender from PPP, just faster at 13i and with one less recovery frame. Virtually the same, just slighlty better lift stun on counter hit with +32 instead of +31. Will cause a +17 stun against back facing foes and will cause an outright +32 normal hit lift stun against foes crouching. Does not track and is still unsafe unless you end with the safe ender. All string options are guaranteed against back facing foes.
°3PP- Ends the string with her Ryu-Enbu. Virtually the same frames and all. Useful as both a tracking option and as a swift refloat in juggles. Nice delay.
*3PK- Her safe Shinobi-Bachi ender. Useful as a string juggle ender and covers a good distance. No tracking. Virtually the same frames as the standalone 236K attack. Nice delay and great reach.
°3P2K- Virtually the same as her PPP2K string low ender, just with an additional recovery frame reducing the advantage to one frame less on normal hit and on counter hit. Will cause a +44 slip stun on counter hit in stages with slippery surfaces or water areas. Tracks but is still unsafe, and still vulnerable to standing and crouching throw punishes due to the squatting status.
°1P- One of Mai's best low pokes on offer: a 16i low fan poke with 26i recovery. Using her fan as an added extension of her arm, this makes the low have great mid long range reach, as well as crouching to avoid highs! On normal hit, it's -3 at tip range and -4 up close, and will cause a +5 stun on counter hits and in stun, making it a useful counter poke as well! It also will track as well, making it a good way to check sidesteps, and as an added bonus it'll cause a +3 low stun against back facing foes and a +33 low trip one on hi counter!
While useful, it's unsafe at -10 when blocked and it has tip range properties meaning it'll deal less damage at max range. When done on slippery surfaces or water areas, it'll cause a +11 trip stun, and it can also be used to tech up grounded foes, providing +19 if it's the attack that was used as the 2nd one to tech them up.
*66P/(While Running)P- Her forward dashing or while running attack, a dashing dual elbow 18i mid punch attack with 26i recovery. Covering a a decent mid far reach, it's a useful move for moving in and will cause a +2 to +4 stun on normal hit depending on the distance. While it won't be useful for a combo, the advantage can help you lead the offense and you can continue into a launching follow up with its ender. A counter hit will cause a +17 to +19 stun depending on the distance which is viable for mix ups or stun set ups since the opponent still has to watch out for the mid kick launcher. Will soft wall splat on counter hit, giving you a meaty +34 stagger stun to work with and also guaranteeing the launcher!(Which will also wallsplat).
When performed on a foe facing away, it'll cause a limbo back fall stun that forces the opponent to fall and will not be able to be held out of giving you +61 advantage which is enough to connect attacks that are 25i or faster. Unsafe however at -7 to -9 depending on the distance.
*66PK/(While Running)PK- Her ender to her elbow attack which is a 23i backflipping jumping mid kick with a lengthy 35i recovery. This is her only ender from the string, making it what you call a static string: a string that has only one possible ender which may seem bad, but actually the mix up is making your foe think that you'll go for it, which makes it a good mind game when you score a 66P on counter hit! The move launches on normal hit but using it stun or via a counter hit will provide a much higher launch height. Using the attack on crouching foes and back facing will provide higher launches as well, and the entire string is guaranteed on foes facing away too! The move lacks tracking though, and is unsafe at -13 when blocked, but using it at max range can often avoid most neutral throws and throws that lack reach. Also useful from certain launches and attack knockbacks as a refloat, especially when near walls since the kick doesn't wallsplat, but space carefully since the 66P will cause a splat from a launch or knockback.
°K- Her quickest kick which is a 12i high kick with 24i recovery. It has decent reach, with it being able to avoid most throws at max range. Causes a +8 stun on normal hit which allows you to either use the advantage to pester the foe or you can combo into her kick follow up. A counter will cause a +25 stun like her PK variant, and using it on a back facing foe will cause a +16 stun that will guarantee ALL of her additional kick follow ups from this string, including even her special cancels from the very last kick besides 214P in open space(The first 2-in-1 will whiff in open space which will give the opponent time to execute a break hold) and 214P+K which is too slow to connect before they can hold again. Unsafe at -12 when blocked and does not track, as well as being vulnerable to being ducked or crushed by attacks that evade highs. Will also wallsplat on counter hit and in stuns.
*KK- Adds in a 14i high kick that also has 24 recovery frames. Slightly better stun on normal hit since it will always cause a +25 stun making it very useful for mix ups since the entire KKK kick string is a static string. Will also cause a +16 stun on back facing foes which will guarantee the final kick and all previously mentioned special cancels like the initial kick before it. -12 when blocked and no tracking and can be ducked. Can be delayed nicely.
*KKK>- Her final kick which is a 17i vaulting high kick with 27i recovery. Will always cause a +22 stun on normal and counter hits, and you're able to quickly cancel into a special move too, although I generally regard this as her worst move to cancel from outside of stuns since the kick causes a knockback that will basically prevent cancels from connecting, and the kick will always wallsplat. The cancels listed previously will all be guaranteed from its +14 back facing stun if the foe is facing away besides 214P in open spaces(First hit whiffs when not near walls) and 214P+K. Unsafe at -15 when blocked and doesn't track but it's pushback when spaced correctly can often avoid neutral throws and throws that lack reach. Doesn't track, but this can be bandaged with her 214P ender and you can use 236K as a way to end the string safely if you need either a tracking ender or one that will discourage throw attempts.
~Play with me?: KKK is a viable way to end juggles when you want to pursue a force tech, since you can use attacks as slow as 1K which is 20i and as fast as 2P which is 13i to go for a tech attempt if your foe doesn't tech up which will leave you still at an advantage! The KKK as as ender can be used after most juggles against light and mids, but heavies can't be juggled with 3P+K or a max threshold 3P launch.
°6K- One of Mai's quicker pokes, which is 13i mid kick with 25i recovery. Having good reach, it'll always cause a +4 stun on hit turning the momentum in your favor! If performed on foes back turned, it'll cause a +15 stun that can be used with quicker attacks to initiate a stun set up. I regard this move as a general safe mid poke since it's safe at -3 and there isn't really any drawbacks to using it besides watching for potential expert mid kick holds that may quickly deplete your own health. Doesn't track however.
°4K- Her 16i high kick that has her performing an axle kick with 25i recovery. This is one of her quickest ways to score a stun on normal hit, as you'll be given a +24 stun, and a +30 lift stun if performed in stuns or via counter hit. Can also function as a sort of low launcher when in a pinch but counter hits and stun usage will cause a wallsplat. Relatively semi safe at -7 when blocked and 7i throws aren't even quick enough to punish it, meaning foes will have to use a neutral grab to even attempt to throw you. Also tracks as well. Will also launch the foe when backturned allowing an easy yet odd way to score some quick damage!
*8K- Mai's 15i high kick launcher with 25i recovery. Being relatively a mid close range move and being -13 when blocked, it's not a wise move to use outside of stun as it can be be crushed by lows and can be beat by quicker strikes. If it does somehow hit on normal hit, you'll gain a +30 lift stun, but using it on counter hit or in stun will cause a a good launch for juggles. Doesn't track.
*7K- a new tool Mai gained in DOA6: A 15i backflipping mid dual kick jump with a lengthy 38i recovery. It can avoid lows when timed right due to the jump, and it'll launch on normal hit although the low launch and recovery make it near useless, but a higher launch will result from counter hits or in stun. Because of how quick it is, it's useful as a quick panic move when dealing with foes who are free cancelling or getting obnoxious with the low pokes. Very unsafe however at -30 when blocked, but high throws and strikes will not be able to punish it since you're considered crouching while recovering, your foe will have to either low throw you, low hit you, or they can perform a mid that will often cause more dangerous stuns on foes crouching or considered crouching... Also be wary since the move does not track, but the move can be used from certain launchers as a refloat, but only up close due to its poor reach.
*2K- Mai performs a quick 14i crouching low kick with 25i recovery. It lacks reach and is unsafe on normal hit at -9 to -11 and -15 when blocked, and it has tip range properties meaning it'll do even less damage from afar. If it hits on counter hit, you'll gain +10 to +11 with a low stagger stun. Although situational, if you perform this move on a backturned foe, it'll cause a nasty +34 trip stun! Does not track and has poor reach making it more suited for close range usage. Can also be used as a force tech that'll force the foe up with you gaining +19 advantage if the kick was the 2nd strike to force them up. Will also cause a +12 to +13 trip stun on counter hit in stages with slippery surfaces or with water areas.
~Play with me??: If Mai performs 2K on normal hit, her 2nd low follow up with be guaranteed since it jails on hit!
°2KP- Her follow up which ends the string with her 2P. Virtually the same frames and such besides slightly better reach, and the string will jail on normal hit. Useful as a low poke to pester standing guard foes. Although the 2K will connect when attempting a force tech, the 2P will whiff so avoid using it unless trying to get an out of reach foe so only the 2P portion hits. Has good delay although this will negate its jailing abilities.
*2KP+K- Another unique attack of Mai, she ends the string with a 17i crouching mid angled fan mid punch with 29i recovery. Being considered crouching, this is a high crush and will allow you to evade high strikes with ease, and on top of that it tracks! On normal hit, you'll be +0 from the stun which is perfect since the pushback resets the neutral as well giving you space to either rush in or establish an iron keep out or spacing game. Counter hits will cause a +15 stun allowing you to create a stun combo set up, and the ender soft wallsplats giving you a +34 stun to work with. The string is also guaranteed on back facing foes too netting you a +11 stun. Unsafe however at -9 to -10 when block depending on distance.
°3K- Mai performs a ranged 14i vaulting mid kick with 24i recovery. Having great reach and being fairly swift at mid range, this is a useful poke as it leaves you -3 on hit, and will cause a +20 stun on counter hit and in stun. Using it on foes facing away will score you a +16 stun, and you can use this in stun set ups in open space to cause a knockback fall at the end of a critical stun threshold so you can go for a no timing force tech set up with attacks like 1P! Soft wallsplats on counter hits as well giving you a meaty +39 stun to work with.
While it does not track, it's semi safe at -7 limiting your foe to neutral grabs to punish you, although you can easily avoid these throws when the move is done from max range.
*1K- Standalone version of the low from 6PK, same frames and all and properties besides slighlty better reach. Unsafe and doesn't track.
*1KP- Standalone version of the ender from 6PKP, same general frames and properties. No tracking and unsafe but still has a tracking ender. True mid. Good delay.
*1KPP- Ends the string with the same Ryu-Enbu, tracks and 2nd 2-in-1 avoids lows but is unsafe.
*1KK- Standalone version of the 6PKK string, same frames and all. Unsafe and can be both standing and low throw punished due to the squatting recovery. Doesn't track.
°°66K/(While Running)K- Mai's new attack that replaces her old command from LR, which is a leaping 20i jump dual mid kick with 38i recovery. It has great reach and will always cause a hard knockback on hit and it has close hit properties, meaning it'll deal higher damage up close! It's also a guard break as well with the advantage vastly changing depending on distance: Max range hit on block will leave you +1 to +2 when spaced right while a closer hit will leave you +0 to -4(-4 being if you're right in their face), making this a viable spacing tool or keep out tool when moving in or trying to keep foes out, as well as it avoiding lows. Wallsplats but can't really be used since the recovery is so steep. Lacks tracking as well so be wary since the steep recovery can cost you a good deal of health... This is her go to bound set up ender so always go for a close hit by hitting as close as possible after the bound!
Will also cause a +36 to +44 rebound rope wall stun in stages that have rope wall properties like the Muscle or Sweat!
°46K- A returning move that many thought was gone for good in LR, it was later patched back in! This is a 20i briefly swaying back jump mid kick with 24i recovery. Covering good reach, it causes a +19 to +21 stun on normal hit depending on the distance, and will cause a nasty crumple stun that will make the opponent fall UNLESS they hold, making it a risky situation for them to be in since they risk either falling or trying to correctly hold and wind up getting hit again, launched or thrown for high counter damage! The stun is also lengthy enough to allow any attack that is 30i or faster to connect too! The move also can crush numerous attacks including highs and some shorter ranged mid attacks due to the brief sway back during the start up, and the jump evades lows too. The move will also cause a +15 to +16 stun when executed on foes facing away.
The attack is unsafe up close at -8 when blocked, but it does have a high kick follow up that can be delayed nicely to throw off throws quick to throw. The move is also -6 at max range!
°46KK>- Ends the string with the same kick ender from KKK, except slower at 23i but besides that the attack properties are pretty much the same besides this having better reach and only giving a +5 stun on normal hit. Like KKK, you're able to cancel into a special making it dangerous, and you can use the string for the same guarantees as KKK too! No tracking and can be ducked. Wallsplats on normal hit.
°P+K- Her returning move from LR, her 20i dual open mid punch fan attack with 25i recovery. Has good reach making it useful at mid range, and it causes a +19 stagger stun on normal hit allowing stun set ups. The move will cause a crumple fall stun on counter hit and in stun as well, as the stun is lengthy enough to connect attacks as slow as 30i. Will soft wallsplat on normal hit gaining you a +38 stun, and the move causes a +15 stun against foes facing away, and using it in juggles or after specific knockbacks like a bound can create massive distance since it provides a very big pushback that sends the foe rolling to the far side of the screen. Doesn't track and is -9 when blocked, but max range hits can avoid some neutral throws if spaced properly.
°2P+K- Standalone version of the ender from 2PP+K, virtually all of the same frames and all. Avoids highs and tracks, but poor reach and unsafe.
*3P+K·P- An 18i upwards swiping fan mid punch with 28 recovery frames. This is one of her launchers, although one of her less useful ones since its slow and rather unsafe at -13 when blocked, but it provides a +27 to +28 lift stun depending on distance. Will outright launch in stun or on counter hits allowing you to either use a juggle combo or you can go for her bound set up from her 9P forward jump stance by pressing P to cancel into the jump, and then pressing KK to perform the bound. However you can only enter the P cancel jump stance on normal hit or counter hit, otherwise you won't be able to. You may also use the P cancel as a feint to bait a hold or to keep advantage since depending on distance you'll be left either +3 to -3 depending on how quick you entered the jump stance. Doesn't track but it will launch outright against foes facing away.
*H+K- Her 15i jumping mid knee launcher with 24i recovery. It's unsafe at -14 when blocked and isn't really useful on normal hit since the launch can't be used to really do anything besides going for a no timing force tech set up. If done on counter hit however, it'll provide a decent launch that can be used for a quick launch. Wallsplats on normal hit and will cause a counter hit type launch against back turned foes and can avoid lows. Doesn't track and has poor reach making it more a close range move.
°6H+K- One of Mai's better ranged tools, this is a jumping 25i mid leap kick with 25i recovery. Despite its slow speed, it's perfect for using at about mid far range and will cause a +19 stun on normal hit. Using it in stun or on counter hit will result in a special rollback bound that allows you to continue executing a juggle type combo or you can even perform your close hit attack as it will count as a close hit up close! Wallsplats on normal hit and will simply knock back against back facing foes. Semi safe at only -7 up close and being -6 at max range. Doesn't track however but can evade lows.
*4H+K- The standalone version of the mid kick ender from PPK, tracks but is slow at 20i and still unsafe.
°8H+K- Her fatal sit down attack or fatal stun attack that doesn't require a fatal rush: a Jumping 25i downwards mid kick with 27i recovery. This will instantly place the foe in a stun that can't be escaped from with normal holds and will require a break hold to escape if your opponent is willing to pay that cost to escape the guaranteed damage, otherwise they'll fall if nothing else is done. Evades lows and covers a good mid reach, and will wallsplat on normal hit, so avoid using this near walls as it can foul up a launch set up. Using this attack before executing a launch will also let you get the best launch height from all of her launchers besides highs which don't connect from this stun type. Using this at stun's max threshold or twice will cause a generic bound that can be used for follow ups but not really anything extravagant, but her close hit move will count as a close hit up close from this bound too. Unsafe however at -13 and doesn't track but can evade lows.
°2H+K- Standalone version of the vaulting crouch low from PP2K, same frames and all and is still 23i. Tracks and has good reach but is unsafe still and has tip range properties that can affect its damage at max range. Can be used as a force tech and will give you a +17 advantage if it was the 2nd move used to force them up.
*2P(While foe is on the ground)- Her 17i light ground attack that has her viciously stab jab her closed fan into her foe's prone body as if using a knife. Quick and can easily beat out wake up kick attempts but it's 31i which means it can be risky to whiff if the foe techs up quickly backwards. Lacks reach but is swift.
*8P+K(While foe is on the ground)- Her heavy ground attack, that has her leap through the air to perform a vicious 40i body crush landing on their back or torso. Covers a good distance but is very risky when whiffed having a long recovery and a brief squatting position that can be both standing and low throw punished. Lacks speed but is stronger and better ranged.
°4P- Her 11i mid punch strike while facing away. Links into the same strings as her regular 6P facing forward and causes a somewhat higher +31 stun on counter hit but is -13 on hit and block. Doesn't track
°2P- Same as her 2P facing forward, but -5 when blocked. Same general stuns and advantage on block.
°K>- Executes the same kick ender as 46KK, just faster at 15i. Same general advantage but slightly less reach. Unsafe at -15 when blocked but you can special cancel into her special moves this as well! Doesn't track.
*4K- Executes the H+K command while back turned. Slightly higher damage.
°2K- Executes the same sweep as 2H+K facing forward, just faster at 18i and one less recovery frame.
-And that covers all of her moves!! I will update this section with a few minor things like rope wall stuns and such down the line! Now we will get into her throws!!
-This section will break down all of Mai's throws, including all damage(damage from floors and walls included) and how fast they are and what they do. While Mai's throw game isn't too barebones, it's not much compared to characters like Kasumi who have multiple throw types like a grapple, punish throws and more. Mai's basic throws are generally suited for simplicit purposes such as changing sides, only her neutral throw can interact with walls at the risk of a throw break.
Mai does have a punish throw however that's useful when foes are recklessly holding and she also does have a launcher throw in 6 now! She also has an air throw that can be used from certain heights for unscaled easy damage! Damage in parentheses and with a ° will represent general wall damage if done near a wall. So let's get into it:
~Mai's quickest throw being 5i and having 23i recovery. She goes on her foe's shoulders with a handstand before grabbing their neck to toss them to the floor face first in a dramatic fashion. Decent distance left between the both of you. Interacts with both walls and floors for extra damage or to cause a floor break transition in stages like the Forbidden Fortune. Quick but lacks reach and is a neutral throw, so a well timed throw break can be performed with T, leaving you -5. This is unfortunately the only throw in her arsenal that can interact with walls.
~Play with me??: Remember, all throws tracks meaning they'll grab sidestepping foes and will deal counter hit damage!!!
/~Mai's 7i throw with 24i recovery that can be done both with the forward motion or back motion when throwing. She performs a flip on her foe's head as she manages to get their head in between her feet so she can fling them face down if done with 6T or back down if she performs it with 4T, leaving Mai briefly in a lying position. This throw will deal the exact same damage no matter if you want to toss the foe forward or behind you to switch sides, although the forward throw has better reach. Interacts with floors. Both leave a decent amount of space between you and the foe.
~Mai's 10i launcher throw with 25i recovery. She launches her foe into the air with a beautiful fan barrage giving you the opportunity to pursue a juggle before they fall taking damage. Useful since its quick and very well suited near walls and in open space for good damage potential. The fall will also interact with floors if no juggle is performed.
~Mai's 12i punish throw with 26i recovery. She handstands on her foe's shoulders before squatting atop them to summon a massive fiery explosion before jumping off. Has good reach and will interact with floors, as well as leaving good distance between you and the foe! Her best throw when wanting to punish missed holds in stun.
-Just a heads up that all of Mai's Throws can be performed to foes who are backturned which will result in 10 more damage on normal hit, 12-13 more on counter hit, and about 15 more on hi counter. The only throw that can't be used against a backturned foe is her launcher 66T which will become her regular 6T.
~Her only low throw which is a 5i one with 22i recovery. She handstands her crouching foe's shoulders to force them down before doing a jumping dual knee drop to slam them in the dirt and she flips off. Leaves you a good distance from your foe and will also interact with floors. Decent reach.
-This throw can also be done to back turned foes, dealing 10 more damage on normal hit, 13 more on counter, and 15 more on hi counter!
(To launched foe in the air)~Her jumping 8i air throw she can perform if the foe is launched high enough in the air with a lengthy 50i recovery if whiffed. If it connects, she'll grab the foe in mid air and do a dual knee drop to them in the vein as her crouching throw, leaving a good distance from your foe. Interacts with floors and is great for getting easy unscaled damage, but longer combos will cause the air throw damage to be scaled down, with the first scale being about 28 and then the second one being about 25.The scale after that will be variable depending on how long the combo is including break blow cancels, and the lowest I've gotten is about 21 to 18, so be wary about the lessened damage when used in lengthier combos.
-Hot right?? That covers all of Mai's Throws, remember to use them wisely as throws will lose to strikes putting you in a dangerous hi counter situation! Now let's ease into her holds!
-This section will break down all of Mai's holds in her kit, from her normal to jumping attack holds. Mai doesn't have any holds besides her normal ones as she lacks both expert holds, parry type holds, and offensive holds meaning that she'll have to more manually be able to get out of situations by either guessing right, reading the opponent and holding correctly, or by crushing their moves with the right attacks. All of her holds have 18 active frames and 12i recovery. Remember to avoid recklessly holding, as a wrong hold will put you at risk of getting hit and being hi counter thrown which will cost a good chunk of your health, so only throw one out if you are absolutely confident you know what your foe is gonna throw out. Now, let's begin:
~Remember, the better the timing of the hold, the more damage it'll cause, so if you know what is coming, sometimes it's best to wait for the attack to JUST about hit you before holding, since that'll result in more damage. A hold that's just thrown out will do normal damage, a better timed hold will do counter damage, and a hold that's executed JUST as the opponent will hit will do optimal max damage. Holds done in stun will also do less damage than a raw hold.
(Vs. High Punch)- Mai intercepts her foe's high punch and returns the favor with a mean open fan slugger punch that knocks them back a good distance. Interacts with walls and floors.
(Vs. High Kick)- Mai stops her foe's high kick with one arm before performing a low open fan sweep with her arms to trip the foe, making them fall hard on the floor on their face. Leaves you a decent distance away from the foe to retreat and interacts with floors.
(Vs. Mid punch)- Mai intercepts her foe by pushing their mid punch attack out of the way before roasting them with two Ryu-Enbus in a row, flooring them. Leaves a good distance between the both of you, but the opponent can tech up quickly after the hold. Interacts with floors.
(Vs. Jumping Mid Punch)- Mai quickly jumps in the air to quickly shut down her foe's jumping mid punch, using her thighs to secure their head in between them as she pile drives them into the floor, flipping away with seductive hubris. Leaves a decent space between you both, and interacts with floors as well.
(Vs. Mid Kick)- Mai quickly intercepts her foe's mid kick before delivering a harsh high kick similar to her KKK ender that knocks them back a good distance. Interacts with both floors and walls but can be teched up from to recover.
(Vs. Jumping Mid Kick)- Mai jumps in their air to stop her foe's mid kick in their track s as she handstands on them before sending them into the ground on their back with a hard hitting dual knee strike. Interacts with walls and leaves you a good distance from your foe.
(Vs. Low Punch)- Mai quickly grabs her foe's arm before slamming them to the ground with her 8P attack. Leaves you relatively close to the opponent but does interact with floors.
(Vs. Low Kick)- Mai humiliates her foe for by stopping their low kick in their tracks before flipping atop them to forcibly sit her weight on their upper chest area. Interacts with floors but leaves you fairly close to the foe.
-That should do for her current holds, now let's get you into some of her combos!!
- This section will teach you some simple combos that work on everyone, as tested on Rachel who is possibly the heaviest character in DOA6! These combos should give you something to work with but feel free to experiment and see if you can find better ways to get that damage! Let's begin:
-KK>3P+K·P~KK(BOUND)>(Dash for close hit)66K(Close hit) ~70 Damage~
-4P~214P+K>6PKK ~48 Damage~
-66T>(Right after launch)>4P>T(Air throw) ~55 Damage~
-8H+K(Fatal Stun)>3P+K·P~KK(Bound)>(Dash for close hit)66K(Close hit) ~68 Damage~
-66PK>6PP~236K ~54 Damage~
-4K>3P>46K>6H+K(Backwards slide bound)>9PKP+K ~94 Damage~
-4H+K>P>P+K(Crumple stun)>H+K>6PP~214P>6PKK ~79 Damage~
-(Counter hit near walls)4H+K>PPK>P>3K(Soft Wall splat)>(free step behind foe to go behind them during stun)2K>6H+K9PK~P+K ~130 Damage~
-(Vs foe sidestepping)S(Causes fatal backturned stun)>66P(Limbo stun)>2K>8H+K(Fatal stun)>3P+K·P~KK(bound)>(Dash closer for close hit)66K(Close hit) ~94 Damage~
-(Counter hit in slippery surface areas)2H+K>6T(Throw bait, ok to whiff)>P>46K(Crumple stun)>6H+K(Roll back bound)>9PK~P+K ~113 Damage~
-(Counter hit)8K>6PP~214P(refloat)>6PKK ~63 Damage~
-(Counter hit)H+K>6PP~214P>6PKP ~64 Damage~
-(Counter hit)46K(Crumple)>P+K(Crumple)>SS(Fatal stun)>6H+K(Rollback bound)>9PKK(Bound)>(Dash closer for close hit)66K(Close hit) ~103 Damage~
°There we go! This should give you something to work with, I'll add on more in time but let this be a foundation for expanding on Mai's awesome hot combo damage! Now let's move on to a sample of her offensive tools!
-This section will shed light on moves Mai can use to pack on the pressure when you have the offensive lead! Just to note tho, Mai is not a pure offensive rushdown character, she almost always must have a counter hit or an opening to get her offense started. Here's the tools you'll need to do so:
°2P/2KP- One of her better tools when trying to open up foes, if done at max range you'll be +0 and the -1 up close isn't too bad against characters slightly slower than her, and it's not at all a real hindrance when facing slow characters as Mai will only have one frame added to her moves in that instance. A useful way to open up turtles but do watch out for blocks and sidestepping opponents.
-9PP- Another way to end at a rather safe note on block, as you're left -1 up close and +0 at max range, and it tracks! Can be ducked but the fact that her 9PK is a mid makes this 50/50 situation a risk if they guess wrong. Useful from a distance when wanting to move in.
°236P- Her high projectile, which is surprisingly a nuisance! From afar, the foe is gonna have to duck, sidestep, or crouch to avoid it and it can prove a real pest when the clock is ticking. Can be ducked but it has pushback on block and hit, although the foe can hold it up close. Useful for creating a sort of iron wall to prevent the foe from being able to easily rush you in tense matches as well as being a quick way to passively attack when they're at long range. Depending on how your foe reacts to the move defensively, you can edge them close walls or danger zones if they freestep, and you can also force them to hold their position if they crouch, but be wary of crouch walks.
°66K/(Max range to long range only)- A useful pressure tool when at max to long range since you can be +0 to +2 when spaced correctly from the GB, as well as avoiding lows and having good reach as well. Even if done up close, you'll be -4 on block at the first and the max range pressure may be enough to make a wary player nervous to strike you, although for the most part you're still at a safe disadvantage up close. Can be stepped however so don't be too reliant on this. Using this move as a pressure tool for advantage is very dependent on your knowledge of spacing and zoning so practice is advised.
°6K- Her safe 13i poke, good range, safe and is always +4 on hit, and is relatively safe to chuck out since it's not very unsafe although faster grapplers can still grab you when blocked. Doesn't track but it's use as a safe poke making it very suitable for throwing out when in situations where a speedy mid is needed at mid range.
°(Strings with the 2K sweep low like 3P2K & PPP2K)- Useful as a way to open up foes since you're left +8 on normal hit and +9 to +10 on counters. Also tracks but it lacks general range compared to her other moves and it's unsafe and can be both standing throw and low throw punished making it a huge risk against characters with stronger throws and such since you're left squatting. A useful general low but definitely can't be abused.
°2H+K/PP2K- Another useful low, this 23i low is useful for popping open guarding foes and gives you a +8 stun to pursue pressure. Also has good reach and it tracks. While it isn't considered squatting meaning that only lows can punish it, it's still -15 making it still a risky move to use, however it's still generally a less risky tool compared to her other low variants that lack the reach this has and that can be punished by both standing and crouching throws.
°PP- While not an outright pressure tool since you're left at safe disadvantage on hit or counter hit, this puts the opponent in a situation where they'll have to react after the jabs since PP will jail on normal and counter hits. You can go for a quick tick throw if you think the opponent will continue to guard, or you can use the string moves to punish specific reactions; PPP will blow up crouches, PPK will blow up crouches and sidestep attempts, and PP2K will easily help you gain advantage if the foe doesn't crouch to guard it, and it tracks making it another useful option. PP however can be ducked and high crushed and free cancelling it can be a risk if the foe knows you're aren't trying to delay the string.
-This section will shed some light on Mai's tools for sidestepping, since in 6 stepping is far easier and can quickly blow you up if you don't take the precautions to shut down steppers. Tracking moves are not only useful for this, but it'll cause a counter hit effect as well which greatly augments it's abilities! This section will cover Mai's tracking tools and her in string ones that are useful. But be aware, there are characters in the game who have alternative ways to sidestep without using the universal generic sidestep system and that may also have special benefits. They'll be listed below:
~ Has her Jakeiho that can be used from moves as well as a standalone stance. Avoids linear attacks AND highs as well, making high tracking near useless against her. Her 7P can also avoid tracking high strikes as well too. Doesn't affect or hinder Mai much since she doesn't really rely much on tracking highs, she has plenty of mid strikes that track for that with lethal counter hit properties.
~Has a special sidestep that avoids linear attacks, but doesn't do anything else special besides that besides having a mid follow up that can cause a stun that can be comboed on CH, but it's unsafe at -9 via block.
~ Her minuet stance avoids linear attacks and also evades tracking lows and has an unsafe but powerful close hit fling attack. Doesn't hurt Mai much although this can be a pest with her tracking lows.
~ Has a special sidestep from her Bokuho stance that already avoids highs, and it has an unsafe -9 follow up that gives a +19 normal hit stun. She can also evade mids and tracking mids as well with her Bokuho duck, but this doesn't truly effects Mai thankfully as she has her 15i 8P as a true mid and it has a tracking follow up as well albeit unsafe.
~ Has a special spinning sidestep that can evade linear attacks but that's about it. Has a 43i launching mid punch and a crouching 38i low that leaves her +13 on hit, putting you in a situation where you'll have to guess to stop her.
~ Has a rolling sidestep stance that avoids linear attacks and tracking highs, and he can also confirm into a 35i offensive hold. Can be crouched however and low punished.
~ Has her 44P which avoids linear attacks on start up, but it can be shut down easily with quick combo attacks since its built to only avoid one attack at a time. Safe and causes a blind stun on successful hit but it's a high and can be crushed with Mai''s tracking lows and her 2P+K or 2KP+K which avoids highs and is a tracking mid and ender for the latter.
-Lets now begin on her hot tracking tools!
°S- Her easiest and probably most lethal tracking move, an 18i high. Puts the opponent in a fatal stun on normal hit that will guarantee her next attack or launcher if the foe doesn't have the meter to escape the stun. When done against a foe caught stepping, it'll cause a forced backturned spin stun that leaves the foe wide open for a guaranteed set up, with 66P causing a back limbo fall stun in this situation. Is unsafe however and be easily high crushed.
°1P- Her 16i tracking low poke, quick, has reach and is ok to use outside of stun as it leaves you at safe disadvantage on normal hit. It'll cause a +5 counter stun against sidesteppers, and it avoids highs making it a good crush. Unsafe however when blocked.
°4K- Her 16i spinning high kick that stuns on hit, and causes a +30 lift stun against foes caught stepping. -7 as well being semi safe and only vulnerable to neutral throws and quicker based throws. Can be crouched and it's range is more suited for close quarters.
°6PP- Her in string 15i mid elbow, swift and will cause a +17 stun vs steppers. Unsafe at -17 on normal hit and block but has a safe ender and a tracking mid ender to watch out for.
°4H+K- Her standalone mid kick that tracks, is slower at 20i and unsafe but can avoid neutral grabs at max range, and causes a +16 stun against sidesteppers. It's in string PPK variant is also useful as a way to catch steppers who like to step to evade linear strings.
°214P- Her quickest tracking option being only 12i, it'll cause a +16 stun against reckless sidesteps, and it's also present at the end of strings like PPPP, 8PP and 3PP making it suicide to step against. Has decent reach and can also evade lows but is unsafe and can easily be thrown so don't get too content making this a go to.
°214P+K- Her 28i launcher, unsafe and not truly useful by itself but it can catch foes from specific strings like 4P and 46KK as its special cancel to catch foes trying to evade with a sidestep. It launches a decent height allowing a combo follow up but be wary of holds as it'll cause an evade hold, and it's unsafe when whiffed and blocked. Has 3 auto hits in total that the opponent must be wary of.
°2H+K- Her 23i tracking low that gives you +10 trip stuns from tip and close range. Unsafe but is useful by itself and in string from PP2K. Good general reach and is useful for gaining momentum to score a chance to land the next blow.
°2K low from strings like 3P2K & PPP2K- Another useful low that can nail stepping foes. Also leaves you +10 but this is a riskier low since you can be punished with both standing and low throws due to the squatting recovery. More useful against foes who like to step mid string.
°2P+K- 17i mid tracking move that ducks highs, unsafe but is a decent attack to use since it'll leave you +0 on normal hit and you gain a +15 against sidesteps, which is great for special sidesteps with a high attack tacked on!
°9PP- A good go to from a distance. This is a decent ranged 30i high fan swipe that causes a constant +25 on normal hit. It's reach makes it crucial from a distance but beware it's weakness of being easy to duck and high crush. Relatively a safe option as well since depending on distance, you'll be +0 to -1 if the foe opts to block.
°46K- One of the better punishes and crushes in the game, this attack briefly sways back to avoid high attacks and some poor ranged mids to perform a 20i jump kick. It has good reach and a high follow up that allows you to cancel into her specials, as well as causing a crumple on counter hit! Also avoids lows as well but this lacks tracking and safety. Still one of her strongest crushes to use offensively and defensively.
°2P/2KP- A useful low both by itself and in string being 13i and being safe. Leaves you +0 to -1 on normal hit depending on distance and it avoids highs. 2KP also jails as well, making it a useful nuisance against foes who are pretty fond of using highs. Lacks tracking and general damage however.
°2P+K/2KP+K- A useful high crush since this mid avoids highs! 17i and unsafe but is very useful when being pressured with highs, leaving you +0 on normal hit and causing a decent stun when used to successfully counter foes. When done as the string ender from 2K, this can also prove deceptive as you can delay it and the low can catch foes who are stand guarding. Also tracks as well.
°1P- Another high crush: a 16i low that tracks and has good reach, leaving you at a safe disadvantage on normal hit and causes a small low stagger stun on counter hits, making it useful for turning the momentum back in your favor from mid to close range. Unsafe however so don't abuse this.
°7K- Her 15i backflip attack which is useful as a quick panic move when dealing with free cancelling foes and opponents who like to frequently delay strings. The flip automatically low launches foes back and you're left crouching which forces them to have to low throw you if they successfully guard. Unsafe however and doesn't track, and it's range is poor so only use when backed into walls or in your opponent's face.
°2H+K- Her 23i vaulting crouch low, has good reach and is useful as a meaty high crush when being pressured although it's somewhat slow. Causes a good stun to turn the advantage in your favor and also tracks but is unsafe.
°6K- Not a true defensive tool but being 13i, safe on block, and having good reach, this can be a good way to check free cancels and string delays with slower intervals before the next strike lands. Causes a decent advantage on hit as previously mentioned and no real weakness besides being linear and can be stepped.
°7P- Although not an actual attack, this has her perform her backwards jump that can actually avoid attacks like wake up kicks and even some follow ups from strings with lacking range including lows due to the jump, giving her a pesky way to retreat away from foes pressuring you up close or at mid range when used carefully. Avoid using when near walls as you will perform a wall grab that can become a wrong move if the foe is closing in unless you can somehow use the wall follow ups from using P to jump off it to counter hit your foe.
~PLAY WITH ME??: Keep in mind that Mai has several moves that have varying safety and pushback depending on how close or far she hits her foe with the move, and she also has lows that have tip range properties, which lowers the damage!
°6K- One of her simplest ranged tools: her 13i mid kick. Safe, has good reach and will give her a +4 stun at all times, useful as a general poke up close and at mid range. Lacks tracking.
°236P- Her fan high projectile which is her longest ranged tool she has. Full screen, and is relatively swift at 18i and causes a varying stun depending on range that can't be used to actually combo into anything, but it can be a nuisance. The foe can't actually physically hold it unless up close, and you can duck or free step to avoid it, which may seem linear but if you have the life lead and the clock is ticking, you can use this to waste the foe's time since ducking, sidestepping and free stepping isn't exactly a quick process to get closer in. Unsafe however at -22 when blocked up close and specific characters may have the appropriate tools like stances to avoid it. Kasumi can also easily teleport behind you with her teleport parry holds so try not to use this much against her in particular…
°3K- her mid vaulting 14 kick, good reach and is safe on hit at -3 and semi safe on block at -7. Can be spaced to avoid short ranged neutral grabs and will cause a +16 stun on counter hit. A useful mid range kick to use when wanting to use a counter hit poke that isn't too unsafe, but can be stepped.
°66K- Her close hit 20i forward jumping kick, has good reach and is safe up close when blocked by -4 to -1 depending on range and longer range will leave you at +0 to +2. Very useful as a ranged GB poke or long range GB poke to gain small advantage against slow and fast opponents alike, and it can crush lows! Can be stepped.
°66P- Her forward thrusting 18i elbow attack, useful for moving in, but is unsafe at -9 on block up close but semi safe at -7 when spaced. Somewhat slow and more mid range oriented but scores you either a small +2 to +4 stun on normal hit and a more meaty +17 to +19 stun on counter hit. Also has 66PK as its ender which may deter foes from throwing you since it can be delayed and the ender also has good reach and launches and avoids lows, although it's unsafe and can be punished since its -13 when blocked, but spacing can avoid some throws. 66P will also cause a stagger limbo fall stun against foes facing away.
°6H+K- Her 25i jumping forward mid kick, avoids lows and has great reach, making it perfect for running in as a counter hit mid long range attack. Normal hit will cause a +19 stun while a clean counter hit will cause a rollback bound that can be used to juggle foes briefly, or you can jump in with 9P to execute her K·P+K attack throw sequence or you can go for her bound set up. Semi safe to safe at -7 to -6 when blocked making it a safer option but like most of her other ranged kicks, it lacks tracking.
°1P- Ranged 16i tracking low that's safe on normal hit and has good mid reach although unsafe. A useful poke for opponents who favor standing guard, and it crouches highs!
°236K- Her 2-in-1 20i mid flip kick to jumping high elbow, safe, absurd range and reach, and it can't be ducked if the mid kick connected. A useful combo ender and also her go to cancel from strings that allow it as a way to end the string on a safe note. Doesn't track however and the high elbow part can be crouched from long range. Useful by itself and from strings that already move you forward like 6PP and 3P.
°4H+K- Her tracking 20i mid kick, unsafe and is vulnerable to throw punishment if not max range spaced, but it can be spaced and has useful mid reach that can catch even sidestepping foes.
°46K- Her 20i leaping back sway jump mid kick. Good mid reach and is one of her best crushes as she can avoid a good amount of highs and mids with lacking reach up close due to her brief backwards spring sway, and the jump can avoid lows too! The ender allows for her to cancel into specials too, although neither part of the string track and the ender can be ducked. Unsafe unless you use the ender to cancel into her 236K.
°1K- This low is unsafe on normal hit and block, but the 20i move can be used at mid range thanks to it's good reach. Will cause a minor CH +6 low stagger stun that allows you to combo into either her mid punch or mid kick ender or you can use the advantage to further poke at the foe. Lacks tracking and free cancelling can be a risk although it's follow ups can be nicely delayed to throw off foes. Has tip range properties but this can hurt it's damage when used at max range.
°214P- More a close mid range tool, this quick 12i fire spin avoids lows, jails since it's a 2-in-1, and it tracks making it her fastest tracking strike too! Unsafe however at -9, and the 2nd part of the move is what you'll want to space with since the first part has poor reach, while the 2nd part has decent mid reach to use when somewhat not close enough to really jab the foe up close.
°9PP- Her 30i jumping fan swat from her jumping 9P, decent reach and it tracks as well as being safe on block at -1 to +0 depending on if you did it at max range. Can be ducked easily however and has slightly worse reach than her other jump in attacks.
°9PP+K- Her 38i full body lunge jump attack from 9P, great reach and is safe to semi safe at -3 to -7 depending on how far you performed the move against blocking foes. Perfect as a way to reset the distance when your opponent is quick to rush in on you, and it also avoids lows. Caution since this is also vulnerable to low throw punishes. Can also function as an "anti air" type move when dealing with characters who have jump in moves or stances or attacks that have a telegraphed jump during the start up!
~What's Wrong?: As a heads up, an anti air is an attack commonly in 2D fighting games that acts as a counter to opponents using a jump in move or attack that has them airborne. When 9PP+K is done to a foe who is in the air, it'll also lead into her special attack throw sequence as if she had launched them manually in the air! Keep this in mind when dealing with Nyos flying towards you and against characters who possess a jump stance or an attack that leaves them in the air for a longer period of time.
°9PK- Another useful 30i tool from 9P, a leaping mid knee. Unsafe but has a semi safe to safe follow up to watch out for that is basically her 9PP+K, causes a decent stun on hit and the follow up being it's static follow up can deter holds out of fear of you using the P+K ender. Like 9PP+K it can function as an anti air as well.
°2H+K- Her 23i low sweep, has the good reach, tracking, and stun stagger to make it a nuisance when out of close quarters range. Is unsafe however and it's too range properties can hurt it's damage when playing from longer range.
°P+K- Her 20i mid dual fan attack which like 46K functions as her counter hit crumple stun. Has good reach, causes a +19 stun on normal hits and as previously stated, it'll cause a solid fall stun in stun or counter hit unless the foe is willing to hold to prevent the fall which leaves them open for additional follow ups or a hi counter throw if they guess wrong. The attack can also be used from certain launches and bounds as a solid range reset due to its massive pushback. However, it's unsafe at -9 and doesn't track, but it can avoid certain throws if spaced correctly at max range.
-That should cover us up for now regarding her ranged tools, she has a lot with powerful abilities so always be wary of what can and can't be used at all possible ranges! And now….
-This is an additional section added so you'll have an easier time being able to make out what Mai's stun starters are! Be aware tho that moves that cause a stun on normal hit but lead to a launch or similar on counter hit i won't add since they're counter hit launchers. Here's a brief symbol summary of the types you'll see:
☆These are going to be for moves that stun on normal, being what I called true stun starters. Mai has a few of these but they tend to be highs, or they're slower but unsafe or easier to react to. She tends to be rather tame in this area, but the moves she does have like this tend to have better properties when used as a counter hit attack.
○These are for stun starters that may cause a minor stun on normal hit but can or may lead to a deeper stun on counter hit. Mai is rather gimped in these. These attacks tend to generally be swifter but unsafe in most regards, and as such Mai isn't that great with these although she can easily use some for crushes.
●Attacks that do not stun whatsoever on normal hit and only stun on counter hits. Most of Mai's tools for stuns are generally leaning in this area since her style generally needs a counter hit to get these stuns going. They're often safer or usually have a follow up tacked on that can make a foe second guess trying to retaliate immediately. However, Mai is somewhat limited even in this area. A few of Mai's options that are categorized here may also have have a "minor" stun that can only connect her follow ups from that move unless the foe panic holds.
☆214P- Her quickest way to start a stun, her 12i twirling Ryuu-enbu special. Causes generally a spinning stun, tracks and is her quickest mid in her arsenal that naturally stuns. It's full reach however is suited for mid close reach and the attack is also unsafe. Quick and consistent but care must be made to use this carefully. Her fastest low crush as well. Present after certain strings as an ender such as 6PKPP and it's variants and PPPP and it's variants making it able to be used in a similar manner from those as well.
☆4P>- Her 15i high fan face jab, causes a +35 blind stun and it guarantees her special attack cancels. Unsafe at -13 when blocked but it can cancel into her specials at any time, as well as the stun being consistent and a threat. Lacks tracking.
☆4K- Her 16i high axle kick, tracks and causes a +24 stun on hit. Semi safe at -7 but lacks reach making it suited to mid close range. Counter hits will cause a +30 lift stun making it useful for counter and sidestep punishes, and can be used in stun the same way.
☆P+K- Her 20i open dual fan mid punch attack, causes a +19 stun on normal hit and will cause a crumple stun when used in stun or against attacks as a counter making it slower but dangerous. Can soft wall splat and has useful reach, but lacks tracking and is unsafe at -9.
☆4H+K- Her 20i spinning mid kick, tracks and causes a +11 stun on normal hit, only allowing a P to connect but this static option to continue the stun can be used to bait a reaction hold from foes who know of this. Against sidesteps, or when used to counter slower attacks or in stun, you'll get a forced +16 spin stun instead, but again this isn't much better since you'll be able to continue a stun set up but quick launchers won't be virtually possible unless your foe recklessly tries to hold in fear. Unsafe at -10 to -11 depending on the range but it's possible to avoid most neutral and standard throws if spaced correctly. Her in string PPK can be in a similar manner as the standalone move, but it's just as risky. One of her worse stun starters due to it's limits and unsafety.
☆46K- Her 20i swaying back jump mid kick, very versatile since the move is multiple crushes in one: the jump back sway can evade and crush highs and shorter ranged mids up close, and the jump can crush lows too! It has good reach and can be used at about any range that isn't too far across the screen to score a +19 to +21 stun depending the distance, and a counter hit or successful crush counter or use in stun will cause a similar gut crumple stun to P+K. Unsafe at -8 up close and lacks tracking but using it at max range leaves you -6. Overall one of her better stun starters as the crush properties more than make up for its speed. Very versatile in use.
☆6H+K- Her 25i forward jumping leap kick, slower than usual but can crush lows, covers a good range allowing her to move in with ease and causes a +19 stun on normal hit. Counter hits and use in stun will cause a rollback slide "launch" allowing for juggle combo type follow ups, very useful as a slower counter hit tool. Semi safe up close at -7 and -6 at max range, lacks tracking.
☆☆8H+K- Her 25i fatal sit down stun which is a jumping downwards axe kick. Unsafe at -13 and lacks tracking but good mid reach making it a good low crush and whiff punish from a distance. True mid as well and wall splats. A risky way to start a stun but it's way of forcing a break hold makes it an invaluable tool.
☆9PP- Her 30i high jumping downwards fan swat. Tracks and always causes a +25 stun on hit. Decent reach and is safe at -1 on hit but +1 at max range. Slow but can evade lows and cover distance quick, but is vulnerable to high crushes and crouches.
☆9PK- Her 30i mid knee jump kick, causes a +25 stun like her high jab but is unsafe at -11 when blocked, but has a safe to semi safe follow up ender which is P+K, it's safety can vary depending on range since it has deceptive reach. Her other option is K which is her bound attack but unsafe at -13 on block.
○K- Her quickest way to cause a minor stun, her 12i high kick. Causes a +8 stun on normal hit and a meatier +25 stun via counter hit making it pretty deadly as a quick counter tool. Useful but can be crushed, unsafe at -12 when blocked and crouched and lacks tracking, and it's use near walls is kind of gated since it cause a wall splat on counter hit. It does have follow up kicks but all are highs and the full KKK string is unsafe when free canceling all of the kicks making it a risk to try to attempt on block although the delay of all of them is good and the final kick can be cancelled into one of her specials.
○6K- A 13i mid vault kick, this always causes a minor +4 stun push back, regardless of counter hit or position, making it a standard mid kick poke of the static variety. Safe, good mid reach and can be used to either poke at the foe, reset the neutral in your favor from a stun, or generally just to be a safe go to. Lacks tracking and the static stun makes it rather gated for use but a reckless panic hold can cause the foe to be vulnerable to additional stun damage if choose to go for a stun set up from that.
Overall I consider this a good but still limited minor stun attack since the stun does not increase even when used upon successful counter hits.
○2P+K- Her 17i slanted fan crouching mid punch attack, is +0 on hit causing a pushback stun and a counter hit or successfully timed crush will cause a +15 stun. Risky since it's -9 to -10 on block but tracks and is her go to way to crush out highs when being pressured up close. Wallsplats on counter hit and in stun.
○66P/(While running)P- Her 18i dashing dual elbow mid attack, covers decent distance and can be used while running, and it'll cause a +2 to +4 minor stun on normal hit, allowing you to for her her static ender launcher 66PK as a quick launch, but it's risky and easy to step or hold. Linear to sidesteps and is unsafe at -9 up close but proper spacing can make it semi safe at -7. A proper counter hit or crouch punish will cause a +17 to +19 stun giving you better stun to work with, and with the possibility of a quick launch, it can make the foe scared to hold in fear of that dreaded flipping mid kick flame launch.
●6P- Her 11i mid punch elbow, her quickest and main counter hit close quarter tool when looking to fish for a counter hit. Demands a counter or better since block and normal hit leaves her -13 but causes a +20 stun when used to counters. To mask its short reach and linear lack of tracking, it does have a tracking mid twin elbow follow up with a special cancel opportunity, and also has a low vault crouch kick follow up as well with two string enders but both also demand a counter to get the offense going or else you'll risk throw punishment. Overall her go to tool when fighting other characters who also possess an 11i mid or who happen to be at a speed disadvantage, adding to one of the horrors of her up close neutral. Useful against crouches.
●3P- Her 13i mid lifting fan jab, vs 6P this is her go to counter hit lift stun that causes a nasty +32 lift on counter hit. Unsafe at -13 on block and normal hit and lacks tracking. Has both a tracking mid punch and low sweep kick to mind and also has a safe mid jump kick to high jump elbow to use when needing to prioritize safety over a sidestep attempt. Overall a less risky way to fish for a stun up close with better stun and options to compensate the slightly worse start up speed.
●3K- Her 14i mid vaulting kick, Her go to option when looking to get a mid kick stun from mid range or when trying to get a counter. Useful as a normal hit poke since it's -3 on hit and semi safe at -7 when blocked, but it's reach can bandage this when used at max range to evade throws. A +20 stun will result from a successful counter hit and it will wallsplat too! Swift and has reach overall making it a relatively fair tool to use for a counters, but lacks tracking.
●2K- Her 14i crouching low kick, different from most standard 14i low kicks since it does have follow ups and can outright crush highs. Is -9 to -11 when done on normal hit but is -15 when blocked. Successful counter hit will cause a +10 to +11 stagger stun that allows her to connect her two string options, either her low 2P crouch fan poke that's safe but lacks reach and tracking or her 2P+K that tracks and can cause a better stun for connecting stun set ups but lacking safety. Her 2KP can be a useful safe poke string since it jails on hit leaving you at a very safe disadvantage, but mind 2K's tip range since it hurts its damage potential.
●8P- Her 15i downwards fan swipe, a true mid and can easily stuff crouches. Although fairly swift, it's only -13 on block and normal hit making it an unsafe tool to use, although it does have her tracking Ryuu-enbu attack that can be delayed to deter hasty punishes. A counter hit will score you a +20 stun(+17 against a crouch), and since it's a true mid, this can be used to easily shut down stances like the Bokuho Helena possesses that can not only evade high, but also normal mids with the duck evade. Lacks tracking.
●1K- Her 20i low crouching leg thrust kick, very risky since it's -14 on block and hit, and even though it can easily crush highs and go under them, you're left squatting making you vulnerable to crouch and standing throws. Causes a general minor +6 stun on counter hit that allows its enders to connect, forcing a 50/50 guess between a mid kick or mid punch downwards fan, although the ability to delay isn't that impressive. Has reach to compensate for its lack of tracking but the tip range damage reduction can hurt it's damage from afar.
-This should leave you with some hot ideas for getting the fire ignited with Mai! Now to conclude
-Well, as fun as it is teaching others how a character works and their tools and such, every lesson and guide must eventually end…. I thank you for reading and hope that I've helped you better understand Mai and want to continue picking her up if she's the main for you! This concludes the guide, but it's far from being simply finished since updates always can change something and I'll continue to post and update this vanilla guide with any new findings as future patches or game iterations are released! Have a good day, and now hopefully you'll better understand why Mai self proclaims herself as Japan's best!!

~Fin.~
Having been in the original DOA5LR game as its final DLC character, Mai has returned in 6 with more ways to play her and alot more new additions and tweaks to further flesh out her style! This guide will give you a nice hot take on what she has to offer from her jumping stance, to her special moves, throws and holds and much more!!
Latest guide notes:
°5/19/21 ~ Base guide finished.
°5/21/21 ~ Added in rope wall tech notes.
°6/25/21 ~ Added in KKK force tech notes.
°4/22/23 ~ Added in an additional section that highlights Mai's stun starters.
Table of contents
Table of contents
Section 1: Explanation of reading frame data & understanding numerical input
Section 2: Mai's Pros & Cons with a Rundown Summary
Section 2: Mai's Pros & Cons with a Rundown Summary
Section 3: Mai's Forward Jump Stance and Back Jump
Section 3: Mai's Forward Jump Stance and Back Jump
Section 4: Mai's Cancels & her Specials
Section 5: The Break Gauge & the Break System
Section 6: Mai's Full Moveset Breakdown
Section 7: Mai's Throws Explanation
Section 8: Mai's Holds Explanation
Section 9: Mai's Hot Basic Combos & Set Ups
Section 10: Mai's Offensive Pressure Tools
Section 11: Mai's Anti-Sidestep Tools
Section 12: Mai's Defensive Tools
Section 13: Mai's Hot Zoning and Ranged Tools
Section 14: Mai's Stun Starters
Section 15: Final Remark, Thanks, & Future Expansion
Section 1: Explanation of Frame Data & reading Numerical Inputs
-Before we start the guide off, if you're a beginner you should know the basics about reading frame data and inputs. I will use actual button macros throughout this guide, but here is a picture that shows you what the directional inputs are numerically:
1 ~ Down Back
2 ~ Down
3 ~ Down Forward
4 ~ Back
5 ~ Neutral/No Direction
6 ~ Forward
7 ~ Up Back
8 ~ Up
9 ~ Up Forward
-Another key thing you need to know is MOVE SAFETY. Move safety is how safe or unsafe an attack is on block, and you can see for yourself how unsafe an attack is by enabling the move details in training mode and looking at the move advantage. +1 or better frames means you have a frame advantage, meaning in this situation you're able to move first and the attack you use afterwards in that instance with no delays will be faster by that allowed advantage!(Example: If you perform an attack and gain +4, the attack you use immediately afterwards will be virtually 4 frames quicker than normal in that instance). +0 to -5 is safe, meaning you can not be throw punished after the attack, with the only exception being 5i neutral throws if you are left at -5. -6 to -7 is semi-safe, meaning you can be thrown if an opponent uses a quick throw, but longer framed throws will not get you, and -8 or worse is unsafe, meaning you can be thrown, so watch out when you use her unsafer attacks.
-Throughout this guide, to cut some corners and to eliminate text bulk, I will use the "i" symbol in place of the term "frames'. An example would be 23i, which basically is the same as saying 23 frames. Keep this in mind as you read this guide.
-Finally, another thing I will mention throughout is whether Mai's attacks track, meaning if your opponent attempts to sidestep it, it will follow them, while if an attack has no tracking, it will not hit when sidestepped. Now that all the basic stuff is covered, let's transition to her pros and cons.
Section 2: Mai's Pros & Cons with a Rundown Summary
-Knowing what your chosen fighter specializes in and struggles in is a key thing I think you should know. This section will show her pros and cons, and I will provide a detailed summary to further explain them:~Pros/Strengths~
°Very fast; Has a 9i high punch strike, 11i mid punch and a 13i low punch making her amongst the quickest fighters in the cast. Her kicks are swift as well, having a 12i high kick, 13i mid kick and a 14i low. Very quick oriented neutral.
°Relatively easy to pick up and play, being low execution and having a pretty decent sized move kit meaning you won't have to worry much regarding a large move set or complex combos.
°Virtually all of her cancels are some of the easiest in the roster since she doesn't require specific conditions like needing a normal hit to be able to chain into them besides her one that leads into her jump stance.
°Has great delay in her strikes, useful for throwing off opponents when free canceling or fishing for a counter hit.
°Somewhat above average combo damage output and counter damage. Her combos are also relatively lower execution making it easy to perform her max damage set ups.
°Very versatile, having good mix ups from her strings that have varying hit levels. Also has her cancel specials from specific strings that allow a cancel into a special move which further adds an edge to options in and out of stuns!
°Very good at close quarter range, being able to quickly overwhelm and score counters against slower opponents. Also fairs well against characters who are about her speed as she has the quick tools to keep up with them easily!
°Has great reach from most of her attacks, having a great mid range when dealing with opponents who aren't within close range! Useful when you wish to fight your foe outside of close quarters especially if they struggle at that range. Has several attacks that actually become safe and or can avoid throw punishes with the pushback.
°Great at far and long range, having a number of useful approaching and keep out tools to either blast back reckless foes or to hone in on them.
°Has a projectile attack, a high fan that can be used from anywhere on the screen to either hit the opponent or to keep them out and waste their time by forcing them to crouch, free step, or use attacks with crouching properties to avoid it. Can be a major nuisance to foes who already have a tough time moving in.
°Pretty good mid range pokes that are generally safe. Quite a handful of her attacks also benefit from max range spacing as they can avoid certain throws from max or tip range, and her on block safety and advantage can also change vastly from this as well making her even more rewarding for players who can space and zone well.
°Good evasion, having attacks that can crush those of her opponents, and having moves with crouching and jump properties that can easily evade and crush highs and lows in defending situations.
°Can move in and out quickly thanks to her jump; also has quick walking and retreating speed.
°Has a fatal sit down stun in her kit, giving her an additional way to pursue potentially guaranteed damage when not wanting to use her universal fatal rush attack.
°Can cancel into her special attacks from the third hit sequence of her fatal rush string, giving her more an edge in combos and in stun!
°Great stuns; has deep lift stuns, a blind stun, and also has a mid punch and mid kick stun that crumples in stun or from counters, forcing the opponent to hold in these situations or else they will fall to the ground, quite similar to her fatal stun and fatal sit down stun!
°Very counter oriented, alot of her attacks benefit from hitting her opponent before they do you, making her counter hit game very dangerous!
°Great carry, very adept at carrying her foe across the stage and into danger zones with very little effort.
°Good throws; has quick throws, a punish throw that does good damage and also has a quick 10i launcher throw. Also has an air throw that can be used to score less scaled damage when needed in shorter juggles.
°Decent tracking; Has useful moves that can easily punish reckless sidesteps if carefully predicted.
~Cons/Weaknesses~
°Virtually no pressure tools or positive guard breaks besides her Break blow on block and her close hit attack at max range. Has to rely more on mix ups and counter hits to open her opponent up offensively.
°Generally an unsafe character, having only a handful of safe attacks, and the ones she does have tend to be linear or easy to avoid.
°Risky lows; while her sweeps can score quick advantage, they tend to be easy to react to. May be difficult to open up turtles when not wanting to risk a throw. Some of her lows are also vulnerable to both standing and low throw punishes since some leave her "squatting", which makes all throws be able to grab her.
-Generally very counter hit oriented, and needs openings and good interrupts to get her deadlier stuns going as alot of her kit will only cause stuns on successful counter hit or crouch punishes. Overall needs counters as catalysts to get her deeper stuns going which have the best properties when used before her foe attacks her.
°Relatively slow launchers, as she lacks any swift quick launchers in her kit, meaning she'll need deeper stuns to get the most optimal launcher options for mix ups as her fastest launch speed is 15i. Virtually no in string launchers as well unless you utilize her special move launcher from her attacks that allow it, and even that launcher is particularly predictable and punishable. Overall has a very honest launch game that's very dependent on deeper stuns to make use of.
°Very risky tracking game; Most of her best tracking moves are lows, and her mid tracking attacks tend to be unsafe and can be throw punished. Also lacks in string tracking moves, she can use special cancels after certain ones to remedy this but this is often unsafe.
°Her smaller moveset can be a hindrance at higher level unless you play her carefully.
°Average hold game; Doesn't have any expert holds, and her holds tend to have limited environmental reaction.
°Her special attacks lack much versatility; 2 of the 4 are mid punches, 2 of the 4 track, and 3 out of the 4 are unsafe up close.
°Her DOA6 bound set up is probably one of the more limited in the game, having very little use outside of stun launch set ups since doing it from her standard mid fan launcher is predictable, and she can do it from roll back bounds in stun or on counter hit or after fatal stuns but this isn't useful since her rollback bound attacks can interact with walls. Because of this, it's damage potential with regard to danger zones is more tame compared to other characters like Kasumi who are able to do much more before they can end their set up with a bound into a close hitter.
°Lacks any real way to go backturned and doesn't have any strings or cancels that allow her to be left backturned either. Not truly a hindrance but this makes using her backturned kit harder since she has quick tools from it like a launcher, her 9i, 11i, and 13i punch jabs still, and she can cancel into her special moves from her backturned K attack.
°Is a lightweight so juggles are especially effective against her and can lead to far more health loss compared to mid and heavy weights who can't be juggled as long.
-To summarize this, Mai is amongst the fastest characters in the roster, having a 9i/11i/13i high-mid-low jab speed for her punches and having a 12i/13i/14i one for her kicks making her very good at close quarters. Her attacks are mostly quick, and she is very counter oriented with a lot of her attacks causing more lethal stuns when used to interrupt her foes, and her damage output is good as well. She also possesses a great wall carry, and she has one of the best ranged games in the DOA6 roster as she has numerous attacks that cover a multitude of different ranges, making her deadly from all ranges if you want to either play keep out, zoning from mid range, or if you want to be a pest up close! Her throws are decent too, having quick ones, a launcher one that's swift, and she also has a punish one that deals good counter damage and she also has an air throw for unscaled damage, and an a throw sequence from her forward body lunge jump attack at the proper height.
Defensively, she has attacks that can easily crush highs and lows, and her range can make it difficult for opponents to safely touch her if they struggle moving toward the aggressor. Her projectile fan also can waste time as the opponent must free step or duck to avoid it if they don't properly hold it, and her jump stance also has other ways she can move in as well. Finally, she has a great array of stuns, including a blind high stun, a mid punch and kick stun that can crumple forcing the opponent to risk a hold to stand, and she has good versatility in her kit which is already a decent size and easier to pick up, making her useful for all skill levels. Her specials will also add an additional edge to the strings she can cancel them from making it a risk to just randomly hold her.
While she's pretty solid, she does struggle a bit since alot of her attacks demand a counter hit in order to stun, and her lows aren't that great as its only her slower sweeping lows that give her a stun, meaning that she'll struggle somewhat to open an opponent who plays careful and doesn't easily give in to counter fishing. She's also amongst one of the unsafer characters in the game, and has virtually no way to gain any real advantage against blocking foes, meaning she'll have to play the neutral poking and counter hit baiting game more honestly compared to other characters who have ways they can gain advantage on block. Her tracking is also not that great, as she lacks in string quick tracking and nearly all of her standalone tracking moves are slower and unsafe, making them vulnerable to throw punishment. Her launchers are also mostly slow and require a counter hit to get the most optimal damage, and her holds are fairly limited in regards to interacting with the environment. Her bound set up is also pretty limited as well too, as the damage potential from it is way more tame compared to characters like Kasumi who can easily get more damage and wall carry from it.
Although Mai has her weaknesses, this doesn't take away the fact that she's amongst the more dangerous characters to fight in the game, and her speed and range can prove to be a high fire wall to extinguish when mastered. Being one of the more unique characters since she's based from a 2D fighter, this guide will help you learn her thoroughly so you can show your friends and rivals why she's Japan's best!!
~What's wrong?: This mini section will give a brief rundown on what her LR vs 6 changes are! Compared to LR, I feel like Mai is far more easier to use in LR since she was generally safer and her damage was also higher too, but in DOA6 she has to generally work harder for her damage since alot of tools were toned down. Some attacks no longer stun on normal hit and some stuns were also changed from crumples to more normal stuns, this means she has to play more honestly compared to LR where she had stuns and options to really keep her foe's guard up. She has had some safety changes as her Ryu enbu is no longer safe, her Shinobi-Bachi now is and certain moves now are different and don't give her advantage; her new fatal stun attack is an example, as it's now an unsafe attack rather than a positive guard break like before.Despite these changes, Mai is still a strong character as she's had numerous buffs, like her old fan lift throw now causing a launch, her combo game is now more varied as she can now go for bound set ups and besides the mentioned moves, her stun game is still quite threatening, as she keeps her original critical burst attack in 6 as a crumple stun, and her original 66K is now 46K and also stuns for a crumple like before too! Mai all in all is still a threat, but she's been mellowed down so that way she's more an honest character rather than the cheaper one she was in LR, you'll now have to work harder for damage and openings but Mai is still threatening enough to not let this hold her back.
Section 3: Mai's Forward Jump Stance & Back Jump
-This section will introduce you to another mechanic she brings from KOF: Her forward jump and her backwards jump called "Kawasemi no Mai"! The input for them is simple: and . The first one we will address is . It's very evasive, and allows you to jump closer to your opponent while evading lows, and can also be used to get over to the opposite side of the arena when your opponent is down on the floor. Here are the possible follow ups you may use if you want to get feisty! Also please keep in mind that both her punch and kick follow up are 30i and have 24i recovery.Please note: If you are coming here from my LR Mai guide, this should be quite familiar to you, but do keep in mind that attack properties and frame data may have changed in terms of advantage and safety. With that in mind let's begin:
~ Her high downwards swatting high punch fan attack, virtually the same as in LR. It tracks, making it a useful go to when moving in on foes who are quick to sidestep. It also covers a decent distance thanks to the initial jump, although the attack itself has somewhat poor range. The attack can be crouched, but it's been buffed, as its safer at -1 on hit, rather than the -4 it was in LR, making it a relatively safe way to continue pressure against slower foes as you'll be 10i/12i/14i in neutral punch frames and 13i/14i/15i in go to neutral kick frames, meaning you're not at much of a risk if you want to continue to pester slower foes!~Play with Me??: If this attack is done at max tip range, you'll be +1 on block! It's tricky to get this since the attack has very poor range, but this makes it a useful way to reset the neutral when moving in and done correctly!~ Her mid knee kick follow up, it has a few adjustments from LR to 6; Because it now has another attack ender, it'll now give you +20 on normal hit instead of +25 which is a slight nerf. It no longer wallsplats at all, and it is still -11 when blocked and doesn't track.In 6, it's follow up has been adjusted as well, with her still being able to cancel into
, but the catch is it can't be delayed anymore, you'll have to commit to the ender or else it won't come out. The attack is also unsafer at -7 on block up close, but is -3 to -6 depending on distance when done at max range, making it more suited as a distance safe move when moving in. A new buff is that if the attack by itself or the string is done against an airborne opponent, she'll perform a damaging air attack throw sequence that floors her opponent before jumping a safe distance away, making it both a useful combo ender in launches or as an anti-air against characters who are prone to be in the air like Nyotengu! Can be low throw punished on block or whiff.Another new string ender option is
from the this attack after the mid kick hits on hit or block, she'll perform a dramatic dual knee drop with her fans open as it floors the opponent. Unsafe at -13 and doesn't track, but it can bound airborne opponents after the appropriate juggles, or by itself if used as an anti-air! The normal knockdown also allows you to go for a force tech to force the opponent up if they don't tech up quickly as well.- The standalone lunging attack previously mentioned performed by itself, virtually the same although it has more utility without the string being tacked on, however it's slower at 38i. Avoids lows and covers a great distance and is -3 to -7 depending on max distance block. Doesn't track and can be low throw punished.-I will cover it more in depth in the full move kit break down, but in DOA6 Mai is now able to cancel into the forward jump from her counter hit launch attack that is
by simply pressing when it hits! However, it MUST hit in order for the cancel to work, and it won't work on block. Can be used as a feint as well which leaves you +2 on normal hit if the opponent doesn't attempt to hold.-Now to address her backwards jump, for those coming from the LR guide, this section has remained pretty much the same as there are no changes in DOA6 besides the frame data on hit or block and etc. as mentioned earlier!
- This is similar to her forward jump, except this actually retreats and creates distance to move away from your opponent. If done near a wall, she will briefly grab on to it, allowing you to jump from it by pressing if you wish. When you jump from the wall, you will be able to perform all the follow ups from her forward jump stance, but take heed they'll be somewhat slower because of the prior maneuver. Her punch and kick follow ups will now be 60i and her P+K will now be 54i. The jump itself is also especially useful for retreating away from attacks, ideally wake up kicks since the jump can help you evade both kicks so you can reset your spacing again.-In conclusion, don't underestimate the power of her jumps, they can be very useful in moving in on or retreating away from aggressive opponents. With that being said it is now time to move into Mai's special moves breakdown!
Section 4: Mai's Cancels & her Specials
-This next section will cover Mai's main mechanic she brings from the 2D fighting game genre: The cancel mechanic. This is the act of quickly canceling normal move or string into one of her four specials. The following attacks can be cancelled from:
, , , , and back turned and .~This is gonna be hot!: Mai can also cancel into her Specials from her fatal rush after the third hit! Keep this in mind for potentially guaranteed damage!!-These are the following specials she can cancel into and what they can do. Also be aware you can perform these specials by themselves too:
~ This cancels her attack into her signature "Kachousen", her high projectile attack that hurls an 18i fan at her foe. Being a projectile, it is full screen and can only be evaded by crouching, or free stepping to evade it, that or sidestepping. Doing it at max range nets you +26 via a stun, but because of how far you are and the 46i recovery, it can't actually be used. Up close, it'll give you a +4 stun advantage, but the stun will vary vastly from a distance, where the range will change the hold to an "evade" hold(a hold that makes the opponent avoid the attack with a slow motion effect, leaving you open to a backturned combo set up in most cases), while doing this up close will result in a normal high hold punish if held.Gameplay wise, I regard this as her worst cancel attack since it'll only leave you +4 at the most up close in stuns or max damage thresholds, it's best when used at a range to waste the opponent's time, especially when the clock is ticking and you have the life lead. You'll however be left -22 on block, and this will also generally leave you a safe but negative disadvantage when performed on foes facing away. If done as a cancel in a juggle, it'll cause a knockback that normally would be useful for pursuing a no timing force tech but because the recovery is so slow, it can't be used really for anything besides as a way to scare the opponent into standing up.
~ Another returning special from LR, This is Ryu-Enbu, a 12i twirling jump attack that summons a 2-in-1 fire attack that ends with an 11i jailing attack that jails on block(Jail means that if the first strike hits on block, normal hit, or counter hit in most cases, the opponent won't be able to block, duck, or hold the second attack in this case. The only way to bypass this is to ensure the first attack doesn't connect). Having 33i recovery and being -9 when blocked, it's no longer a safe attack or ender like in LR where it was safe to use, and as a result it was somewhat easy to abuse since it also tracks as well and is her ender from PPPP, 8PP, 6PKPP, 1KPP, and 3PP, meaning you don't have to cancel into it from these strings. The first attack part avoids lows with the jump but has poor reach while the 2nd part has decent mid reach, making it useful for mid close range situations. If the attack hits, you'll score a +16 spin stun, while if just the 2nd part hits, you'll get a minor +11 stun that limits you to you only using P to continue a stun. The attack is also a good refloat, especially near walls since the attack does not wallsplat! When done on a back facing for, the first part of the attack will briefly cause a limbo back stun that would normally cause a fall, but the second hit will quickly change the stun to a +7 one that leaves them standing.~ One of Mai's most unique special, this is Hissatsu Shinobi-Bachi, a long ranged 20i 2-in-1 attack that begins with a flipping forward mid kick attack into a 20i high jumping elbow finish. Like her previous special, it's useful since it jails on hit and block, mean if the opponent guards the first hit, it'll force them to block the high elbow, which is -6 up close and about -3 at max range, but getting max tip range is a bit tricky since the elbow pushes you forward quite a bit. Although this is a safe special and ender from her strings 3PK and PPPK, if the first attack whiffs, you'll be able to easily be crouched by the opponent since the elbow is very telegraphed besides that, and if the opponent ducked the elbow, you'll be roughly -11 due to the 29i recovery, about the same as if the opponent sidesteps the attack, making you open for a very easy throw punish... The attack also doesn't track, but compared to LR, it's far safer and you won't have to worry about a 10i throw punish! The attack covers a good range to begin with, and will lead to a quick "launch" into a good knock back with the elbow part. The move also looks deceptively unsafe, and it's common for foes not experienced with the match up to try to throw you after they blocked the move, be sure to quickly hi counter this attempt if they use any throw that's slower than 6i, but be wary against the grapplers who have very quick throws that can easily make using this move a huge mistake. A good whiff punish as well as a good ranged keep out move and combo juggle ender! Will also cause a special +49 to +52 rope wall rebound stun in stages like Sweat that sends the opponent hurling back towards you as a major disadvantage!~ Her final special which is Kagerou no Mai, a 28i fire summoning move that has Mai use her ninpo to summon a 3-in-1 hellish fire blaze that engulfs her in beautiful flames. The 2nd and 3rd part of the move both have 6 active frames and a quick 1i start up that jails on block and hit, and the swift start up makes it absolute suicide to try to hit her since up close, you're gonna lose out against her 1i flames. The attack will launch on normal hit and will launch higher in stun, making it useful to launch foes although the start up in stun can make it easy to hold, and a successful hold results in an "evade hold' type that'll have the opponent evade the attack as if stepping it and you'll be left a shocking -27 due to the 24i recovery and the opponent will wind up behind you, making you vulnerable to all character's limbo back stun set ups if they know what they're doing, that or a simple attack will prove dangerous since you're wide open.If blocked up close, you'll be left at -12, while if only the first strike hits at a distance and the two following fire attacks don't connect due to the poor range, you'll be left at -26. If only the first two strikes hit from a distance, you'll instead be -19. The attack tracks and can also act as a refloat but be wary since it's refloat use will depend on the situation and what was used to launch the foe. This attack overall has the worst reach out of all her specials and is the slowest as well.
-This covers all of Mai's specific special moves, please note that you don't have to always cancel into them from strings, throw them out when you think your foe has let their guard down! Now let's move on to the break system!
Section 5: The Break Gauge & The Break System
-This section will be a brief explanation of the Break System of DOA6. Let's begin:
The meter in DOA6 is divided in 4 parts, and the meter fills up quickly as you attack, but it also slowly fills from defending and receiving damage.
/- You can use ¼ of the meter to perform a side step attack. This is a 27i mid kick strike with 30 frame recovery that knocks back the opponent full screen. Unsafe at -15 and doesn't track.- You can use ½ the meter to perform a Break Hold. A break hold is a hold that will hold any attack but does very low damage. This will also provide +5 advantage and reset the positions to round 1 fight distance, resetting the neutral. These are also the only way to escape a fatal stun from attacks or a break blow cancel.- You can use a full meter to perform a Break Blow. Mai's break blow and break blows in general are a powerful attack with Sabaki type properties, meaning it'll interrupt strikes if timed right, allowing you to unleash a damaging blow that'll send the opponent flying backwards, clothes tattered and bruised. The attack is also able to be used after certain launches, after bounds, and even after certain wallsplats. The disadvantage is that it can be shut down with a simple low strike and can be hi counter thrown and the move can be stepped and held. +4 on block. ~PLAY WITH ME??: There's more to the Break Blow than you think: if you press H once it hits, Mai will perform a Break Blow Cancel. A cancel will stop the full blow from coming out and will leave the opponent in a fatal stun state. While in fatal stun, the opponent will be unable to do anything unless they have ½ a meter available to break hold to escape the stun, meaning you can use the cancel as an opportunity to go for more damage than the Break Blow may do in set situations, especially in certain environments with the right conditions. Be wary since if your opponent has meter, they can use the meter escape the fatal stun, but you can also use this as a way to go for a hi counter throw set up if you anticipate this. Also be wary that the opponent is only limited to break holds for escape as long as you don't use any normal attacks to continue the stun, since after that the opponent will not be in the fatal stun anymore; in this case they can regularly hold which although is a risk, you can use to pursue even more damage or a hi counter throw set up. This however can be avoided if you use her 8H+K to "extend" the fatal stun since it will put the opponent into a fatal fall stun that can be used to get the max launch height before going a juggle set up or bound set up.There's other attacks you can use that involve the new
button, but don't cost meter:/- This lets you avoid linear or non tracking attacks at the press of a button. You can use this to avoid specific attacks and punish the recovery with a throw, but be wary since sidesteps lose to throws and will result in a counter throw. If you have meter, you can use ¼ of it to follow up a step with a side step attack. If the sidestep attack is done near walls with rope properties, it'll cause a +48 to +50 wall rope rebound stun that leaves the foe at a major disadvantage. This is possible in stages like Muscle, Sweat, and the Colosseum from a certain distance. Be wary for fatal rush attacks since the first hit will turn the opponent backwards in a fatal stun, which can lead to some deadly back turned situations. The side step attack also has no tracking so your opponent can step you for it as well.Another thing is a fatal rush: a string that puts the opponent in a fatal stun, and finishing it can lead to quick damage, but you can also stop part way through and make a custom combo using the fatal stun:
- The first hit is the only one that can be done unless it hits. This is a 18i tracking high punch with 28i recovery. On hit, it'll result in a fatal stun which you can then follow with the other 3 attacks(the frames and the hit level don't really matter since only break holds can stop them and they can't be done unless the first strike hits). You can also use it in stun since the fatal stun eliminates the worry about opponents using normal holds and it'll force them to use their meter if they don't want to risk guaranteed damage. attacks with close hit properties will also have their close hit damage added on again in fatal stuns as well too! Because Mai however is doing a flurry of attacks, it'll do a total of 8 hits, the first one hitting once, the second hitting twice, the third hitting 4 times and then the final one hitting once with a knockback. As mentioned before, Mai can cancel into one of her specials during the third fatal rush string hit during the 4 hit part, making it useful for combo enders but be wary about the 30 hit combo limit, as reaching 30 hits will cause any other hits afterwards to whiff, ending the combo.When the full
string hits, it'll knock back and can wall splat. The string can also be used in juggles and after certain launchers as well if the height is high enough. If done on block, you'll be unsafe at -12, and be careful since the string can be ducked and low crushed. The string is also strong against side steps as it will cause a fatal stun that leaves them back turned and open to a guaranteed back turned set up. The string will also cause a +37 rebound rope wall stun in stages like Sweat or Muscle that have wall rope properties, but only from a certain distance.If you have a full meter and do the string, you'll automatically transition into your break blow, but if you wish to save your meter, do
so that you won't waste meter. DOA6 is a game where meter management is important, so be sure to save it and stock up for when you'll need it. Avoid wasting it on random sidestep attacks and nasty break blows and use it when the time's right and when it's absolutely necessary since sometimes your opponent will attempt to force you to discard it and bait reactions to make you waste it which is the last thing you want to do. Make every time you use the meter count!Now that we've finished the rundown of the Break System and you better understand it, let's ease into her moveset!
Section 6: Mai's Full Moveset Breakdown
-This section will cover all of Mai's moves in her kit, from strings to moves and even back turned strikes, and I'll explain everything from it's frames to it's stuns and safety as well as usage!! Please refer to the directional inputs section so you know what direction is what, and I'll be sure to to use special symbols for various move types. To begin, let's cover a few notable changes in her inputs from LR to 6:
-4P+K is no longer a command move in 6, in LR this was her jumping mid kick PB attack that not only avoided lows but had great reach and pushback making it basically safe. No longer an attack in 6.
-Her old LR 66KK attack was removed briefly in 6 and replaced with 66K which is her new close hit attack. It was later added in a recent patch as 46KK.
-Her old PPK is no longer possible; in LR, this was a string that had her perform her 9i punch strikes before ending with a high kick that launches on counter hit and stun and just lift stuns on normal hit. It no longer is in her kit, with her 8K being the only way to use the ender as a standalone, which means she no longer has a real in string launcher which is a slight nerf. However to compensate, it was replaced with her new 4H+K as the ender, which is a somewhat slower spinning mid kick that tracks, although it's unsafe and the stun is worse than before.
-A few of her moves have been removed and been reworked to be used for different attacks. For example, her old high punch which was a beautiful fan barrage is now basically her fatal rush during the 2nd and 3rd portion of the attack, and her old flinging butt attack is now her break hold attack.
-That sums up the main highlights that you should know about her kit! I'll touch base more when certain moves are mentioned, so now let us begin!
°P- Mai's neutral jab, a 9i strike that hits high and only has 13 recovery frames. -2 on normal hit, and is +1 to +2 depending on distance on counter hit, and a hi counter hit or using it in stun will cause a +36 stun, giving her varied follow up options. Is also -2 on block making it safe poke, and it causes a +11 on hit vs a backturned foe. Does not track and can be ducked, but it's a useful attack for punishing unsafe attacks and is her quickest command move, making it a go to when facing characters who are far slower than she is, or to rival a character who's also about the same speed of her up close.
°PP- Her follow up to p, which is another dual high punch 9i strike that has her use her closed fan which 15i recovery. Has slightly better reach and is -4 to -5 on normal hit, and is also -4 to -5 when blocked making it another safe option. The attack jails on block and normal hit, perfect for tick throw pressure or to scare your opponent into preparing for a string ender, which may leave you capable of attempting a mix up or free cancel. On counter hit, you'll be +0 to +1 on hit if the strike hits by itself, but you'll be -4 to -5 again if it jails when both strikes hit. Use in stun or counter hit will give you a +34 stun, and the attack will cause a +9 stun when the foe is backturned, allowing you to continue the stun if you use the string enders like PP2K, PPP, and PPK. Does not track and can be ducked.
*PPP- Follows up the previous strikes with a mid punch upwards 15i open fan lift jab with 24i recovery to it. Not very useful on normal hit or block as you're left -13 when free cancelled, but if done on a counter hit or in stun, you'll gain an easy +31 lift stun, leaving you with ample option to work with! Will also shut down crouches as you'll gain a great +36 making it dangerous when does are crouching you, and you can also use this to hit backturned foes, since if the strike hits by itself, it'll give you a +16 crouch keel stun. Does not track but has decent range.
*PPPP- Ends the string with the special cancel move previously covered before, 214P or Ryu-enbu. Virtually the same frames, just slightly better reach. Useful as a string refloat for an additional follow up and it tracks but is still unsafe. The 2nd attack from it evades lows too. Can be delayed to throw off opponents nicely.
*PPPK- Ends the the string with her 236K special Shinobi-Bachi, virtually the same frames and all, just slightly better reach. Her safe string ender although if the first initial part of the 2-in-1 doesn't hit, your foe will be able to duck the high elbow leaving you at an unsafe disadvantage... Also doesn't track. Can be used as a string ender to knock back the opponent after the right launches and refloats but you'll likely find better enders as you learn her better with her cancels.
*PPP2K- Mai ends the string with a somewhat swift 23i low sweep with 27i recovery. This is one of her few lows in her kit that can help gain advantage when trying to open up opponents who are playing very defensive, as you'll gain a brief but good +8 foot stagger stun that puts the momentum in your favor! If done in stun, on hi counter hit or against back facing foes, it'll knock down outright, and you'll be able to pursue a force tech situation if they don't get up quickly.(A force tech is performing an attack to a grounded foe to force them up, which if done twice in quick succession, will force them up with you at am advantage, however only true mids and lows can do this and how quick you do it and the positioning of the stage also factor into it since certain attacks may push the opponent out of reach unless a wall "cages" them.)
If done on counter hit, the stun will cause trip fall stun that leaves you +9 to +10 depending on distance! The sweep also tracks, Counter hits will also be applied to foes who are sidestepping as well too making it a useful way to pest those quick to step you. If done in stages like the Road Rage or Lost Paradise stages that have slippery floors due to the water streams or the snow on the ground, it'll cause a more dangerous slip stun on counter hit that leaves you +45 as the opponent helplessly tries regain the footing, making it a very great opportunity to go for a nasty stun set up or throw attempt if you feel the opponent will try to hold or break hold. The only downside to this low is that it's unsafe at -15 when blocked, and you're left squatting in the recovery meaning both standing and low throws can be used to punish you... Be very cautious when using this. It's range is also barely average but the attack does have tip range properties, meaning it can be used while about mid range but tip range hits will result in halfed damage.
*PPK- A new revised command as previously mentioned earlier, a 20i spinning mid kick with 32i recovery. It tracks, and a normal hit will cause a +11 stun that can be used to further poke at the foe or you can use P to continue it into an actual stun set up. If done on counter hit or in stun, you'll gain a +16 forced spin stun, but besides using strings as a follow up, it can't be used really for launchers as her launchers tend to be slower and require longer lift stuns or longer stuns in general to be used from. Unsafe at -10 to -11 on block depending on distance, but max range hits on block can avoid most neutral throws and throws that lack range if spaced correctly. If done against a foe facing away, you'll gain a +7 stun putting you on the offensive.
°PP2K- Another useful string ender to help open up guarding foes, a 23i low vaulting kick with 26i recovery. It's relatively sneaky since it can be delayed nicely, and it covers a good distance, as well as causing a +8 low foot stagger stun that's good for turning the momentum back to you! Counter hits will result in a low trip fall stun that gives you a +10 advantage, while a close hit on high counter will result in a fall, however if done at tip range it'll just cause a regular counter hit stumble. If done in a stage with slippery surfaces or water areas, the low will cause a nasty +45 trip stumble stun on counter hit too!
Tracks, but is -15 on block and because it has tip range properties, the damage will be halved when done at max range.
°PK- Ends her high jab with a 12i high kick with 24 recovery frames. Being quick and blunt, it's good for using when at an advantage as it will jail on counter hit guaranteeing the kick. Will cause a +10 stun on normal hit and counter hit as well if both the strikes hit. If only the kick hits on counter hit or if the string is done in stun, it'll cause a +25 stun, and if done on a foe facing away the string will cause the +25 stun while only causing a smaller +16 one if the kick is the only strike to hit.
While the attack has its uses, it's not reccomended in corners since the kick will wallsplat in stun or on counter hit if only the kick hits. The move also doesn't track and is -11 on block, but it's actually possible to evade certain throws that lack reach if the kick part is properly spaced. The move is also endowed with good delay and can be used to throw off guarding foes who are quick to try to throw you!
°6P- Her fastest mid attack, an 11i mid punch elbow with 24i recovery. Being a swift mid, this attack is very well suited for scoring counter hits up close, but it suffers from short range meaning you'll have to be close up to get it to connect. It's -13 on block and normal hit but a counter hit or using it in stun will score you a +20 stun to work with, useful for mix ups since the move has both a mid tracking punch with special cancel options and a low with mid follow ups to watch out for! If done on an opponent facing away, it'll cause a brief +16 stun.
Doesn't track but it does have a tracking mid follow up to watch out for, and it will cause an outright +20 stun on crouching foes as well as somewhat higher damage.
~Play with me??: As a heads up, all of Mai's string options as well as all of her string ender cancel options except for 214P+K which is too slow are guaranteed against a backfacing foe!! Hot right??°°6PP> -Her 15i follow up twin mid elbow with 27i recovery. This tracks, has somewhat better reach and allows you you to cancel into her specials at any time! The move will only cause a +17 stun on counter hit and in stun because of its already good traits, but the string can be delayed nicely to throw off defending foes. Will cause a +13 stun on back facing foes and as previously mentioned, because of how the opponent is still forced to be backturned from the 6PP string, it'll guarantee all string enders and special cancels except for her slower 214P+K special cancel. Will cause a +14 stun to foes crouching on normal hit.
*6PK- Transitions into a low 20i vaulting kick with 27i recovery. The kick has great reach making it perfect for using at mid long range, although the tip range properties will hurt it's damage at max range. The crouch will also avoid highs easily but the move doesn't track and is -14 on block and hit, making it one of her worst lows to use since even its string enders are unsafe and don't track besides her Ryu-Enbu which is a slower ender to get before a sidestep attempt. Using it in stun or on counter hit will cause a minor +6 low stagger stun that can't be used much besides with her string enders but the advantage can be used to further poke and pester the foe with mix ups. If done on slippery surfaces or water areas, the low will cause a +16 low stagger stun on counter hit, which while not as major as her other lows, it can help get a quick stun set up going.
The low is also good for refloats that involve using its string enders, making it a good go to for lower launch juggle enders.
*6PKP- Follow up the previous kick with a vicious 17i downwards open fan mid punch strike with only 24i recovery. It's unsafe on normal hit and block at -13 compared to LR where it did stun, but it will cause a +20 stun on counter hit and in stuns, and will cause a +17 stun on foes foolish enough to crouch. If the strike is also done at the very limit of a critical stun threshold, it'll also cause a generic bound that can be used as a way to end with various attacks to push the opponent backwards or you can even end it with your go to string enders or close hit attack!
The strike is also a true mid, meaning it'll hit foes lying on the ground, and it'll also hit characters in special stances that avoid normal mids. Does not track but has good reach and can be delayed nicely.
*6PKPP- Ends the string with her Ryu-Enbu attack without having to actually special cancel. Identical frames and all, just a miniscule amount of better reach. Tracks, but is unsafe. 2nd part of the 2-in-1 avoids lows.
*6PKK- This ends the string with a very flexible looking angled 17i mid kick with 32i recovery. Will always cause a +23 lift stun on normal hit and counter, as well as in stun. Because she's considered squatting, this can actually evade highs when delaying it unlike her 6PKP follow up ender, and it's perfect as both a juggle ender or wall splat as it will interact with walls on normal hit as well. Does not track however and is -11 on block, and due to its squatting properties, both high and low throws will be able to punish it... However it can avoid throws if properly spaced at max range.
°4P>- A swift 15i high open fan jab with 24i recovery. One of her better attacks, this will always cause a lengthy +35 blind stun, and you can also cancel into her specials from this move! The move is unsafe at -13 on block but you can use her safe ender to bandage this, and although it lacks tracking, it's quick Ryu-Enbu cancel can help mask this as well besides being unsafe. Can be ducked and doesn't track. Useful as good refloat. Will cause a +16 stun when done against a backturned foe.
~This is gonna be hot!: When 4P is done on normal hit, all special cancel options will be guaranteed except for 214P+K! The same goes for if they're facing away!*8P- Standalone attack from the string ender 6PKP, except faster at 15i and slightly stronger damage. Far less reach and is still unsafe but frames and all are virtually the same. Does not track. Also a useful standalone true mid. Can be used as a force tech, with it providing +20 advantage when used as the 2nd strike to force the foe up.
*8PP- Same as the ender from 6PKPP, ends with Ryu-Enbu. Tracks and second 2-in-1 avoids lows due to the jump but is unsafe.
°2P- Mai's quickest low poke, a 13i low punch fan strike with 20i recovery. The move -1 up close, which in that instant makes Mai a 10i/12i/14i in punch neutral strikes and a 13i/14i/15i in kick neutral which can act as "pressure" against slower foes but makes it a bit of a risky position against characters about your speed, although the attack is +0 at max range. When used on counter hit or in stun, you'll gain +5 stun advantage, and using it on slippery surfaces on counter hit or as the final attack when you're about to exceed the critical stun threshold, you'll get a whopping +9! The attack is -3 to -4 on block but doesn't track and has poor reach.
Can also be used as a force tech although the pitiful reach requires you to be near a wall to "cage" the foe due to the pushback. Two 2ps in a row or using it as the second strike after a first tech strike will force them up giving you +24 advantage!
°3P- The standalone version of the ender from PPP, just faster at 13i and with one less recovery frame. Virtually the same, just slighlty better lift stun on counter hit with +32 instead of +31. Will cause a +17 stun against back facing foes and will cause an outright +32 normal hit lift stun against foes crouching. Does not track and is still unsafe unless you end with the safe ender. All string options are guaranteed against back facing foes.
°3PP- Ends the string with her Ryu-Enbu. Virtually the same frames and all. Useful as both a tracking option and as a swift refloat in juggles. Nice delay.
*3PK- Her safe Shinobi-Bachi ender. Useful as a string juggle ender and covers a good distance. No tracking. Virtually the same frames as the standalone 236K attack. Nice delay and great reach.
°3P2K- Virtually the same as her PPP2K string low ender, just with an additional recovery frame reducing the advantage to one frame less on normal hit and on counter hit. Will cause a +44 slip stun on counter hit in stages with slippery surfaces or water areas. Tracks but is still unsafe, and still vulnerable to standing and crouching throw punishes due to the squatting status.
°1P- One of Mai's best low pokes on offer: a 16i low fan poke with 26i recovery. Using her fan as an added extension of her arm, this makes the low have great mid long range reach, as well as crouching to avoid highs! On normal hit, it's -3 at tip range and -4 up close, and will cause a +5 stun on counter hits and in stun, making it a useful counter poke as well! It also will track as well, making it a good way to check sidesteps, and as an added bonus it'll cause a +3 low stun against back facing foes and a +33 low trip one on hi counter!
While useful, it's unsafe at -10 when blocked and it has tip range properties meaning it'll deal less damage at max range. When done on slippery surfaces or water areas, it'll cause a +11 trip stun, and it can also be used to tech up grounded foes, providing +19 if it's the attack that was used as the 2nd one to tech them up.
*66P/(While Running)P- Her forward dashing or while running attack, a dashing dual elbow 18i mid punch attack with 26i recovery. Covering a a decent mid far reach, it's a useful move for moving in and will cause a +2 to +4 stun on normal hit depending on the distance. While it won't be useful for a combo, the advantage can help you lead the offense and you can continue into a launching follow up with its ender. A counter hit will cause a +17 to +19 stun depending on the distance which is viable for mix ups or stun set ups since the opponent still has to watch out for the mid kick launcher. Will soft wall splat on counter hit, giving you a meaty +34 stagger stun to work with and also guaranteeing the launcher!(Which will also wallsplat).
When performed on a foe facing away, it'll cause a limbo back fall stun that forces the opponent to fall and will not be able to be held out of giving you +61 advantage which is enough to connect attacks that are 25i or faster. Unsafe however at -7 to -9 depending on the distance.
*66PK/(While Running)PK- Her ender to her elbow attack which is a 23i backflipping jumping mid kick with a lengthy 35i recovery. This is her only ender from the string, making it what you call a static string: a string that has only one possible ender which may seem bad, but actually the mix up is making your foe think that you'll go for it, which makes it a good mind game when you score a 66P on counter hit! The move launches on normal hit but using it stun or via a counter hit will provide a much higher launch height. Using the attack on crouching foes and back facing will provide higher launches as well, and the entire string is guaranteed on foes facing away too! The move lacks tracking though, and is unsafe at -13 when blocked, but using it at max range can often avoid most neutral throws and throws that lack reach. Also useful from certain launches and attack knockbacks as a refloat, especially when near walls since the kick doesn't wallsplat, but space carefully since the 66P will cause a splat from a launch or knockback.
°K- Her quickest kick which is a 12i high kick with 24i recovery. It has decent reach, with it being able to avoid most throws at max range. Causes a +8 stun on normal hit which allows you to either use the advantage to pester the foe or you can combo into her kick follow up. A counter will cause a +25 stun like her PK variant, and using it on a back facing foe will cause a +16 stun that will guarantee ALL of her additional kick follow ups from this string, including even her special cancels from the very last kick besides 214P in open space(The first 2-in-1 will whiff in open space which will give the opponent time to execute a break hold) and 214P+K which is too slow to connect before they can hold again. Unsafe at -12 when blocked and does not track, as well as being vulnerable to being ducked or crushed by attacks that evade highs. Will also wallsplat on counter hit and in stuns.
*KK- Adds in a 14i high kick that also has 24 recovery frames. Slightly better stun on normal hit since it will always cause a +25 stun making it very useful for mix ups since the entire KKK kick string is a static string. Will also cause a +16 stun on back facing foes which will guarantee the final kick and all previously mentioned special cancels like the initial kick before it. -12 when blocked and no tracking and can be ducked. Can be delayed nicely.
*KKK>- Her final kick which is a 17i vaulting high kick with 27i recovery. Will always cause a +22 stun on normal and counter hits, and you're able to quickly cancel into a special move too, although I generally regard this as her worst move to cancel from outside of stuns since the kick causes a knockback that will basically prevent cancels from connecting, and the kick will always wallsplat. The cancels listed previously will all be guaranteed from its +14 back facing stun if the foe is facing away besides 214P in open spaces(First hit whiffs when not near walls) and 214P+K. Unsafe at -15 when blocked and doesn't track but it's pushback when spaced correctly can often avoid neutral throws and throws that lack reach. Doesn't track, but this can be bandaged with her 214P ender and you can use 236K as a way to end the string safely if you need either a tracking ender or one that will discourage throw attempts.
~Play with me?: KKK is a viable way to end juggles when you want to pursue a force tech, since you can use attacks as slow as 1K which is 20i and as fast as 2P which is 13i to go for a tech attempt if your foe doesn't tech up which will leave you still at an advantage! The KKK as as ender can be used after most juggles against light and mids, but heavies can't be juggled with 3P+K or a max threshold 3P launch.°6K- One of Mai's quicker pokes, which is 13i mid kick with 25i recovery. Having good reach, it'll always cause a +4 stun on hit turning the momentum in your favor! If performed on foes back turned, it'll cause a +15 stun that can be used with quicker attacks to initiate a stun set up. I regard this move as a general safe mid poke since it's safe at -3 and there isn't really any drawbacks to using it besides watching for potential expert mid kick holds that may quickly deplete your own health. Doesn't track however.
°4K- Her 16i high kick that has her performing an axle kick with 25i recovery. This is one of her quickest ways to score a stun on normal hit, as you'll be given a +24 stun, and a +30 lift stun if performed in stuns or via counter hit. Can also function as a sort of low launcher when in a pinch but counter hits and stun usage will cause a wallsplat. Relatively semi safe at -7 when blocked and 7i throws aren't even quick enough to punish it, meaning foes will have to use a neutral grab to even attempt to throw you. Also tracks as well. Will also launch the foe when backturned allowing an easy yet odd way to score some quick damage!
*8K- Mai's 15i high kick launcher with 25i recovery. Being relatively a mid close range move and being -13 when blocked, it's not a wise move to use outside of stun as it can be be crushed by lows and can be beat by quicker strikes. If it does somehow hit on normal hit, you'll gain a +30 lift stun, but using it on counter hit or in stun will cause a a good launch for juggles. Doesn't track.
*7K- a new tool Mai gained in DOA6: A 15i backflipping mid dual kick jump with a lengthy 38i recovery. It can avoid lows when timed right due to the jump, and it'll launch on normal hit although the low launch and recovery make it near useless, but a higher launch will result from counter hits or in stun. Because of how quick it is, it's useful as a quick panic move when dealing with foes who are free cancelling or getting obnoxious with the low pokes. Very unsafe however at -30 when blocked, but high throws and strikes will not be able to punish it since you're considered crouching while recovering, your foe will have to either low throw you, low hit you, or they can perform a mid that will often cause more dangerous stuns on foes crouching or considered crouching... Also be wary since the move does not track, but the move can be used from certain launchers as a refloat, but only up close due to its poor reach.
*2K- Mai performs a quick 14i crouching low kick with 25i recovery. It lacks reach and is unsafe on normal hit at -9 to -11 and -15 when blocked, and it has tip range properties meaning it'll do even less damage from afar. If it hits on counter hit, you'll gain +10 to +11 with a low stagger stun. Although situational, if you perform this move on a backturned foe, it'll cause a nasty +34 trip stun! Does not track and has poor reach making it more suited for close range usage. Can also be used as a force tech that'll force the foe up with you gaining +19 advantage if the kick was the 2nd strike to force them up. Will also cause a +12 to +13 trip stun on counter hit in stages with slippery surfaces or with water areas.
~Play with me??: If Mai performs 2K on normal hit, her 2nd low follow up with be guaranteed since it jails on hit!°2KP- Her follow up which ends the string with her 2P. Virtually the same frames and such besides slightly better reach, and the string will jail on normal hit. Useful as a low poke to pester standing guard foes. Although the 2K will connect when attempting a force tech, the 2P will whiff so avoid using it unless trying to get an out of reach foe so only the 2P portion hits. Has good delay although this will negate its jailing abilities.
*2KP+K- Another unique attack of Mai, she ends the string with a 17i crouching mid angled fan mid punch with 29i recovery. Being considered crouching, this is a high crush and will allow you to evade high strikes with ease, and on top of that it tracks! On normal hit, you'll be +0 from the stun which is perfect since the pushback resets the neutral as well giving you space to either rush in or establish an iron keep out or spacing game. Counter hits will cause a +15 stun allowing you to create a stun combo set up, and the ender soft wallsplats giving you a +34 stun to work with. The string is also guaranteed on back facing foes too netting you a +11 stun. Unsafe however at -9 to -10 when block depending on distance.
°3K- Mai performs a ranged 14i vaulting mid kick with 24i recovery. Having great reach and being fairly swift at mid range, this is a useful poke as it leaves you -3 on hit, and will cause a +20 stun on counter hit and in stun. Using it on foes facing away will score you a +16 stun, and you can use this in stun set ups in open space to cause a knockback fall at the end of a critical stun threshold so you can go for a no timing force tech set up with attacks like 1P! Soft wallsplats on counter hits as well giving you a meaty +39 stun to work with.
While it does not track, it's semi safe at -7 limiting your foe to neutral grabs to punish you, although you can easily avoid these throws when the move is done from max range.
*1K- Standalone version of the low from 6PK, same frames and all and properties besides slighlty better reach. Unsafe and doesn't track.
*1KP- Standalone version of the ender from 6PKP, same general frames and properties. No tracking and unsafe but still has a tracking ender. True mid. Good delay.
*1KPP- Ends the string with the same Ryu-Enbu, tracks and 2nd 2-in-1 avoids lows but is unsafe.
*1KK- Standalone version of the 6PKK string, same frames and all. Unsafe and can be both standing and low throw punished due to the squatting recovery. Doesn't track.
°°66K/(While Running)K- Mai's new attack that replaces her old command from LR, which is a leaping 20i jump dual mid kick with 38i recovery. It has great reach and will always cause a hard knockback on hit and it has close hit properties, meaning it'll deal higher damage up close! It's also a guard break as well with the advantage vastly changing depending on distance: Max range hit on block will leave you +1 to +2 when spaced right while a closer hit will leave you +0 to -4(-4 being if you're right in their face), making this a viable spacing tool or keep out tool when moving in or trying to keep foes out, as well as it avoiding lows. Wallsplats but can't really be used since the recovery is so steep. Lacks tracking as well so be wary since the steep recovery can cost you a good deal of health... This is her go to bound set up ender so always go for a close hit by hitting as close as possible after the bound!
Will also cause a +36 to +44 rebound rope wall stun in stages that have rope wall properties like the Muscle or Sweat!
°46K- A returning move that many thought was gone for good in LR, it was later patched back in! This is a 20i briefly swaying back jump mid kick with 24i recovery. Covering good reach, it causes a +19 to +21 stun on normal hit depending on the distance, and will cause a nasty crumple stun that will make the opponent fall UNLESS they hold, making it a risky situation for them to be in since they risk either falling or trying to correctly hold and wind up getting hit again, launched or thrown for high counter damage! The stun is also lengthy enough to allow any attack that is 30i or faster to connect too! The move also can crush numerous attacks including highs and some shorter ranged mid attacks due to the brief sway back during the start up, and the jump evades lows too. The move will also cause a +15 to +16 stun when executed on foes facing away.
The attack is unsafe up close at -8 when blocked, but it does have a high kick follow up that can be delayed nicely to throw off throws quick to throw. The move is also -6 at max range!
°46KK>- Ends the string with the same kick ender from KKK, except slower at 23i but besides that the attack properties are pretty much the same besides this having better reach and only giving a +5 stun on normal hit. Like KKK, you're able to cancel into a special making it dangerous, and you can use the string for the same guarantees as KKK too! No tracking and can be ducked. Wallsplats on normal hit.
°P+K- Her returning move from LR, her 20i dual open mid punch fan attack with 25i recovery. Has good reach making it useful at mid range, and it causes a +19 stagger stun on normal hit allowing stun set ups. The move will cause a crumple fall stun on counter hit and in stun as well, as the stun is lengthy enough to connect attacks as slow as 30i. Will soft wallsplat on normal hit gaining you a +38 stun, and the move causes a +15 stun against foes facing away, and using it in juggles or after specific knockbacks like a bound can create massive distance since it provides a very big pushback that sends the foe rolling to the far side of the screen. Doesn't track and is -9 when blocked, but max range hits can avoid some neutral throws if spaced properly.
°2P+K- Standalone version of the ender from 2PP+K, virtually all of the same frames and all. Avoids highs and tracks, but poor reach and unsafe.
*3P+K·P- An 18i upwards swiping fan mid punch with 28 recovery frames. This is one of her launchers, although one of her less useful ones since its slow and rather unsafe at -13 when blocked, but it provides a +27 to +28 lift stun depending on distance. Will outright launch in stun or on counter hits allowing you to either use a juggle combo or you can go for her bound set up from her 9P forward jump stance by pressing P to cancel into the jump, and then pressing KK to perform the bound. However you can only enter the P cancel jump stance on normal hit or counter hit, otherwise you won't be able to. You may also use the P cancel as a feint to bait a hold or to keep advantage since depending on distance you'll be left either +3 to -3 depending on how quick you entered the jump stance. Doesn't track but it will launch outright against foes facing away.
*H+K- Her 15i jumping mid knee launcher with 24i recovery. It's unsafe at -14 when blocked and isn't really useful on normal hit since the launch can't be used to really do anything besides going for a no timing force tech set up. If done on counter hit however, it'll provide a decent launch that can be used for a quick launch. Wallsplats on normal hit and will cause a counter hit type launch against back turned foes and can avoid lows. Doesn't track and has poor reach making it more a close range move.
°6H+K- One of Mai's better ranged tools, this is a jumping 25i mid leap kick with 25i recovery. Despite its slow speed, it's perfect for using at about mid far range and will cause a +19 stun on normal hit. Using it in stun or on counter hit will result in a special rollback bound that allows you to continue executing a juggle type combo or you can even perform your close hit attack as it will count as a close hit up close! Wallsplats on normal hit and will simply knock back against back facing foes. Semi safe at only -7 up close and being -6 at max range. Doesn't track however but can evade lows.
*4H+K- The standalone version of the mid kick ender from PPK, tracks but is slow at 20i and still unsafe.
°8H+K- Her fatal sit down attack or fatal stun attack that doesn't require a fatal rush: a Jumping 25i downwards mid kick with 27i recovery. This will instantly place the foe in a stun that can't be escaped from with normal holds and will require a break hold to escape if your opponent is willing to pay that cost to escape the guaranteed damage, otherwise they'll fall if nothing else is done. Evades lows and covers a good mid reach, and will wallsplat on normal hit, so avoid using this near walls as it can foul up a launch set up. Using this attack before executing a launch will also let you get the best launch height from all of her launchers besides highs which don't connect from this stun type. Using this at stun's max threshold or twice will cause a generic bound that can be used for follow ups but not really anything extravagant, but her close hit move will count as a close hit up close from this bound too. Unsafe however at -13 and doesn't track but can evade lows.
°2H+K- Standalone version of the vaulting crouch low from PP2K, same frames and all and is still 23i. Tracks and has good reach but is unsafe still and has tip range properties that can affect its damage at max range. Can be used as a force tech and will give you a +17 advantage if it was the 2nd move used to force them up.
*2P(While foe is on the ground)- Her 17i light ground attack that has her viciously stab jab her closed fan into her foe's prone body as if using a knife. Quick and can easily beat out wake up kick attempts but it's 31i which means it can be risky to whiff if the foe techs up quickly backwards. Lacks reach but is swift.
*8P+K(While foe is on the ground)- Her heavy ground attack, that has her leap through the air to perform a vicious 40i body crush landing on their back or torso. Covers a good distance but is very risky when whiffed having a long recovery and a brief squatting position that can be both standing and low throw punished. Lacks speed but is stronger and better ranged.
~Back-Facing Strikes~
°P- Her 9i strike while back turned. -2 on block and hit but +1 on counter hit and guarantees PP and PK. +36 stun on hi counter stun as well. Doesn't track but links into the same strings as her regular P facing forward.
°4P- Her 11i mid punch strike while facing away. Links into the same strings as her regular 6P facing forward and causes a somewhat higher +31 stun on counter hit but is -13 on hit and block. Doesn't track
°2P- Same as her 2P facing forward, but -5 when blocked. Same general stuns and advantage on block.
°K>- Executes the same kick ender as 46KK, just faster at 15i. Same general advantage but slightly less reach. Unsafe at -15 when blocked but you can special cancel into her special moves this as well! Doesn't track.
*4K- Executes the H+K command while back turned. Slightly higher damage.
°2K- Executes the same sweep as 2H+K facing forward, just faster at 18i and one less recovery frame.
-And that covers all of her moves!! I will update this section with a few minor things like rope wall stuns and such down the line! Now we will get into her throws!!
Section 7: Mai's Throws Explanation
Mai does have a punish throw however that's useful when foes are recklessly holding and she also does have a launcher throw in 6 now! She also has an air throw that can be used from certain heights for unscaled easy damage! Damage in parentheses and with a ° will represent general wall damage if done near a wall. So let's get into it:
~N:45(55°) C:56(66°) HC:67(77°)~
~Mai's quickest throw being 5i and having 23i recovery. She goes on her foe's shoulders with a handstand before grabbing their neck to toss them to the floor face first in a dramatic fashion. Decent distance left between the both of you. Interacts with both walls and floors for extra damage or to cause a floor break transition in stages like the Forbidden Fortune. Quick but lacks reach and is a neutral throw, so a well timed throw break can be performed with T, leaving you -5. This is unfortunately the only throw in her arsenal that can interact with walls.~Play with me??: Remember, all throws tracks meaning they'll grab sidestepping foes and will deal counter hit damage!!!~N:50 C:62 HC:75~
/~Mai's 7i throw with 24i recovery that can be done both with the forward motion or back motion when throwing. She performs a flip on her foe's head as she manages to get their head in between her feet so she can fling them face down if done with 6T or back down if she performs it with 4T, leaving Mai briefly in a lying position. This throw will deal the exact same damage no matter if you want to toss the foe forward or behind you to switch sides, although the forward throw has better reach. Interacts with floors. Both leave a decent amount of space between you and the foe. ~N:16(30 from ground hit*) C:20(37 from ground hit*) HC:24(45 from ground hit*)~
~Mai's 10i launcher throw with 25i recovery. She launches her foe into the air with a beautiful fan barrage giving you the opportunity to pursue a juggle before they fall taking damage. Useful since its quick and very well suited near walls and in open space for good damage potential. The fall will also interact with floors if no juggle is performed.~N:62 C:77 HC:93~
~Mai's 12i punish throw with 26i recovery. She handstands on her foe's shoulders before squatting atop them to summon a massive fiery explosion before jumping off. Has good reach and will interact with floors, as well as leaving good distance between you and the foe! Her best throw when wanting to punish missed holds in stun.-Just a heads up that all of Mai's Throws can be performed to foes who are backturned which will result in 10 more damage on normal hit, 12-13 more on counter hit, and about 15 more on hi counter. The only throw that can't be used against a backturned foe is her launcher 66T which will become her regular 6T.~N:50 C:62 HC:75~
~Her only low throw which is a 5i one with 22i recovery. She handstands her crouching foe's shoulders to force them down before doing a jumping dual knee drop to slam them in the dirt and she flips off. Leaves you a good distance from your foe and will also interact with floors. Decent reach.-This throw can also be done to back turned foes, dealing 10 more damage on normal hit, 13 more on counter, and 15 more on hi counter!~N:32 C:40 HC:48~
(To launched foe in the air)~Her jumping 8i air throw she can perform if the foe is launched high enough in the air with a lengthy 50i recovery if whiffed. If it connects, she'll grab the foe in mid air and do a dual knee drop to them in the vein as her crouching throw, leaving a good distance from your foe. Interacts with floors and is great for getting easy unscaled damage, but longer combos will cause the air throw damage to be scaled down, with the first scale being about 28 and then the second one being about 25.The scale after that will be variable depending on how long the combo is including break blow cancels, and the lowest I've gotten is about 21 to 18, so be wary about the lessened damage when used in lengthier combos.-Hot right?? That covers all of Mai's Throws, remember to use them wisely as throws will lose to strikes putting you in a dangerous hi counter situation! Now let's ease into her holds!
Section 8: Mai's Holds Explanation
~Remember, the better the timing of the hold, the more damage it'll cause, so if you know what is coming, sometimes it's best to wait for the attack to JUST about hit you before holding, since that'll result in more damage. A hold that's just thrown out will do normal damage, a better timed hold will do counter damage, and a hold that's executed JUST as the opponent will hit will do optimal max damage. Holds done in stun will also do less damage than a raw hold.(Vs. High Punch)- Mai intercepts her foe's high punch and returns the favor with a mean open fan slugger punch that knocks them back a good distance. Interacts with walls and floors.(Vs. High Kick)- Mai stops her foe's high kick with one arm before performing a low open fan sweep with her arms to trip the foe, making them fall hard on the floor on their face. Leaves you a decent distance away from the foe to retreat and interacts with floors.(Vs. Mid punch)- Mai intercepts her foe by pushing their mid punch attack out of the way before roasting them with two Ryu-Enbus in a row, flooring them. Leaves a good distance between the both of you, but the opponent can tech up quickly after the hold. Interacts with floors.(Vs. Jumping Mid Punch)- Mai quickly jumps in the air to quickly shut down her foe's jumping mid punch, using her thighs to secure their head in between them as she pile drives them into the floor, flipping away with seductive hubris. Leaves a decent space between you both, and interacts with floors as well.(Vs. Mid Kick)- Mai quickly intercepts her foe's mid kick before delivering a harsh high kick similar to her KKK ender that knocks them back a good distance. Interacts with both floors and walls but can be teched up from to recover.(Vs. Jumping Mid Kick)- Mai jumps in their air to stop her foe's mid kick in their track s as she handstands on them before sending them into the ground on their back with a hard hitting dual knee strike. Interacts with walls and leaves you a good distance from your foe.(Vs. Low Punch)- Mai quickly grabs her foe's arm before slamming them to the ground with her 8P attack. Leaves you relatively close to the opponent but does interact with floors.(Vs. Low Kick)- Mai humiliates her foe for by stopping their low kick in their tracks before flipping atop them to forcibly sit her weight on their upper chest area. Interacts with floors but leaves you fairly close to the foe.-That should do for her current holds, now let's get you into some of her combos!!
Section 9: Mai's Hot Basic Combos & Set Ups
- This section will teach you some simple combos that work on everyone, as tested on Rachel who is possibly the heaviest character in DOA6! These combos should give you something to work with but feel free to experiment and see if you can find better ways to get that damage! Let's begin:
-KK>3P+K·P~KK(BOUND)>(Dash for close hit)66K(Close hit) ~70 Damage~
-4P~214P+K>6PKK ~48 Damage~
-66T>(Right after launch)>4P>T(Air throw) ~55 Damage~
-8H+K(Fatal Stun)>3P+K·P~KK(Bound)>(Dash for close hit)66K(Close hit) ~68 Damage~
-66PK>6PP~236K ~54 Damage~
-4K>3P>46K>6H+K(Backwards slide bound)>9PKP+K ~94 Damage~
-4H+K>P>P+K(Crumple stun)>H+K>6PP~214P>6PKK ~79 Damage~
-(Counter hit near walls)4H+K>PPK>P>3K(Soft Wall splat)>(free step behind foe to go behind them during stun)2K>6H+K9PK~P+K ~130 Damage~
-(Vs foe sidestepping)S(Causes fatal backturned stun)>66P(Limbo stun)>2K>8H+K(Fatal stun)>3P+K·P~KK(bound)>(Dash closer for close hit)66K(Close hit) ~94 Damage~
-(Counter hit in slippery surface areas)2H+K>6T(Throw bait, ok to whiff)>P>46K(Crumple stun)>6H+K(Roll back bound)>9PK~P+K ~113 Damage~
-(Counter hit)8K>6PP~214P(refloat)>6PKK ~63 Damage~
-(Counter hit)H+K>6PP~214P>6PKP ~64 Damage~
-(Counter hit)46K(Crumple)>P+K(Crumple)>SS(Fatal stun)>6H+K(Rollback bound)>9PKK(Bound)>(Dash closer for close hit)66K(Close hit) ~103 Damage~
°There we go! This should give you something to work with, I'll add on more in time but let this be a foundation for expanding on Mai's awesome hot combo damage! Now let's move on to a sample of her offensive tools!
Section 10: Mai's Offensive Pressure Tools
-This section will shed light on moves Mai can use to pack on the pressure when you have the offensive lead! Just to note tho, Mai is not a pure offensive rushdown character, she almost always must have a counter hit or an opening to get her offense started. Here's the tools you'll need to do so:
°2P/2KP- One of her better tools when trying to open up foes, if done at max range you'll be +0 and the -1 up close isn't too bad against characters slightly slower than her, and it's not at all a real hindrance when facing slow characters as Mai will only have one frame added to her moves in that instance. A useful way to open up turtles but do watch out for blocks and sidestepping opponents.
-9PP- Another way to end at a rather safe note on block, as you're left -1 up close and +0 at max range, and it tracks! Can be ducked but the fact that her 9PK is a mid makes this 50/50 situation a risk if they guess wrong. Useful from a distance when wanting to move in.
°236P- Her high projectile, which is surprisingly a nuisance! From afar, the foe is gonna have to duck, sidestep, or crouch to avoid it and it can prove a real pest when the clock is ticking. Can be ducked but it has pushback on block and hit, although the foe can hold it up close. Useful for creating a sort of iron wall to prevent the foe from being able to easily rush you in tense matches as well as being a quick way to passively attack when they're at long range. Depending on how your foe reacts to the move defensively, you can edge them close walls or danger zones if they freestep, and you can also force them to hold their position if they crouch, but be wary of crouch walks.
°66K/(Max range to long range only)- A useful pressure tool when at max to long range since you can be +0 to +2 when spaced correctly from the GB, as well as avoiding lows and having good reach as well. Even if done up close, you'll be -4 on block at the first and the max range pressure may be enough to make a wary player nervous to strike you, although for the most part you're still at a safe disadvantage up close. Can be stepped however so don't be too reliant on this. Using this move as a pressure tool for advantage is very dependent on your knowledge of spacing and zoning so practice is advised.
°6K- Her safe 13i poke, good range, safe and is always +4 on hit, and is relatively safe to chuck out since it's not very unsafe although faster grapplers can still grab you when blocked. Doesn't track but it's use as a safe poke making it very suitable for throwing out when in situations where a speedy mid is needed at mid range.
°(Strings with the 2K sweep low like 3P2K & PPP2K)- Useful as a way to open up foes since you're left +8 on normal hit and +9 to +10 on counters. Also tracks but it lacks general range compared to her other moves and it's unsafe and can be both standing throw and low throw punished making it a huge risk against characters with stronger throws and such since you're left squatting. A useful general low but definitely can't be abused.
°2H+K/PP2K- Another useful low, this 23i low is useful for popping open guarding foes and gives you a +8 stun to pursue pressure. Also has good reach and it tracks. While it isn't considered squatting meaning that only lows can punish it, it's still -15 making it still a risky move to use, however it's still generally a less risky tool compared to her other low variants that lack the reach this has and that can be punished by both standing and crouching throws.
°PP- While not an outright pressure tool since you're left at safe disadvantage on hit or counter hit, this puts the opponent in a situation where they'll have to react after the jabs since PP will jail on normal and counter hits. You can go for a quick tick throw if you think the opponent will continue to guard, or you can use the string moves to punish specific reactions; PPP will blow up crouches, PPK will blow up crouches and sidestep attempts, and PP2K will easily help you gain advantage if the foe doesn't crouch to guard it, and it tracks making it another useful option. PP however can be ducked and high crushed and free cancelling it can be a risk if the foe knows you're aren't trying to delay the string.
Section 11: Mai's Anti-Sidestep Tools
-This section will shed some light on Mai's tools for sidestepping, since in 6 stepping is far easier and can quickly blow you up if you don't take the precautions to shut down steppers. Tracking moves are not only useful for this, but it'll cause a counter hit effect as well which greatly augments it's abilities! This section will cover Mai's tracking tools and her in string ones that are useful. But be aware, there are characters in the game who have alternative ways to sidestep without using the universal generic sidestep system and that may also have special benefits. They'll be listed below:
~ Has her Jakeiho that can be used from moves as well as a standalone stance. Avoids linear attacks AND highs as well, making high tracking near useless against her. Her 7P can also avoid tracking high strikes as well too. Doesn't affect or hinder Mai much since she doesn't really rely much on tracking highs, she has plenty of mid strikes that track for that with lethal counter hit properties.~Has a special sidestep that avoids linear attacks, but doesn't do anything else special besides that besides having a mid follow up that can cause a stun that can be comboed on CH, but it's unsafe at -9 via block.~ Her minuet stance avoids linear attacks and also evades tracking lows and has an unsafe but powerful close hit fling attack. Doesn't hurt Mai much although this can be a pest with her tracking lows.~ Has a special sidestep from her Bokuho stance that already avoids highs, and it has an unsafe -9 follow up that gives a +19 normal hit stun. She can also evade mids and tracking mids as well with her Bokuho duck, but this doesn't truly effects Mai thankfully as she has her 15i 8P as a true mid and it has a tracking follow up as well albeit unsafe.~ Has a special spinning sidestep that can evade linear attacks but that's about it. Has a 43i launching mid punch and a crouching 38i low that leaves her +13 on hit, putting you in a situation where you'll have to guess to stop her.~ Has a rolling sidestep stance that avoids linear attacks and tracking highs, and he can also confirm into a 35i offensive hold. Can be crouched however and low punished.~ Has her 44P which avoids linear attacks on start up, but it can be shut down easily with quick combo attacks since its built to only avoid one attack at a time. Safe and causes a blind stun on successful hit but it's a high and can be crushed with Mai''s tracking lows and her 2P+K or 2KP+K which avoids highs and is a tracking mid and ender for the latter.-Lets now begin on her hot tracking tools!
°S- Her easiest and probably most lethal tracking move, an 18i high. Puts the opponent in a fatal stun on normal hit that will guarantee her next attack or launcher if the foe doesn't have the meter to escape the stun. When done against a foe caught stepping, it'll cause a forced backturned spin stun that leaves the foe wide open for a guaranteed set up, with 66P causing a back limbo fall stun in this situation. Is unsafe however and be easily high crushed.
°1P- Her 16i tracking low poke, quick, has reach and is ok to use outside of stun as it leaves you at safe disadvantage on normal hit. It'll cause a +5 counter stun against sidesteppers, and it avoids highs making it a good crush. Unsafe however when blocked.
°4K- Her 16i spinning high kick that stuns on hit, and causes a +30 lift stun against foes caught stepping. -7 as well being semi safe and only vulnerable to neutral throws and quicker based throws. Can be crouched and it's range is more suited for close quarters.
°6PP- Her in string 15i mid elbow, swift and will cause a +17 stun vs steppers. Unsafe at -17 on normal hit and block but has a safe ender and a tracking mid ender to watch out for.
°4H+K- Her standalone mid kick that tracks, is slower at 20i and unsafe but can avoid neutral grabs at max range, and causes a +16 stun against sidesteppers. It's in string PPK variant is also useful as a way to catch steppers who like to step to evade linear strings.
°214P- Her quickest tracking option being only 12i, it'll cause a +16 stun against reckless sidesteps, and it's also present at the end of strings like PPPP, 8PP and 3PP making it suicide to step against. Has decent reach and can also evade lows but is unsafe and can easily be thrown so don't get too content making this a go to.
°214P+K- Her 28i launcher, unsafe and not truly useful by itself but it can catch foes from specific strings like 4P and 46KK as its special cancel to catch foes trying to evade with a sidestep. It launches a decent height allowing a combo follow up but be wary of holds as it'll cause an evade hold, and it's unsafe when whiffed and blocked. Has 3 auto hits in total that the opponent must be wary of.
°2H+K- Her 23i tracking low that gives you +10 trip stuns from tip and close range. Unsafe but is useful by itself and in string from PP2K. Good general reach and is useful for gaining momentum to score a chance to land the next blow.
°2K low from strings like 3P2K & PPP2K- Another useful low that can nail stepping foes. Also leaves you +10 but this is a riskier low since you can be punished with both standing and low throws due to the squatting recovery. More useful against foes who like to step mid string.
°2P+K- 17i mid tracking move that ducks highs, unsafe but is a decent attack to use since it'll leave you +0 on normal hit and you gain a +15 against sidesteps, which is great for special sidesteps with a high attack tacked on!
°9PP- A good go to from a distance. This is a decent ranged 30i high fan swipe that causes a constant +25 on normal hit. It's reach makes it crucial from a distance but beware it's weakness of being easy to duck and high crush. Relatively a safe option as well since depending on distance, you'll be +0 to -1 if the foe opts to block.
Section 12: Mai's Defensive Tools
- This section will help highlight some good defensive tools Mai can use when she's being pressured or when you need to successfully crush or counter your foe to gain the momentum back! While it may be safer to block and even hold when forced in some situations, Mai has the appropriate tools to help offensively get the opponent off of her. Be wary however that since Mai is more suited for offense and spacing, she's not truly adept in the defensive field, but she's not truly lacking either, as she does have some useful moves that can quickly turn the battle in her favor. So let's begin:°46K- One of the better punishes and crushes in the game, this attack briefly sways back to avoid high attacks and some poor ranged mids to perform a 20i jump kick. It has good reach and a high follow up that allows you to cancel into her specials, as well as causing a crumple on counter hit! Also avoids lows as well but this lacks tracking and safety. Still one of her strongest crushes to use offensively and defensively.
°2P/2KP- A useful low both by itself and in string being 13i and being safe. Leaves you +0 to -1 on normal hit depending on distance and it avoids highs. 2KP also jails as well, making it a useful nuisance against foes who are pretty fond of using highs. Lacks tracking and general damage however.
°2P+K/2KP+K- A useful high crush since this mid avoids highs! 17i and unsafe but is very useful when being pressured with highs, leaving you +0 on normal hit and causing a decent stun when used to successfully counter foes. When done as the string ender from 2K, this can also prove deceptive as you can delay it and the low can catch foes who are stand guarding. Also tracks as well.
°1P- Another high crush: a 16i low that tracks and has good reach, leaving you at a safe disadvantage on normal hit and causes a small low stagger stun on counter hits, making it useful for turning the momentum back in your favor from mid to close range. Unsafe however so don't abuse this.
°7K- Her 15i backflip attack which is useful as a quick panic move when dealing with free cancelling foes and opponents who like to frequently delay strings. The flip automatically low launches foes back and you're left crouching which forces them to have to low throw you if they successfully guard. Unsafe however and doesn't track, and it's range is poor so only use when backed into walls or in your opponent's face.
°2H+K- Her 23i vaulting crouch low, has good reach and is useful as a meaty high crush when being pressured although it's somewhat slow. Causes a good stun to turn the advantage in your favor and also tracks but is unsafe.
°6K- Not a true defensive tool but being 13i, safe on block, and having good reach, this can be a good way to check free cancels and string delays with slower intervals before the next strike lands. Causes a decent advantage on hit as previously mentioned and no real weakness besides being linear and can be stepped.
°7P- Although not an actual attack, this has her perform her backwards jump that can actually avoid attacks like wake up kicks and even some follow ups from strings with lacking range including lows due to the jump, giving her a pesky way to retreat away from foes pressuring you up close or at mid range when used carefully. Avoid using when near walls as you will perform a wall grab that can become a wrong move if the foe is closing in unless you can somehow use the wall follow ups from using P to jump off it to counter hit your foe.
Section 13: Mai's Hot Zoning & Ranged Tools
-This final tool section will highlight Mai's assortment of ranged tools and spacing moves which is perhaps her strongest area, as well as having some of the best reaching and range in the current DOA6 game! While Mai can be a pest up close, her mid and long range game is definitely not lacking at all and she can quickly make it a maelstrom of hellfire for her opponent to bypass her fiery ranged keep out game! So let's get into it!! ~PLAY WITH ME??: Keep in mind that Mai has several moves that have varying safety and pushback depending on how close or far she hits her foe with the move, and she also has lows that have tip range properties, which lowers the damage!°6K- One of her simplest ranged tools: her 13i mid kick. Safe, has good reach and will give her a +4 stun at all times, useful as a general poke up close and at mid range. Lacks tracking.
°236P- Her fan high projectile which is her longest ranged tool she has. Full screen, and is relatively swift at 18i and causes a varying stun depending on range that can't be used to actually combo into anything, but it can be a nuisance. The foe can't actually physically hold it unless up close, and you can duck or free step to avoid it, which may seem linear but if you have the life lead and the clock is ticking, you can use this to waste the foe's time since ducking, sidestepping and free stepping isn't exactly a quick process to get closer in. Unsafe however at -22 when blocked up close and specific characters may have the appropriate tools like stances to avoid it. Kasumi can also easily teleport behind you with her teleport parry holds so try not to use this much against her in particular…
°3K- her mid vaulting 14 kick, good reach and is safe on hit at -3 and semi safe on block at -7. Can be spaced to avoid short ranged neutral grabs and will cause a +16 stun on counter hit. A useful mid range kick to use when wanting to use a counter hit poke that isn't too unsafe, but can be stepped.
°66K- Her close hit 20i forward jumping kick, has good reach and is safe up close when blocked by -4 to -1 depending on range and longer range will leave you at +0 to +2. Very useful as a ranged GB poke or long range GB poke to gain small advantage against slow and fast opponents alike, and it can crush lows! Can be stepped.
°66P- Her forward thrusting 18i elbow attack, useful for moving in, but is unsafe at -9 on block up close but semi safe at -7 when spaced. Somewhat slow and more mid range oriented but scores you either a small +2 to +4 stun on normal hit and a more meaty +17 to +19 stun on counter hit. Also has 66PK as its ender which may deter foes from throwing you since it can be delayed and the ender also has good reach and launches and avoids lows, although it's unsafe and can be punished since its -13 when blocked, but spacing can avoid some throws. 66P will also cause a stagger limbo fall stun against foes facing away.
°6H+K- Her 25i jumping forward mid kick, avoids lows and has great reach, making it perfect for running in as a counter hit mid long range attack. Normal hit will cause a +19 stun while a clean counter hit will cause a rollback bound that can be used to juggle foes briefly, or you can jump in with 9P to execute her K·P+K attack throw sequence or you can go for her bound set up. Semi safe to safe at -7 to -6 when blocked making it a safer option but like most of her other ranged kicks, it lacks tracking.
°1P- Ranged 16i tracking low that's safe on normal hit and has good mid reach although unsafe. A useful poke for opponents who favor standing guard, and it crouches highs!
°236K- Her 2-in-1 20i mid flip kick to jumping high elbow, safe, absurd range and reach, and it can't be ducked if the mid kick connected. A useful combo ender and also her go to cancel from strings that allow it as a way to end the string on a safe note. Doesn't track however and the high elbow part can be crouched from long range. Useful by itself and from strings that already move you forward like 6PP and 3P.
°4H+K- Her tracking 20i mid kick, unsafe and is vulnerable to throw punishment if not max range spaced, but it can be spaced and has useful mid reach that can catch even sidestepping foes.
°46K- Her 20i leaping back sway jump mid kick. Good mid reach and is one of her best crushes as she can avoid a good amount of highs and mids with lacking reach up close due to her brief backwards spring sway, and the jump can avoid lows too! The ender allows for her to cancel into specials too, although neither part of the string track and the ender can be ducked. Unsafe unless you use the ender to cancel into her 236K.
°1K- This low is unsafe on normal hit and block, but the 20i move can be used at mid range thanks to it's good reach. Will cause a minor CH +6 low stagger stun that allows you to combo into either her mid punch or mid kick ender or you can use the advantage to further poke at the foe. Lacks tracking and free cancelling can be a risk although it's follow ups can be nicely delayed to throw off foes. Has tip range properties but this can hurt it's damage when used at max range.
°214P- More a close mid range tool, this quick 12i fire spin avoids lows, jails since it's a 2-in-1, and it tracks making it her fastest tracking strike too! Unsafe however at -9, and the 2nd part of the move is what you'll want to space with since the first part has poor reach, while the 2nd part has decent mid reach to use when somewhat not close enough to really jab the foe up close.
°9PP- Her 30i jumping fan swat from her jumping 9P, decent reach and it tracks as well as being safe on block at -1 to +0 depending on if you did it at max range. Can be ducked easily however and has slightly worse reach than her other jump in attacks.
°9PP+K- Her 38i full body lunge jump attack from 9P, great reach and is safe to semi safe at -3 to -7 depending on how far you performed the move against blocking foes. Perfect as a way to reset the distance when your opponent is quick to rush in on you, and it also avoids lows. Caution since this is also vulnerable to low throw punishes. Can also function as an "anti air" type move when dealing with characters who have jump in moves or stances or attacks that have a telegraphed jump during the start up!
~What's Wrong?: As a heads up, an anti air is an attack commonly in 2D fighting games that acts as a counter to opponents using a jump in move or attack that has them airborne. When 9PP+K is done to a foe who is in the air, it'll also lead into her special attack throw sequence as if she had launched them manually in the air! Keep this in mind when dealing with Nyos flying towards you and against characters who possess a jump stance or an attack that leaves them in the air for a longer period of time.°9PK- Another useful 30i tool from 9P, a leaping mid knee. Unsafe but has a semi safe to safe follow up to watch out for that is basically her 9PP+K, causes a decent stun on hit and the follow up being it's static follow up can deter holds out of fear of you using the P+K ender. Like 9PP+K it can function as an anti air as well.
°2H+K- Her 23i low sweep, has the good reach, tracking, and stun stagger to make it a nuisance when out of close quarters range. Is unsafe however and it's too range properties can hurt it's damage when playing from longer range.
°P+K- Her 20i mid dual fan attack which like 46K functions as her counter hit crumple stun. Has good reach, causes a +19 stun on normal hits and as previously stated, it'll cause a solid fall stun in stun or counter hit unless the foe is willing to hold to prevent the fall which leaves them open for additional follow ups or a hi counter throw if they guess wrong. The attack can also be used from certain launches and bounds as a solid range reset due to its massive pushback. However, it's unsafe at -9 and doesn't track, but it can avoid certain throws if spaced correctly at max range.
-That should cover us up for now regarding her ranged tools, she has a lot with powerful abilities so always be wary of what can and can't be used at all possible ranges! And now….
Section 14: Mai's Stun Starters
-This is an additional section added so you'll have an easier time being able to make out what Mai's stun starters are! Be aware tho that moves that cause a stun on normal hit but lead to a launch or similar on counter hit i won't add since they're counter hit launchers. Here's a brief symbol summary of the types you'll see:
☆These are going to be for moves that stun on normal, being what I called true stun starters. Mai has a few of these but they tend to be highs, or they're slower but unsafe or easier to react to. She tends to be rather tame in this area, but the moves she does have like this tend to have better properties when used as a counter hit attack.
○These are for stun starters that may cause a minor stun on normal hit but can or may lead to a deeper stun on counter hit. Mai is rather gimped in these. These attacks tend to generally be swifter but unsafe in most regards, and as such Mai isn't that great with these although she can easily use some for crushes.
●Attacks that do not stun whatsoever on normal hit and only stun on counter hits. Most of Mai's tools for stuns are generally leaning in this area since her style generally needs a counter hit to get these stuns going. They're often safer or usually have a follow up tacked on that can make a foe second guess trying to retaliate immediately. However, Mai is somewhat limited even in this area. A few of Mai's options that are categorized here may also have have a "minor" stun that can only connect her follow ups from that move unless the foe panic holds.
☆214P- Her quickest way to start a stun, her 12i twirling Ryuu-enbu special. Causes generally a spinning stun, tracks and is her quickest mid in her arsenal that naturally stuns. It's full reach however is suited for mid close reach and the attack is also unsafe. Quick and consistent but care must be made to use this carefully. Her fastest low crush as well. Present after certain strings as an ender such as 6PKPP and it's variants and PPPP and it's variants making it able to be used in a similar manner from those as well.
☆4P>- Her 15i high fan face jab, causes a +35 blind stun and it guarantees her special attack cancels. Unsafe at -13 when blocked but it can cancel into her specials at any time, as well as the stun being consistent and a threat. Lacks tracking.
☆4K- Her 16i high axle kick, tracks and causes a +24 stun on hit. Semi safe at -7 but lacks reach making it suited to mid close range. Counter hits will cause a +30 lift stun making it useful for counter and sidestep punishes, and can be used in stun the same way.
☆P+K- Her 20i open dual fan mid punch attack, causes a +19 stun on normal hit and will cause a crumple stun when used in stun or against attacks as a counter making it slower but dangerous. Can soft wall splat and has useful reach, but lacks tracking and is unsafe at -9.
☆4H+K- Her 20i spinning mid kick, tracks and causes a +11 stun on normal hit, only allowing a P to connect but this static option to continue the stun can be used to bait a reaction hold from foes who know of this. Against sidesteps, or when used to counter slower attacks or in stun, you'll get a forced +16 spin stun instead, but again this isn't much better since you'll be able to continue a stun set up but quick launchers won't be virtually possible unless your foe recklessly tries to hold in fear. Unsafe at -10 to -11 depending on the range but it's possible to avoid most neutral and standard throws if spaced correctly. Her in string PPK can be in a similar manner as the standalone move, but it's just as risky. One of her worse stun starters due to it's limits and unsafety.
☆46K- Her 20i swaying back jump mid kick, very versatile since the move is multiple crushes in one: the jump back sway can evade and crush highs and shorter ranged mids up close, and the jump can crush lows too! It has good reach and can be used at about any range that isn't too far across the screen to score a +19 to +21 stun depending the distance, and a counter hit or successful crush counter or use in stun will cause a similar gut crumple stun to P+K. Unsafe at -8 up close and lacks tracking but using it at max range leaves you -6. Overall one of her better stun starters as the crush properties more than make up for its speed. Very versatile in use.
☆6H+K- Her 25i forward jumping leap kick, slower than usual but can crush lows, covers a good range allowing her to move in with ease and causes a +19 stun on normal hit. Counter hits and use in stun will cause a rollback slide "launch" allowing for juggle combo type follow ups, very useful as a slower counter hit tool. Semi safe up close at -7 and -6 at max range, lacks tracking.
☆☆8H+K- Her 25i fatal sit down stun which is a jumping downwards axe kick. Unsafe at -13 and lacks tracking but good mid reach making it a good low crush and whiff punish from a distance. True mid as well and wall splats. A risky way to start a stun but it's way of forcing a break hold makes it an invaluable tool.
☆9PP- Her 30i high jumping downwards fan swat. Tracks and always causes a +25 stun on hit. Decent reach and is safe at -1 on hit but +1 at max range. Slow but can evade lows and cover distance quick, but is vulnerable to high crushes and crouches.
☆9PK- Her 30i mid knee jump kick, causes a +25 stun like her high jab but is unsafe at -11 when blocked, but has a safe to semi safe follow up ender which is P+K, it's safety can vary depending on range since it has deceptive reach. Her other option is K which is her bound attack but unsafe at -13 on block.
○K- Her quickest way to cause a minor stun, her 12i high kick. Causes a +8 stun on normal hit and a meatier +25 stun via counter hit making it pretty deadly as a quick counter tool. Useful but can be crushed, unsafe at -12 when blocked and crouched and lacks tracking, and it's use near walls is kind of gated since it cause a wall splat on counter hit. It does have follow up kicks but all are highs and the full KKK string is unsafe when free canceling all of the kicks making it a risk to try to attempt on block although the delay of all of them is good and the final kick can be cancelled into one of her specials.
○6K- A 13i mid vault kick, this always causes a minor +4 stun push back, regardless of counter hit or position, making it a standard mid kick poke of the static variety. Safe, good mid reach and can be used to either poke at the foe, reset the neutral in your favor from a stun, or generally just to be a safe go to. Lacks tracking and the static stun makes it rather gated for use but a reckless panic hold can cause the foe to be vulnerable to additional stun damage if choose to go for a stun set up from that.
Overall I consider this a good but still limited minor stun attack since the stun does not increase even when used upon successful counter hits.
○2P+K- Her 17i slanted fan crouching mid punch attack, is +0 on hit causing a pushback stun and a counter hit or successfully timed crush will cause a +15 stun. Risky since it's -9 to -10 on block but tracks and is her go to way to crush out highs when being pressured up close. Wallsplats on counter hit and in stun.
○66P/(While running)P- Her 18i dashing dual elbow mid attack, covers decent distance and can be used while running, and it'll cause a +2 to +4 minor stun on normal hit, allowing you to for her her static ender launcher 66PK as a quick launch, but it's risky and easy to step or hold. Linear to sidesteps and is unsafe at -9 up close but proper spacing can make it semi safe at -7. A proper counter hit or crouch punish will cause a +17 to +19 stun giving you better stun to work with, and with the possibility of a quick launch, it can make the foe scared to hold in fear of that dreaded flipping mid kick flame launch.
●6P- Her 11i mid punch elbow, her quickest and main counter hit close quarter tool when looking to fish for a counter hit. Demands a counter or better since block and normal hit leaves her -13 but causes a +20 stun when used to counters. To mask its short reach and linear lack of tracking, it does have a tracking mid twin elbow follow up with a special cancel opportunity, and also has a low vault crouch kick follow up as well with two string enders but both also demand a counter to get the offense going or else you'll risk throw punishment. Overall her go to tool when fighting other characters who also possess an 11i mid or who happen to be at a speed disadvantage, adding to one of the horrors of her up close neutral. Useful against crouches.
●3P- Her 13i mid lifting fan jab, vs 6P this is her go to counter hit lift stun that causes a nasty +32 lift on counter hit. Unsafe at -13 on block and normal hit and lacks tracking. Has both a tracking mid punch and low sweep kick to mind and also has a safe mid jump kick to high jump elbow to use when needing to prioritize safety over a sidestep attempt. Overall a less risky way to fish for a stun up close with better stun and options to compensate the slightly worse start up speed.
●3K- Her 14i mid vaulting kick, Her go to option when looking to get a mid kick stun from mid range or when trying to get a counter. Useful as a normal hit poke since it's -3 on hit and semi safe at -7 when blocked, but it's reach can bandage this when used at max range to evade throws. A +20 stun will result from a successful counter hit and it will wallsplat too! Swift and has reach overall making it a relatively fair tool to use for a counters, but lacks tracking.
●2K- Her 14i crouching low kick, different from most standard 14i low kicks since it does have follow ups and can outright crush highs. Is -9 to -11 when done on normal hit but is -15 when blocked. Successful counter hit will cause a +10 to +11 stagger stun that allows her to connect her two string options, either her low 2P crouch fan poke that's safe but lacks reach and tracking or her 2P+K that tracks and can cause a better stun for connecting stun set ups but lacking safety. Her 2KP can be a useful safe poke string since it jails on hit leaving you at a very safe disadvantage, but mind 2K's tip range since it hurts its damage potential.
●8P- Her 15i downwards fan swipe, a true mid and can easily stuff crouches. Although fairly swift, it's only -13 on block and normal hit making it an unsafe tool to use, although it does have her tracking Ryuu-enbu attack that can be delayed to deter hasty punishes. A counter hit will score you a +20 stun(+17 against a crouch), and since it's a true mid, this can be used to easily shut down stances like the Bokuho Helena possesses that can not only evade high, but also normal mids with the duck evade. Lacks tracking.
●1K- Her 20i low crouching leg thrust kick, very risky since it's -14 on block and hit, and even though it can easily crush highs and go under them, you're left squatting making you vulnerable to crouch and standing throws. Causes a general minor +6 stun on counter hit that allows its enders to connect, forcing a 50/50 guess between a mid kick or mid punch downwards fan, although the ability to delay isn't that impressive. Has reach to compensate for its lack of tracking but the tip range damage reduction can hurt it's damage from afar.
-This should leave you with some hot ideas for getting the fire ignited with Mai! Now to conclude
Section 15: Final Remarks, Thanks, & Future Expansion
-Well, as fun as it is teaching others how a character works and their tools and such, every lesson and guide must eventually end…. I thank you for reading and hope that I've helped you better understand Mai and want to continue picking her up if she's the main for you! This concludes the guide, but it's far from being simply finished since updates always can change something and I'll continue to post and update this vanilla guide with any new findings as future patches or game iterations are released! Have a good day, and now hopefully you'll better understand why Mai self proclaims herself as Japan's best!!
~Fin.~
Last edited: