Here's the frame by frame analysis of the trailer (HH;MM;SS;FF):
In short:
- The ground system seems to be the same from DOA4 (high wake-up kicks have not been shown yet)
- Unknown if you can hold from a wall crumple
- Hold window may be reduced or the percentage for HCH/CH/NH given has been altered
- Offensive holds have been returned to DOA3 Catch Throw properties
- Three point hold system is in place
- Raidou is still awesome (and working with Donovan)
- Stages have been returned and/or been revised
- The full combo throw can be performed with a tap of the touch screen, with apparently little to no chance of the opponent being able to break it.
- "CHANGE OK" has been added on the HUD during tag battles
- Players can tag out/in while they are in stun
- Moves all look like DOA4 properties have been unchanged (with exception to Offensive Holds as mentioned above)
- Tag throws remain 5 frames, but now there is an on-screen prompt (QTE) when it connects. If you press throw to confirm, it will perform the tag throw, otherwise it will perform the player's standard throw.
- Stun threshold displays in the match. It's first time reappearing since Dead or Alive 2
00;00;31;30: Ayane vs Gen Fu, Helena vs Christie, Gen Fu vs (Kokoro/Eliot?), Zack vs Tina, Hayate vs Hayabusa, Hitomi vs Brad Wong, La Mariposa vs Lei Fang, Jann Lee vs Kasumi, Bayman vs Bass, Ein vs Leon
00;00;37;43: DOA2U/3/4 Cinematics
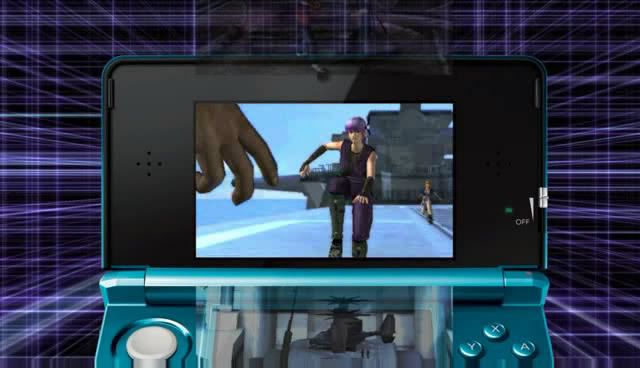
00;01;09;44: Gameplay footage of Ayane/Kasumi on DOA4 bridge
00;01;13;42: Ayane does 6P to Kasumi and scores hi-counter hit, but Kasumi's attack doesn't look like a throw.
Quite possibley OH have returned as CT now. Scoring 25% damage.
00;01;14;24:
Kasumi mid punch counter holds Ayane's 6PP. The timing looks on point (scoring the hold on the hold's 4th frame) but it's counter hold instead of hi-counter hold. She scores 30% damage
00;01;15;26: Ayane techs the mid punch hold as she hits the ground.
00;01;16;00: Kasumi steps upwards as Ayane dashes forward
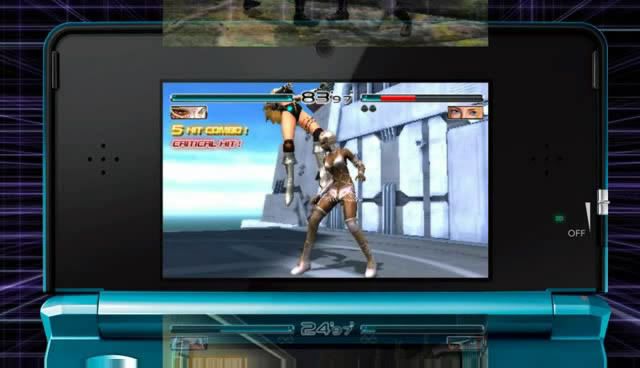
00;01;16;10: Kasumi does 8K to Ayane's dash - causing Critical hit damage. Causes 10% damage, and threshold shows another 11-13% possible.
00;01;16;25: Ayane immediately mid holds with Kasumi continuing combo with P6P knocking Ayane over the bridge causing fall damage
00;01;18;16; Game cut to skip landing time from fall; Ayane hits a back-turned Kasumi with 2F+K causing counter blow doing Knockdown to Kasumi who instantly techs.
00;01;19;38: Ayane counter blow hits Kasumi's 8K with Ayane's 2K
00;01;19;38: Ayane does another 2K but is low defensive held by Kasumi.
Kasumi scores the hit at 10 frames in but only gets normal hold damage (10% life bar).
00;01;20;59: Kasumi's low kick defensive hold scores a
DOA4 styled ground bounce. Kasumi juggles with P6PKK doing an additional 13% damage.
00;01;23;13: Ayane techs and Kasumi performs her running throw - no telling if it's an offensive hold or catch throw. It hits on normal hit and does ~20% life.
00;01;24;46:
Cutscene with Christie begins where Christie tells Kasumi to jump onto the helicopter as Ayane screams to Kasumi "Oh no you don't!".
00;01;51;21: Helena is in the DOATEC DOA4 tower and does 6KP putting Christie in critical stun, and continuing with 66KPP.
00;01;54;21: Kokoro is in the Kyoto in Bloom DOA4 stage and does her
full combo throw with a tap of the touch screen (Combo Throw appears for 1 frame in each part) - knocking Brad Wong into the river doing ~30% before fall damage.
00;01;56;21: Hayabusa is facing Hayate on the DOA3 rooftop stage.
00;01;57;55: Hayabusa does PPPP, and
no limbo stun appears - DOA4 stun occurs.
00;01;58;43:
Izuna drop is performed with the tap of the touch screen, and no combo throw break opportunities appear.
00;02;05;16:
Raidou cutscene begins with Raidou saying, "What exactly did Genra teach to my daughter?", and Ayane responding with "My father's dead!". This is occuring on the new plane stage.
00;02;15;47: Kasumi and Ayane are in a 2-on-1 match against Raidou on the Danger Zone stage (DOA2/3). Kasumi tags in after Raidou has already sustained some damage and Ayane at half health. It's possible that Raidou's partner has been eliminated.
00;02;16;46: Kasumi does 3P as it looks like Raidou does a standing kick. Kasumi wins the exchange with a counter blow damage causing 5% life.
00;02;17;00: Raidou performs a mid
defensive hold which connects on the 10th frame performing Counter Hold damage against Kasumi's 3PK doing 45% life.
00;02;18;44:
CHANGE OK appears on Kasumi's lifebar. Probably referencing that the time has expired to letting Ayane tag in - if needed. Of course that's only assumption as there's never been a CHANGE OK hud item.
00;02;19;18: Raidou does a low kick (Bayman's 1K) which
goes through Kasumi's low wakeup kick due to invulnerability.
00;02;19;40: Kasumi follows up with 6K,
causing a ground bounce, and allowing her to juggle with the PK followup of 6KPK (
new string?).
00;02;21;51: Raidou techs and performs a buffalo horn (Bass' 33P) as Kasumi tags out to Ayane.
00;02;23;11: Ayane does her ballet (3[3]) as Raidou does a leg sweep (2F+K probably) scoring a knockdown for Raidou as counter blow.
00;02;24;30:
Ayane does not tech, so Raidou does his Bayman like 1K attack which connects and forces Ayane up much like DOA4's ground game. It does ~5% life.
00;02;25;33: Raidou does a power gong (Bass' 1P) scoring critical hit at ~12% life and putting Ayane in stun threshold.
00;02;25;57:
Ayane tags out while still in stun. Kasumi comes in and without recovery on the tag in is
immediately able to hold Raidou's power gong followup (Bass' 1PP)
on the 4th frame granting Counter Hold damage of 10%.
00;02;27;36: Raidou techs and is counter blown with Kasumi's 3PP. It's then shown as it fades away that Kasumi tag team throws with Ayane. There's a zoom in, perhaps showing the QTE "Throw" as displayed in a moment but it's off screen at this time.
00;02;31;08: Leifang & Jann Lee are facing Bayman now. Lei Fang does 1K which is blocked, but Hi Counter Blows with the followup K from 1KK. Then follows up with 66K to knock Bayman into the wall.
00;02;33;01: Leifang hits Bayman
during his wall crumple with 3P and tags to Jann Lee who does PPPP knocking Bayman back into the wall.
00;02;36;19: Bass & Tina vs Leon in a tag match. Bass has come in and hits Leon's 9P with his DOA4 2PP - granting him
Hi-Counter Blow damage.
00;02;37;29: Bass continues the stun string with 3P and tags to Tina who continues the string with 66P,Free cancel,PP.
00;02;40;06: Leon techs and tries doing 33F+P but is hit out by Tina's PP.
Tina scores Hi-counter blow damage (Offensive Holds definitely look like they've returned to DOA3 Catch Throw properties).
00;02;41;14: Leon high defensive holds as Tina connects with 3KP - knocking Leon into the wall.
00;02;42;28: Camera cuts to later in the match with Leon doing his 1P+K against Bass who punishes with a tag throw QTE (
which remains 5 frames). It could be possible that this QTE will tell if you want to do Standard F+P or Tag Team Throw (My assumption).
00;02;51;38: "Papa no Kachi!" - "Papa's win!"
00;03;11;14: Hitomi does 6P+K but is counter blown by Lei Fang's 3K - causing slide as she's on snow.
00;03;13;06: Lei Fang goes to punish Hitomi's mid hold with a throw, but Hitomi recovers first and performs a 3P allowing her to duck under the whiffed throw and hi-counter blow Lei Fang.
00;03;14;41: Hitomi does 4F+K causing a ground bounce, and follows the juggle with PPK.
00;03;16;59: Hitomi goes for a slope throw but is hi-counter blown by Lei Fang's 1PP.
00;03;18;08: Hitomi mid holds Lei Fang's punch
on the 14th frame, giving her normal defensive hold damage and doing ~15% life.
00;03;20;32: Hitomi's 236P
loses to Lei Fang's mid wake-up kick due to its invunerability.
00;03;21;26: Lei Fang hits a low holding Hitomi with 6F+K, causing ground bounc, and juggles with the P followup causing slope fall.
00;03;58;42: Zack's 6K sway K remains from DOA4, hitting Bass into the wall.
00;04;01;07: Bayman is trying to snipe Victor Donovan, but Raidou steps into the shot as Ayane charges Raidou but gets gut punched. This can be seen as the Bayman shot is fading off. It's really one big cinematic spliced in two to make it feel like they're unrelated.
00;04;08;42: Tengu is shown appearing on his stage.
00;04;10;28: Helena is facing Christie on the revised DOA3 Lorelei level. She does 9K into bokuho, bokuho P, then launches with back-turned 2P+K.
00;04;13;50: Eliot uses 8K on Brad Wong, putting him into lift stun on a revised DOA3 Tao level. He continues the combo with 6PPP knocking Brad into the wall, putting him into wall crumple.
00;04;16;42: Christie is facing Bayman on a the DOA3 temple rooftop level. She performs 4F+P followed by 66KK which knocks Bayman into the torch.
00;04;20;27: La Maripos is facing Tina on the new airplane helipad level and is in mid stun combo. She launches into her air throw. Sorry, I don't know her moves well enough to know what she launches with.


")