Hello, KasumiLover, xX_APO_Prince on YouTube, and @Maso_Prince on X or Twitter here again to assist with another character I enjoy using: Naotora Ii of the Ii Clan!
In case you're new to to the Dead or Alive series, Naotora is not a native DOA character. Her home series is Samurai Warriors, where she was quite popular for not only her cute looks, but also her attack abilities that place emphasis on her fast, rapid powerful kicks. She debuted on March 17th, 2016 and is already gaining quite a bit of popularity with several DOA players and is shaking up the online field with her over the top attacks and abilities lifted almost completely from Samurai Warriors.
In this thread, I will cover a number of different areas in her game play, so that you can learn how how to use her move set safely, carefully, mindfully and efficiently. Because move properties are constantly changing and patches and updates come at certain times, I will continue to update this as often as I can. Below is the table of contents so you will know what will be covered and addressed:
Latest guide notes:
°3/18/16 ~ Base guide finished.
°2016 to 2023 ~ Minor to major fixes ranging from typos, unintentional misinformation, and incorrect information.
°Mid to late May 2024 ~ Base guide re-released with major touch ups, minor typo fixes and some improved clarity and reduced vague information to make it more easy to understand. Title also changed to Ultimate for re-release.
° ______ ~ Additional sections to be added.
 TABLE OF CONTENT
Section 1: Explanation of reading frame data and understanding numerical inputs
Section 2: Naotora's Pros and Cons w/ a basic rundown summary
Section 3: The Ii Family Creed Stance and follow ups
Section 4: Naotora's jump stance and follow ups
Section 5: Naotora's complete move list breakdown w/ basic frame data and situational usage
Section 6: Naotora's throws explanation
Section 7: Naotora's holds explanation
Section 8: The ancient Ii Clan combo vault
Section 9: Naotora's mighty unholdable set ups
Section 10: Final remarks, credits, and future expansion
Section 11: WIP
Section 1: Explanation of reading frame data and understanding numerical inputs
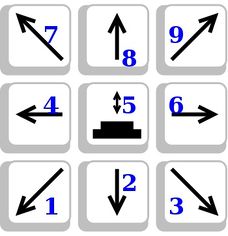
-Before we start the guide off, if you're a beginner you should know the basics about reading frame data and inputs. I will use actual button macros throughout this guide, but here is a picture that shows you what the directional inputs are numerically:
-Next you should know the basics regarding how to read and interpret frame data. Here is an example: 20(4)25. The first number is the start up frames, which shows how many frames it take for the attack or throw to actually begin. The second number in parentheses is the total active frames during the attack animation, and finally the last number is the recovery, which shows how long it takes for the attack to recover so you can begin another attack. Worth noting is that the longer it takes for an attack to start up, the more likely you are to be jabbed or hit out of it, and the longer it takes for the attack to recover, the more likely you are to get hit or thrown afterwards.
-Another key thing you need to know is MOVE SAFETY. Move safety is how safe or unsafe an attack is on block, and you can see for yourself how unsafe an attack is by enabling the move details in training mode and looking at the move advantage. +1 or better frames means you have a frame advantage, while +0 to -5 is safe, meaning you can not be throw punished after the attack, with the only exception being 5i neutral throws if you are left at -5. -6 to -7 is semi-safe, meaning you can be thrown if an opponent uses a quick throw, but longer framed throws will not get you, and -8 or worse is unsafe, meaning you can be thrown, so watch out when you use her unsafer attacks.
-Throughout this guide, to cut some corners and to eliminate text bulk, I will use the "i" symbol in place of the term "frames'. An example would be 23i, which basically is the same as saying 23 frames. Keep this in mind as you read this guide.
-Finally, another thing I will mention throughout is whether Naotora's attacks track, meaning if your opponent attempts to sidestep it, it will follow them, while if an attack has no tracking, it will not hit when sidestepped. Now that all the basic stuff is covered, let's transition to her pros and cons.
Section 2: Naotora's Pros and Cons w/ a basic rundown summary
-Knowing what your chosen fighter specializes in and struggles in is a key thing I think you should know. This section will show her pros and cons, and I will provide a detailed summary to further explain them:
PROS/STRENGTHS
*Decent speed. Has an 11i high kick which can easily beat out slower attacks, has an 12i mid knee kick, and a 14i low kick. Her punches are decent, having an 11i high, 14i mid, and a 14i low punch. Overall decent neutral that can help her against slower opponents and opponents around her own speed since her 11i will have priority over punches and most mids of the same speed.
*Good walking speed advancing or retreating from her opponent. Also has a great backdash that can be very useful for creating gaps between your opponent. Her jump stance also acts as an alternate approach to move in.
*Good combo damage output. Also has lethal counter hit attack properties that make her well suited for interrupting attacks and landing a solid counter hit. Damage is generally solid overall.
*Easy to learn move set with plenty of
kick mix ups. Overall very low learning curve which can make her very easy to main or even sub since she lacks any complex inputs or stances.
*Decent throw game; Has a 7i punish throw that can interact with walls, and her 10i punish throw can interact easily with floors . Has one of the best 12i punish throws in the game as well as it gives her tremendous distance and lethal damage on hi counter. Overall has throws threatening enough to make it risky to panic hold in stun or to attempt a hold against her when she begins with her more lengthy strings.
*Has a long range tracking 236K attack that easily punishes whiffs and opponents who try to approach. Possibly one of the best ranged moves in the game as it creates an instant 50/50 situation for both players.
*Decent handful of strong tracking moves she can use to blow up sidestep attempts at virtually any distance.
*Great range. Perfect as a spacing/zoning character due to her kicks having reach, allowing her to keep out foes who are lacking in long range or mid range tools to contest her own kit. Can be quite difficult to safely move in on in larger stages.
*Decent guard breaks, having some that are safe on block or give her some advantage, which can be used to make room for her slower attacks as well as to also give her a safe chance to increase her range from the opponent.
*Good Okizemi or wake up game, with her tools becoming alot more threatening when used to pressure opponents who are getting up from a knockdown. Overall becomes alot more difficult to deal with when she has ample room to incorporate her slower but stronger moves on the playing field.
*Move kit is generously littered with quick launchers and knockdowns, making her always a threat once her kicking momentum begins.
*Great environmental combo potential, having very good wall carry and being able to to easily convert juggles into either wall or floor slams depending on the juggle ender used. Can generally be a threat on all stages. Also has a formidable wall splat combo game, getting good damage with very little difficulty.
*Has alot of jumping kick attacks that avoid lows, making her adept at low crushes which is very essential as her highs can be subject to crushes.
*Is the only character in the game to possess a stance transition from her power launcher attack.
*Great whiff punisher, having a variety of tools to punish opponents at mid to far range when not directly in their face.
*Quite a few attacks that are actually safe from a distance that your opponent may have to respect. Her safety and spacing are further enhanced when one is aware of her attacks' various ranges, making knowledge of her tip/max range very optimal.
-Very vulnerable to high crushes as alot of her kit consists of highs kicks with varying speeds and safety. Because of this, she can be rather easy to generally crouch or duck.
*Majority of her mids that launch or stun on hit tend to be unsafe, making them risky to attempt unless after having conditioned your foe to duck which can be tricky. Her safe mids tend to demand a counter hit or crouch, or are telegraphed enough to make them easy to intercept.
-Close quarters is not recommended for Naotora, as she can quickly get overwhelmed by characters who are faster or adept at crushes. At a major disadvantage against opponents who are faster, more counter oriented or pressure based fighters.
-Strings tend to be fairly predictable and easy to hold on reaction. Alot of static strings and quite a couple of 50/50 mix ups in her strings which tend to be highly easy to react to, making free canceling and mind games very integral to avoid being easy to read. Has alot of attacks with long recovery and start up frames, making her easy to interrupt if not used mindfully. Whiffing with her can easily make her a sitting duck.
-Below average stun game due to the stagger escape mechanic which can severely tone down her stuns when her foe is adept at stagger escaping. This also makes it rather risky to use deeper stuns in critical stun unless the player is conditioned to fear throw or quick launch attempts. This forces her in most cases to rely on manual mix ups, resets, and often times quick launches to get less risky damage at the risk of not making full use of the critical stun game. Also lacks lift stuns, making deep stuns almost non existent for her which further weakens her mix up game in stun, and her faint stuns that demand a reaction are lacking and rather slow.
-Mediocre hold damage that doesn't provide much advantage, and has no expert holds. Environmental interaction is also rather limited.
-Somewhat lacking in defensive tools, having very little ways to avoid pressure up close. The tools she does have are rather bare compared to other more defensive characters, meaning Naotora will often have to rely on reads and solid defense to revert the momentum, making her glaringly a sitting duck against faster characters. Also lacks offensive holds or throws with hold properties.
-Mediocre lows as she lacks any really threatening low strikes that can help her open up her foes. Her best lows tend to either be in string or are telegraphed to some degree. She's also rather limited in lows in general, lacking stand alone lows besides the couple that are littered in her strings.
-Guard breaks are generally unreliable to use offensively, as they vary from safe to unsafe depending on the attack. Her positive guard breaks are also often predictable or limited in advantage due to pushback or mediocre positive frame advantage.
-Limitied in mid punch/jab moves and strings, being mostly high kick and middle kick oriented and lacking mid punchs. Her mid punches are also quite mediocre, as they almost all are relatively average in speed at best or require a counter or crouch to make them stun on hit. You'll have to rely more on her high kicks or mid kicks to be able to score easy stuns.
-Overall very 50/50 mix up heavy, and the risk can often overshadow the reward due to her string linearity and lackluster advantage on block. Naotora is going to force you to take risks.
-While she does have some good tracking moves, most of them are unsafe. Most of her tracking moves are also highs, making them risky to use against specific characters who have special command sidesteps that can also evade highs. Moderately risky tracking tools that have generally high reward for their general unsafety.
-To summarize this, Naotora is a good character for beginners who is easy to pick up and has a low learning curve. She has decent speed that makes her faster than average, but not as fast as the likes of Kasumi and Pai. She possesses an 11 frame high kick that can beat out slower attacks at close range, and has great kick strings that have mix up potential to confuse your opponents. She can control space well, and has good range kicks that can be useful at keeping away faster characters, particularly ones who struggle at moving in from range. She also has great options stemming from her K and 6K kick strings that can end in launchers, guard breaks, a knock down, and even a useful(but predictable...) sit down stun for a guaranteed CB! Her damage output is also surprisingly high and she can deal great damage if used to great effect. Finally she has several good launchers that can guarantee her excellent K6K juggle ender and avoid an annoying wall splat, as well as other easy combo conversions to make use of whatever danger zones lie in her wake.
Also noteworthy is that she is blessed with an array of quick launches and knockdowns in her kit, making her a near constant threat at all times once she gets her momentum and mix ups going which can work in her favor immensely when fighting someone reliant on defence to shut her down. She has a standard but effective throw game that can help her easily keep hold reliant foes in check, and her moveset generally has ample over the top moves that grant immense reward when you're willing to take risks to connect them, especially when used when the opponent doesn't expect it!
Alas, Naotora is not completely sunshine and rainbows. She has mediocre hold damage and utility with limited environmental interaction or general evasion, no expert or defensive holds to help her, and she has basic but relatively damaging throws, but no offensive holds. Her moves also are generally telegraphed if not very unsafe as an alternative, some have long recovery and start up frames, and although you can get away with mashing strings against inexperienced players who don't know the match up at first, she's actually somewhat linear and can be held on reaction if the opponent carefully guards and reads you. This doesn't mean she's bad to use however, Naotora can be a viable and tricky combatant once you learn to utilize her delays and various mix ups. With enough practice and proper strategy, she can quickly be one of the most dangerous fighters in the game to deal with, but the player has to be aware of her limits and also of expected habits and patterns that players may expect from Naotora. She's generally seen as a mashy, very spam worthy fighter, but it's up to the player to break the mold and show she's beyond that, only to bring out the opposite when they assume you're going to mix up!
The key to using in her in a match safely and effectively is simple: Make sure you have optimal space for her slower moves, and utilize her kick strings, but avoid mashing just for the hell of it, as this can result in heavy punishment at higher level, where players can look past the mashing and easily read static strings. Also, playing Naotora in a defensive way is recommended since although it may seem like mashing with her is a go to like in her native series, DOA isn't the place for that. Although you can play offensively if that is your preference, she's better played at a mid range distance, especially against faster opponents who can dominate and overwhelm her up close as shes not suited for pure momentum or rushdown. She can do very well whiff punishing and using her longer range attacks to catch the opponent off guard when they try to approach. She can also be used for giving her opponent little chance to defend against her rapid kicks, and punishing them with counter launchers and harsh throw punishes if they guess wrong when trying to hold you, but this method is more risky because of her linearity and ease to interrupt. Utilize her guard breaks against defensive players who favor guarding, and don't be afraid to throw an opponent who is wide open. Finally condition your opponent to always assume you're going to mix up so that you can get away with finishing her full kick strings(or vice versa!), and learn how to accurately zone and space your opponent out so that if they are dominating at close range, you can keep a distance and utilize her Ii clan stance and other spacing tools to keep your opponent away and scared to make a move, in fear of the risky damage you can inflict upon either a hard or even low intellect read as DOA is all about taking risks.
Section 3: The Ii Family Creed Stance and follow ups
-This next section will cover one of two of Naotora's stances: The Ii Family Creed. The input is very easy to do, just input 2P+K and she'll say, "For the Ii Clan!". This stance has six possible follow ups: A flipping wind punch, a damaging sakura blossom kick sequence, a low sweeping kick barrage, a throw, a mid launching kick, and a flinging butt attack. Although the stance is useful because of it's damaging options, it's start up is pretty telegraphed and easy to see coming, and it leaves you at 20 frame recovery, meaning anyone can quickly jab you out of the stance or throw punish you since the stance does not offer anything during it's animation that can evade or negate any attacks. Because of how slow the stance is, it's better to use at a distance so that you can have enough time to unleash your follow ups, and to avoid throw punishment or attack interruption; Using IFC after certain situations like at the end of juggles, force techs, or other moments when the opponent can't retaliate promptly to you entering the stance. It's also worth noting that you can enter the stance before the match starts, so that way you can prepare an attack for the opponent to deal with. Here are her follow ups in greater detail:
- Her signature and possibly most popular follow up from this stance. The start up is lengthy at 35i, making it pretty easy to see coming. It if hits, a damaging kick string will begin, and it finishes by leaving your opponent grounded and at a very safe distance from you, allowing you to avoid retaliation. If it's successfully blocked, you won't have to worry too much since it guard breaks, and the beginning jump before the attack initiated avoids lows, which can crush low wake up kicks and other low attacks if done at the right moment. Although you will avoid neutral throws, the attack still leaves you at -12 when blocked, and opponents can use longer range throws to punish instead. Also be careful: Because the kick is a high, it can be crouched, and you can be punished badly during the recovery. The attack tracks, and it has decent range. Also, if it's done next to a wall, the final hit will slam them back first sitting down into the wall, and they will NOT be able to wake up kick or tech up. This situation will put Naotora in an advantageous situation where the opponent can't rely on wake up kicks to get back into the fight, nor can they immediately stand at their own timing to avoid pressure.
I regard this option as being one of her more risky to use since it's very easy to read and use in an actual match without some sort of opportunity to use it such as after a power launcher into IFC.
-Her mid punch follow up that begins with a 41i jump that avoids lows, then transitions into a 10i mid punch attack that summons up a gust of wind to slightly launch the opponent up for a possible follow up if they are light enough. The attack leaves you at -2 when blocked, but it gives enough pushback to allow you to avoid some fighters' neutral throws if you block afterwards, but some like Raidou's can't be avoided. In these cases, an alternative way to avoid being thrown is to quickly back up or crouch, although you risk getting low thrown or thrown by a longer range throw. The attack has great reach, and it also tracks, but it does not have any guard break properties. Don't abuse this follow up too much, as it is highly telegraphed and can be interrupted. It's also worth noting that this can be used as a hard force tech. If the first punch hits, the wind attack can not be avoided or held, making this move a jail type string.(These types of strings will be explained later in the beginning of the move list breakdown section!)
- Her low sweeping sakura blossom kick that begins with a swift 14i, and finishes with two additional 7i sweeps, the last one causing a guard break or a knockdown if it hits. If it's blocked, because of it's GB properties it'll leave you at +2 frame advantage, and with enough distance between you and your opponent to avoid neutral throws. Having decent reach and also being able to be used as a force tech(An attack that can force the opponent back up into standing position;can be either a light or heavy FT), it's useful at long range and getting reluctant grounded opponents back into the action. It's 47i recovery makes it very bad to whiff, so avoid this or throw punishment is guaranteed. Also, a rope stun can occur in stages such as "Sweat", but only if the first kick does not hit. The attack does track, and can evade highs since you'll be in a crouching state during the attack, but your opponent can easily evade it if they have an attack that avoids lows.
This is overall the option you'll want to use when wanting to apply pressure either on hit via knockdown or on block since both work in your favor, especially when you have your opponent caged near a wall.
- A 21i mid kick that provides a slight launch on hit, and guard breaks on block, but it leaves you at -6 frames(-5 from a slight distance) and has a steep 39i recovery, but the move is luckily safe on block. The string doesn't do much damage wise, as you'll need a hi counter to guarantee a K6KK from it against the lighter fighters(It's possible to use KKKKKKKK on Alpha 152 in this hi counter situation). After the GB, it leaves you at a safe distance to avoid neutral throws and some attacks, and it has decent range to boot. The attack does track, giving you a relatively safe option when unsure about opponents quick to sidestep, as well as also being an answer to special sidesteps some characters may have that can also evade high strikes as well. Will also wallsplat, making it a general way to keep steppers in check near a wall.
While not as safe as her slower P option from IFC, this is generally more of a safe go to when wanting a safe mid that's swifter once you have your opponent conditioned to expect her 14i low sweep as a constant threat.
-Her 12i throw option that uses her best throw in her arsenal: 66T! Good for catching opponents off guard and being swift, it does nasty damage, leaves you at a very safe distance from your opponent, and it leaves you in naotora's back turned state, granting access to her array of options, but you can always use the guard button to quickly turn back around. The only major disadvantage the throw has is that it can be interrupted and the range isn't so long, and it can be crouched if your opponent reads you correctly.
-Possibly Naotora's worst follow up to use, this is a flying butt attack that takes 15i to start up and leaves you at 53 frame recovery. The attack is very high risk: it has no tracking, leaves you at -47 frames when held (it is considered a mid punch/mid kick strike, so either of the holds will allow the opponent to evade it) and -33 when blocked. Although it does GB, it's only a small one and the opponent can still throw punish you. The move itself has great range, and can be used in case an opponent tries to rush you, since it comes out quite quickly, and it knocks back your opponent on hit. Avoid whiffing. If used in a stage such as "Sweat" that has rope walls, it can cause a rope stun when it hits! If done close to the opponent, it will result in a close hit, making it deal more damage on normal hit, but the damage increase will be nerfed down on counter and hi counter hit.
~PSST!- Promise me...you won't tell anyone, but the P+K follow up can also be executed while running! This has the same identical frames, and can cause a rope stun too, just like the original! Try it out sometime! This can be useful option when running in on the opponent.
~BONUS TECH- Although Naotora's Ii Family Creed stance follow ups are predictable and some are slow, there's actually a neat thing about the stance: it has very good delay! It's possible to confuse opponents and lower their guard since the follow ups can be delayed for a fairly lengthy period of time, especially when it looks like the stance has ended.
-This concludes her Ii Clan Stance section! Now for the next section....
Section 4: Naotora's jump stance and follow ups
-This section will address Naotora's jump stance. It's done by inputting 9P, thus making her do a cute little hop in the process. The jump avoids lows, and can be used as an alternative way for Naotora to quickly cover some distance. Just so you know, it takes Naotora about 3 jumps from across the entire stage to get within striking distance of her opponents. Because there's only two options, one being a tracking high or a bound launch mid, this makes for a passive 50/50 situation that the opponent can easily block, but if used in lengthy stuns during critical stun or when dealing with opponents who are quick to sidestep or crouch, this can work in your favor for opponents who opt to take more active defensive measures when defending besides guarding.
The following below are her two possible follow ups:
- Her simplest follow up in this stance. The attack is basically a jumping 27i high kick with 26i recovery. It stuns on hit, and can be used to confuse opponents during CB set ups, thanks to the sudden jump. The downside is that it can be avoided by simply crouching. It's also -6 on block meaning it's only punishable with a breakable neutral throw, which makes the move safe on block. The attack tracks, and has decent range, but it's weak against special sidesteps that avoid highs as well as linear strikes, and it's especially weak against crouching mids that can evade while also hitting you which lows can't do.
- Her second option, which is basically a 30i jumping splits mid kick with 30i recovery. This attack has GB properties, and leaves you at a safe distance to avoid most neutral throws because of the pushback, and you'll have +3 frame advantage. The downside to this attack is that it does not track, so it can be sidestepped if an opponent sees it coming. Not much is guaranteed if it hits, but 6K4KK or 6PK4K are good follow ups to use. The attack also hard force techs, which can prove useful against stubborn adversaries who don't want to stand up right away. Can also cause a bounce on backturned opponents, and can crush low wake up kicks.
~BONUS TECH: While in the lab I discovered a use for her jumping stance on grounded opponents. Right as your opponent attempts a wake up mid or low kick and before it can come out completely and hit you, quickly use 9PK or 9P2K(I prefer 9PK because it comes out faster) and presto! You'll be right behind your opponent in Naotora's back turned stance, either before the wake up kick fully finished or just as it ended. Since they're vulnerable and probably won't be able to turn around quick enough, immediately use 6K(Not 4K since you'll have switched sides, assuming you perform this maneuver on the P1 side) then as the opponent slides backwards from the kick, use K4KK(assuming you started the maneuver on the P1 side) to get some decent easy damage. KKKKKKKK is also possible on lighter characters in case of a hi counter hit, although this is somewhat unlikely.
~BONUS TECH: Although the jump stance only has two follow up options, it can be used to create mind games as well! If used in CB setups or in neutral against an opponent who favors reading and holding, it's possible to bait a hold reaction from them so you can either get a hit in uninterrupted, or you can go for a hi counter throw punish. Don't underestimate the power of just the jump!
Section 5: Naotora's complete moveset breakdown w/ basic frame data and situational usage
-This next section will be fairly massive, and will address all of Naotora's command moves, what they can do and their properties, and frame data so that you can know what moves are safe and unsafe to use. I hope you know numeric inputs by now for directional input, as I will use this extensively in this section. Feel free to refer to the picture explanation whenever you need a refresher. Let's begin!
~NOTE: Throughout this guide, I'll replace the "*" bullet with a "☆" next to certain moves as a way to show you the moves I think you should definitely utilize during a match. This is based on the move's properties and not at all based on appearance or aesthetic. I will also use a "¤" to indicate moves that can cause a "bounce" on backturned opponents. Now back to the guide:
*P- Her basic high punch, or shall I say slap. It's swift at 11i, and only has 12i recovery. It's -1 on hit and on block, and it doesn't provide much advantage aside from being used as a poke or inside CB set ups. It does provide +2 frame advantage on CH, and it stuns on Hi counter hit, giving you +37 in this situation. It also provides +12 if done on any counter hit to a back turned opponent. The attack doesn't have alot of range, and doesn't track.
*PP- Basically the same as the last move, but with an additional slap added. The string is now 10i and has 15i recovery, and is -8 on block(-7 from a slight distance.) and -6 on NH, +O on CH, and +34 on Hi counter hit. The second slap has slightly shorter range and also does not track, but you can delay the hit so that you can confuse your opponent and get a counter hit as a result.
Since PP jails on hit or block, it passively puts the opponent into a situation where they'll have to react to a mix up since you'll have a high, mid, or a low to react to. Tick throws, or throwing immediately after is also an option that can be used.
~BONUS TECH: The PP combo string is what you would call a jail string. This type of string is a string that is swift enough that the second strike can not be held, or ducked once the first punch is blocked or if it hits, basically meaning that the second punch is unavoidable if you use it over her PK string, which does not jail since it's slow at 13i, while the P follow up is fast enough since it's only 10i. This does not apply however to hi counter hits when your opponent tries to attempt a critical hold.
*PPP- The same as the previous string, except now her 66P command is attached on. The string has 18i and 26i recovery, and is unsafe at -14 frames when blocked. The advantage to using the combo is that the third hit stuns on normal hit, providing you a +34 frame advantage to work with, and it can't be sidestepped since the last hit has tracking properties. It also launches on either counter hit or high counter hit, and can even launch back turned opponents. The attack also has decent range, and can avoid some neutral throws if done at the farthest distance where it can still connect, assuming the first two hits are whiffed or intentionally do not hit.
Risky to use in neutral situations, but is useful as a general quick launch in stun set up, acting as the mid 50/50 mix up launcher vs her PPK which is a slower, but safe high jump launcher.
*PPK- This string is basically the same as the previously one, except the ending punch is replaced with a somewhat slow and predictable jumping 29i high kick, making the string now have 29 start up frames and 35i recovery. Although the string is dangerous if whiffed, the string tracks, has GB properties that leave you at -2 on block(-1 at a slight distance) and at a safe distance, and the final jump kick avoids lows and launches on NH, although counter hit and Hi counter provide a better launch that you can really utilize, including if you perform the string on back turned opponents. The string is pretty linear and can be avoided by simply crouching, and the final jumping kick can be interrupted, so be strategic when throwing the string out, and remember it can also be slightly delayed.
Like PPP, it's an in string launcher, but it's more easy to react to since it's quite slow to compensate it's safety, making it the safe 50/50 option vs using her PPP mid launch.
☆PP2K- The same as the previous string, except now her crouching low sweep 2H+K is the third hit, making the string have 23i start up and 29i recovery. Although good for a mix up, it's -15 on both normal hit and on block, but it stuns in counter and hi counter, but in two different ways: If it's done not so close to an opponent, it'll cause them them to back up slightly stunned, with them bent over slightly as if to grab their injured leg. This will give you +15-+16 frame advantage. If done within close proximity of the opponent, it'll cause them to almost trip over, which will give you +14-+15 frame advantage. If done at all to a back turned opponent assuming you did it without the first two punches that would turn them around, it'll make them fall to the ground outright. Avoid whiffing and performing this string on block and be cautious on normal hit free canceling, as a low throw punish is guaranteed because of the lack of pushback. Aside from that, the sweeping low kick has tracking properties, and the attack has good range, as well as being able to force tech grounded foes.
This string will force the opponent into a hard 50/50 situation since they'll have to guess between a mid or low ender, and since both options track, there's no easy way to escape the string on block. Both give you +2 frames on block as well, so it's a matter of choosing which you want to foe to watch for.
~BONUS TECH: This is related to her her upcoming follow up string PP2K2K. If PP2K is done on counter hit or higher, the PP2K2K follow up will be GUARANTEED due to the slip like stun...even if your opponent attempts to stagger escape, which leaves you with +8-+14 frame advantage to guarantee the final sweep!~ This also comes into play during stuns or stun set ups, if your opponent does not manage to hold the P, PP, or most importantly the first 2K part of the string during stun, the second 2K will be guaranteed!
~NOTE: There is a buffering error with this move: if you buffer the 2 directional input during the second slap, the attack will always come out as PPK! Avoid buffering in this command string and press the 2 precisely after the second hit.*
*PP2KK-This is a possible mix up that stems from the previous string. She finishes the string with a predictable jumping mid to high kick turn around twin barrage. The first mid kick has 32 start up frames and then the attack automatically transitions into her 3i follow up high kick. Even on normal hit, the attack knocks back the opponent an incredible distance, and the first mid kick evades lows due to the jump. The attack also has GB properties that leave you at +2 frame advantage, but the pushback isn't major, so if you're still in neutral or guarding afterwards, the opponent can attempt a throw. Avoid any whiffing at all costs. The attack does track, and has good range. Also avoid using this after the set up 6KK or KK, the final 3i kick will once again whiff on hit leaving you at a nasty -19.
This is the stronger of the two options from the PP2K mix up, but is more risky since it's start up is quite slow, making it prone to holds and even jabs.
☆PP2K2K- The swifter but linear string finisher from the previous two strings addressed above. This ends the string with another twin sweeping low kick. The attack is faster at 20i start up, but has 47i recovery, making it 6 frames more than the previous mix up. If it hits, it'll knock down on normal hit. The attack also has decent range and GB properties that leave you at +2 frame advantage! Like the first 2K sweep, the final sweep does track, but be wary using this as it can be held on reaction due to the linearity. The first sweep can be used as light force tech, and the second one can hard force tech if they hit the grounded opponent in time.
Being a 50/50, compared to her PP2KK, this is swifter than the mid kick ender which makes it easier to use since it can be hard to react to.
☆PK- A basic two part string that begins with her high slap going into her spinning high kick. The string is swift at 13i start up and an acceptable 25i recovery. Although linear and it can be ducked, it's good in CB set ups, and also useful as good juggle ender in situations where the more optimal K6KK isn't able to hit. The second kick doesn't have the best range, but it has good enough reach where you can hit the opponent from afar, and the pushback allows you to avoid most neutral throws, which helps since the string leaves you at -7 on block, -6 if done from a distance making it safe from afar. The second kick always provides a critical stun(+9 frame advantage), albeit short unless on hi counter hit(+24 frame advantage). If done on counter hit and if ONLY the kick hits, the stun will turn into a longer stun with +24 frame advantage, equating it to the stun that the hi counter hit would provide. The string jails on counter hit as well. The string does track, but the kick can cause a wallsplat.
☆6P- A 14i forward thrusting mid palm attack with 22i recovery. This is one of Naotora's quicker attacks, and if done successfully on an opponent's whiff or during their attack, it scores you an easy critical stun that gives you +26 frame advantage on any counter hit, and +18 if done on back turned opponents. Using this move by itself as a way to bait a counter is risky, because not only does the attack leave you at -12 when blocked, but it also lacks range and has to be done up close, and it doesn't have enough pushback to dismiss throw attempts. The attack also does not track. Despite the risks, the attack can be useful in mix ups: because naotora has a lot of mid kicks and high kicks, you can use this to throw off opponents who weren't expecting a mid punch, since she doesn't have alot of them, so use when using her K or 6K strings can be random if the foe assumes you'll continue into the strings. Somewhat limited however tho since stagger escapes from your foe can make using it a bad idea if they can shave down their stun.
~NOTE: Sorry, sorry, SORRY, but the 6P string is a very linear string since you can only mix up after the the second mid kick...please be careful using this string, as it can be held on reaction. I'm sorry!!
*6PK- Her 6P command followed up with a mid knee, making the string somewhat shorter at 12i but with a slightly longer 24 frame recovery. Although unsafe at -9 on block(-8 at a distance) and having poor range in comparison to 6P, it provides +5 frame advantage on normal hit and a very brief critical stun, but you'll have to use one of the further 6P follow ups to continue it in time. The knee hitting on counter and hi counter will result in a +16 frame and a stun you can use for any set up or baiting of your choice. The string unfortunately is linear and is partially static meaning you can't mix it up to the other follow up options until after the knee hits, so it can be held on reaction if read quickly. The string also does not track.
*6PKK- Her high kick follow up from her 6PK string. This ends the string with her jumping kick from her PPK string. It's 29i and has 35 frame recovery like before, and it still GBs leaving you at -2(-1 at a slight distance) and a safe distance to avoid most throws. The kick launches when it hits as always, but it has to hit by ITSELF to provide the optimal launch needed for her K6KK to connect, and it has to be counter or high counter hit. Alpha 152 is light enough to avert this: She doesn't require for only the jumping kick to hit at all, and the K6K will connect normally if the full string hits on all level counter hits. KKKKKKKK is also guaranteed on her if only the jumping kick hits her on counter and high counter hit. Back to the subject of the core move, the jumping kick has good range, tracks, and can evade lows, but be wary that the kick can easily be held on reaction due to how delayed it is coming out, and it can also be ducked, and the recovery warrants immediate throw punishment.
*6PK4K- Her 6PK command finished off with a 21i mid chopping axe kick with 25i recovery. Having decent reach and granting +24 frame recovery if it hits, it deters opponents from trying to crouch, and provides a good stun to start up a CB set up, and it has nice delay to back it up. It also leaves you backturned granting you some lethal follow up options. The string still isn't completely safe: It has no tracking, is very linear as all the hits are mids, and it's -8 when guarded against up close, meaning throw punishment on your end in this situation. Because of the slight pushback and range of the axe kick, it'll leave you at -7 if done from a distance, allowing you to avoid some throws and to quickly turn back around to reassess your approach. The move is also useful as a light force tech, but you may opt to use the 4K4K version instead since it's quicker. As a rule of thumb, this is an excellent way to end juggles if you are positive that that the 6P will be quick enough to hit the opponent, and the second knee kick causes a brief refloat which can be used to extend combos for another follow up 6PK4K or 4K4K.
Also a true mid which can help hit foes who have stances that can avoid normal mids.
*6PK2K- Her final option stemming from the 6PK string.This ends the string in a 22i backwards low stomp attack that leaves Naotora backturned. It's a good mix up and can provide a slip like stun during some counter hits, but it lacks tracking and doesn't have a lot of pushback, and leaves you at -7 on block, -6 if done at a distance. If done just out of range and if only the low stomp kick hits, it's possible to avoid some neutral throws, but it can be difficult unless you know exactly that you're just within range for it to hit, while remaining far enough to avoid the throw. It can also be used as a force tech, but 4K2K would be the quicker alternative, and keep in mind that it has good delay. Although you are technically in a "crouching" state during the 2K part, you can be both high or low throw punished so be wary. Can also be used as a juggle ender in times where you are not sure the 4K will hit heavier opponents.
*66P/(While running)P- This is basically the final same upwards mid jab from her PPP string, and it has the same identical frames: 18i start up and 26 for recovery. It provides +34 frame advantage on normal hit, and launches on any counter and backturned opponents. The attack provides enough pushback on block so that you can avoid most neutral throws, and it tracks.
☆4P- A 22i high spinning jab attack. It has short range, -7 frames when blocked, 27i recovery and it only provides a brief stun and +5 frame advantage on normal hit, so it's not really much of a move to use by itself in neutral position or spacing situations. If done on counter hit, your opponent will become stunned and will fall to the ground....but only if they don't hold, meaning they'll have to make a guess in this situation or be forced to fall to the ground. The attack also tracks, and does well being used in CB set ups, but be cautious since it can be avoided by low holding out of the hit during a CB set up, or by ducking if the opponent reacts in time. The move however has to be respected when done up close: if done with just a slight amount of distance from your opponent, the move will be -6 on block, making it safe in this situation!
Overall, this is more suited for used in stun since the risk outside of stun is moderate.
☆8P- Another useful tool for CB set ups and scoring a counter hit. This is a 15i slicing mid jab with a 26i recovery. The move leaves you at -3 on normal hit, but it provides a +23 frame advantage on counter hit. Because it's a mid, it can be used on crouching opponents and even stun them, and it can "bound" the opponent unto to the ground if done twice on counter hit. The move however has average range, has no tracking, and leaves you at -6 on block, -5 if done from a slight distance, meaning it can be punished by quicker throws or neutral throws, but this shouldn't be too major since neutral throws can be broken if timed right, making it a relatively safe move to use at a slight distance. When not wanting to risk using her highs to start a stun or her unsafe mids, this is a useful poke that has little real risk. Being her safest mid on offer, you'll likely be using this as a common strike since there's little risk to using it besides the slightly slow speed and lack of tracking.
☆2P- Naotora's 14i low jab attack with only 21i recovery. When an opponent is overwhelming you with attacks and if you can't get them off of you or build momentum while you're defending, this jab pushes back on counter hit, providing you +3 frame advantage, and enough pushback to help you reassess the situation. Also, the 2P crouches during the hit, and it can be used as a blunt way to dismiss opponent throw attempts, and even as a light force tech. It also has great range, is only -4 when blocked(-3 at a distance), and provides +0 frame advantage on normal hit.
The downside is that the attack does not track, and can be beaten out by faster characters who possess a faster 2P with less start up. The low is also not as formidable since Naotora gains no real advantage on hit when used compared to similar slower low pokes, making it more useful as a general safe poke when trying to open up turtling foes.
☆3P- Another one of Naotora's few mid punch attacks, which is simply a 16i frame upward slice jab. The move is definitely not suited for using in neutral: It leaves you at -11 on hit, 25i frame recovery, and is -11 on block, which is just asking for throw punishment. The move is therefore better suited for carefully interrupting moves and scoring counter hits when making solid reads, and also a way to further mix up CB set ups. It provides +35 frame advantage lift stun on counter hit, and +15 on backturned opponents. If done twice on counter hit, it can launch, and you can even use it as an alternative way to launch stunned opponents who thought you were going to for her P+K CB. The attack does not track, but it has decent reach to make it viable from slight distance. It will also stun crouching opponents on normal hit.
This is Naotora's only real lift stun in her kit excluding launchers that need a counter hit to go beyond that, making this an optimal choice when wanting to to fish for more deeper stun damage.
~NOTE: I'm sorry, but....this next move is going to be broken down into 8 separate moves for the infamous Kurenai kick string, to avoid a massive text wall and less of an eye sore for you. With each additional kick, just assume I'm referring to the added on kick, so that you can get a clear idea of what each kick in the string does. This should help simplify things....or so they tell me...
☆K- The first kick in her infamous Kurenai kick string. It has a fast 11i, meaning it can beat out a lot of slower moves and high punches from slower fighters. It stuns briefly on normal hit giving you a small +8 frame advantage, but the stun is elongated on counter hit and provides you a more optimal +25 instead, which is perfect for starting up a CB set up or hold baiting. The attack is now safe at -5 on block(-4 at a slight distance) and now tracks,making it a viable poking tool when baiting for a counter hit. It can also be ducked or low held out of, so be careful when throwing this out at a defensive player.
*KK- A second high kick follow up is added to the base high kick. The follow up kick is slightly slower at 17i start up, but it has a slightly better 23i recovery and is somewhat unsafer on block at -9(-8 at a slight distance). The kick has tracking properties and longer reach than her base kick, and starting from this kick, the entire string will now register as a 8 hit combo if finished since the first kick has stun that the second is fast enough to follow through on. If your opponent blocks the first first kick form before, this will jail meaning they can't hold or attack until after both the kicks finish, they'll also be unable to crouch, assuming you do not delay.
*KKK- A third high kick now added after the second, making the current string now 25i with a 26i recovery. The third hit has great range, and provides a +2 frame advantage on normal hit and +22 on counter hit or during a stun. It also has tracking properties and has the appearance of a slashing mid kick which can throw some people off who don't know the match up. The move is however is -14 when blocked(-13 at a distance), so be cautious free canceling this against defensive players. Also keep in mind that these three high kicks can all be simply crouched, so watch out!
~NOTE: To save space and time, the next three kicks all have 26i recovery. Furthermore they are also all -14 on block(-13 at a slight distance). Keep this in mind!
*KKKK- A fourth 20i mid kick is now added, which will harshly dismiss your opponent's efforts to crouch the first three kicks. This kick provides +5 frame advantage on normal hit, and will put your opponent on the lv. 2 critical stun threshold if you did the previous three kicks successfully. +22 frame advantage is given on counter hit or during a stun if it hits, and unless the opponent holds correctly, the kick is unavoidable since it has decent range and tracks.
*KKKKK- A fifth 15i low sweep is now added, which greatly adds on to the string's unpredictability. It provides +11 frame advantage on normal, counter, and high counter hit if all the previous kicks apart of this string were blocked, or if the sweep hits by itself. It knocks down if the opponent is already in the middle of the kick string since all the kicks before it stun, and it can trip backturned opponents if it hit by itself. The attack has great range and tracks, and can also be used on grounded opponents as a somewhat impractical force tech.
*KKKKKK- Another mid spin kick that is the same as the fourth one, but this one is faster at 14i. It provides +3 frame advantage on normal hit(+14 to +15 if the opponent is crouching) and +23 on counter hit(+14 to+15 if crouching) if they both hit by itself(Which is a pain to do since the string by now goes across the entire screen...trust me, it's tricky to get it to hit by itself unless the opponent is backing up consistently ~_~). In the situation that it hits after the previous low sweep briefly stunned them, you'll be at +22 frame advantage in this scenario. The kick also tracks, and has good reach.
*KKKKKKK- For the seventh hit, another quicker 14i low sweep with 22i recovery is thrown in for good measure. It provides +15 advantage on normal hit and counter hit, and if the opponent was already stunned from the previous kicks in the string, it'll knock them down. This sweep is the final kick in the string that tracks, and it has decent range. Can also be used as a somewhat impractical force tech.
☆KKKKKKKK- This now finally adds the last kick in the Kurenai kick string: a hard hitting 23i high kick that knocks the opponent down on hit! It has GB properties and leaves you at +4 frame advantage if the opponent blocks it, and the pushback is good enough to avoid most throws. Although this final kick has ok range, the long traveling distance that the whole string has makes it pretty long range, but be careful of whiffing as it has a 40i recovery times. The kick also does not have tracking abilities, and can be ducked easily if the opponent has blocked the whole string up to this point. This string is important to utilize as it is her most damaging option to use when the opponent is launched, but the opponent has to be high enough and light enough for it to hit when airborne. Avoid using the string when near a wall, as the fourth hit can cause a premature wallsplat that can steal away potential high damage output.
~NOTE: We're not quite done with the Kurenai kick string yet! Now this next part will cover all 9 of her possible mix ups! Like before, assume I'm referring to the added on command, as I've already addressed the core kicks' abilities in the previous part!
*K6K- This transitions from her basic high kick into her jumping 20i mid hit. It launches on normal hit, but because of the long 38i recovery involved, you won't be able to do any actual follow ups from it other than her K6KK one I will be addressing shortly. Free canceling this attack on block is not a good idea, as you are left at -25 when blocked, and whiffing is also out of the question as well because of frame recovery involved. The attack also doesn't track, and it has somewhat mediocre range, but the jump involved in the kick can evade lows.
☆K6KK- The full string stemming from the previous command, turning this into a 19i command move. If the the opponent is high enough in the air for the rapid high kicks to hit, the attack turns into a throw command that makes her do a relentless barrage of kicks to them while airborne and she finishes it with a hard flipping kick that sends them back first unto the ground. The command is a good mix up against opponents who are already stunned, and it makes a good juggle ender in situations where KKKKKKKK won't hit due to height or weight. The move has 26i frame recovery if it misses, and leaves you at -34 when blocked, which warrants you throw punishment. The string also does not track, and the reach is good, but it will completely go over the opponent's head if done from a long distance where the K6K won't hit.
*KK6K- A mix up that transitions into her 22i(The second auto part is 3i) 9K mid jumping overhead "cartwheel" attack. The "cartwheel" knocks down on normal hit, and has decent range to allow it to be used at a distance, which is the range I recommend since you can be jabbed out of it during the jumping phase and start up and wind up in a stunned state. The "cartwheel" also avoids lows because of the jump, allowing you to crush low attacks and low wake up kicks if timed correctly. The attack unfortunately does not track, and is -9 when blocked (-8 at a slight distance) and has 25i recovery tacked on. Throw punishment can be avoided if you do the string at a distance, as the pushback will allow you to avoid most neutral throws. The "cartwheel" can also be used as a foce tech against opponents on the ground. If only the 4th "auto" 3i kick hits on hi counter hit, it will cause a bounce allowing you to execute a follow up combo. Furthermore if both the kicks hit on hi counter hit but only by themselves, you can also execute a follow up from that as well, but only from a distance. If only the 3i auto kick hits a crouching opponent, it will result in a stomach grab stun that that provides +25 FA on normal hit! Counter hit will result in a knockdown while a Hi counter will result in a bounce instead.
☆KK6KK- The second follow up from the previous string, that ends the string in a 26i twin "cartwheel". It basically does the same things as the original one does: It evades lows, has great range, force techs, and crushes low attacks. It also GBs, providing +8 frame advantage, a decent pushback, and it puts you in her backturned stance. The string however does not track, and because the "cartwheels" are both mid kicks, it can be held on reaction if your opponent is guarding and reads you.
Very useful as a juggle ender since it hits fairly hard and can easily be used against all weights with little difficulty. It can also be used on guard as a way to pressure opponents on block since the +8 is good, but it can be risky to go for since the string can be held easily or sidestep, making it somewhat risky.
☆KKK6K- This string transitions from her triple high kicks to her Makikaze 236K command move. Instead of the 30i start up that the original command has, this starts up slightly quicker at 26i. This attack is a spiral arrow type drill attack that has excellent reach, being able to travel across the whole stage. Once it hits the opponent, they can not hold out of it until their stun animation ends, or until you execute the additional follow up that'll end the stun prematurely.(NOTE: The longer you avoid executing the follow, the longer the stun and drill attack will last.) You will be left at -5 if it hit by itself, which leaves you vulnerable to neutral throws, but it isn't a major issue since they can be escaped/broken. If the base high kicks hit your opponent and if you execute the 6K part on normal hit or higher, the drill attack will launch them and they'll spin out as they fall to the ground. If only the drill attack hit a backturned opponent, it'll put them in a limbo type stun and they'll be unable to hold to escape the follow up. The attack tracks, and evades lows which can shut down your opponent's low attack attempts. Be wary that the attack is a shocking -35 on block, and leaves you at a 41i recovery, although it travels across the whole screen, so unless your opponent jumps over it, it won't make much of a difference as you can still get throw punished either way.
*KKK6KK- This string adds the final follow up to her drill attack: a 26i frame mid kick. It launches the opponent on normal hit, although you won't be able to use her K6KK juggle ender on heavier opponents unless they're light enough to allow the a counter or hi counter hit to launch them high enough.(Alpha 152 can be due to her feather weight, lighter opponents can too but you have to be precise with the timing and have no delay.) Finally the attack also tracks, but keep in mind that that this follow up kick can be held on reaction since it's a mid, so it may be best to save it for use in juggles rather than during a stun. Another use for for this string is that since the 4th wallsplating kick from the original full no mix up string is replaced with this drill attack, you can use this instead against airborne opponents to carry them across the stage so they can fall off ledges, and you can use the final kick follow up to make them hit the wall it leads them to.(If they're high enough for the final kick to hit)
Generally, KKK6KK is very risky to use on block or hit since you're not at advantage unless the foe panic holds in anticipation for the ender. This is definitely a 50/50 mix up you'll have to commit to.
☆KKK4K- This string ends her triple high kicks with a 22i hard hitting high kick that knocks down on normal hit! It has a number of uses: It can be used as a linear but confusing mix up on opponents who thought you were going to go for one of her mid kick mix ups or who assumed you were going to use the full no mix up Kurenai kick string and they were waiting for the mid kick. It's also viable in juggles as the kick has great pushback and provides a wallsplat in case you are near a wall. It also GBs and leaves you at +4 frame advantage and with enough pushback to avoid most neutral throws. Finally, it tracks, and can provide a rope stun in stages with rope walls such as "Sweat". The only negative things about this string is that it's still linear, and can be crouched or held on reaction. The final kick also lacks range and can whiff, resulting in throw punishment because of the 40i recovery. If the final kick is held successfully, the opponent will not be able to hold it; they will simply move aside leaving you at -25 vulnerable to throw punishment.
*KKKK6K- In this string, her low sweep is replaced with the jumping high kick from her PPK string. It's identical to it in terms of frames, still remaining 29i and having a 35i recovery. It still tracks, GBs leaving you at -2 on block and with a good pushback to avoid most neutral throws, and it launches on normal hit and avoids lows because of the jump. A glaring weakness is that since the attack replaces the LOW sweep from the string with a HIGH jumping kick, the opponent can just simply hold low like before to avoid it, and they can throw punish afterwards because of the steep recovery. Because of this, I regard this as one of her worst mix up options to use....be very cautious when throwing this out at your opponent since it's a rather shallow mix up but is safe compared to the low
~NOTE: That concluded her Kurenai string, but we're not quite finished yet! This next part will address her other major kick string Kawayagi, which is compromised of 7 kicks(8 if you count the auto one that is included with the final kick.) Like I did with the Kurenai kick string, I'll separate each kick follow up for simplicity and to avoid a bulky text wall eye sore. I'll address the mix ups from this string once all 7 kicks are broken down.
☆6K- The beginning kick in the string: a 16i forward jumping mid torso kick with 27i recovery. It provides a stun and +21 frame advantage on normal and counter hits, and has good range and evades lows because of the jump. The move however lacks tracking and is -14 upon successful block, and can be throw punished. This is her quickest mid stun starter, but stagger escape can make it rather shallow to use unless you proceed to utilize the full 6K kick string to continue the stun since a successful stagger escape will help avoid mix ups, but not anything tied to the string itself, making it scary as it has a quick launch mix up afterwards that can quickly create a juggle situation.
*6KK- This adds in a 26i flipping overhead mid kick into the mix. This has even longer reach, and also provides +21 on normal and counter hits, and avoids lows too. This one has the same 27i recovery, but is unsafer at -20 on block, and like the first kick, it has no good pushback and does not track. It can be delayed to throw off opponents however, and this hard force techs opponents lying on the ground.
*6KKK- Naotora throws in a twin jumping forward torso mid kick with the same identical move properties and frames as the original 6K.
*6KKKK- Naotora throws another twin flipping overhead mid kick that's the same as the second kick from 6KK. The frames and properties are once again identical. The entire string up to this point is also guaranteed on back turned opponents.
*6KKKKK- Naotora now further switches things up by throwing in a slanted 24i high kick with 24i recovery. The kick provides +25 frame advantage on normal hit, and spins the opponent to the ground on counter hit or if they were stunned by the previous kicks beforehand. The string tracks, but be wary that if an opponent knows the high kick is coming, they can can crouch it on reaction or even hold it.(If they hadn't already held you by now since everything up to this attack was a mid kick...). Also keep in mind that the high kick is -13 on block.
*6KKKKKK- Naotora adds some more spice by throwing in a 20i low sweep with 29i recovery. It provides +14 on normal and counter hit and stuns the opponent by making them fall briefly on their bottom or on their stomach. The sweep tracks, but be careful about free canceling on block since you're left at -15. The sweep can also be used as a somewhat impractical force tech.
*6KKKKKKK- The final hit adds a somewhat telegraphed 33i wild jumping mid kick that automatically transitions into an auto 2 frame high kick. It knocks down on normal hit, tracks, and GBs which leaves you at +2 frame advantage. The pushback doesn't avoid neutral throws, but you can quickly and easily halt your opponent's throw attempts thanks to the frame advantage bestowed to you. The kick also avoids lows and can harshly punish opponents who are naive enough to attempt one.
~NOTE: We're almost done with this kick string! This last bit will finally address all possible follow ups stemming from the Kawayagi kick string. Hang in there for the Ii Clan!
☆6K4K- This transitions from her mid kick into a jumping 16i high kick that launches on normal hit and evades lows during the jump. The attack has decent range, but is unsafe at -14 on block, has a 24i recovery, and does not track. K6KK is a good ender for this if it hits, but KKKKKKKK is even better if the opponent is light enough and if done on counter hit.(Alpha 152 is light enough for the Kurenai kick string to work on normal hit)
☆6K4KK- The follow up to the previously addressed string: a downward 20i mid axe kick. Although unsafe at -11 on block and with 26i frame recovery and no tracking, the follow up is useful in situations where no other follow ups are fast enough to hit, or if the opponent isn't launched high enough due to weight. Can also be used as a force tech, and has good range. Take heed, the attack leaves you briefly in a squatting position, and because of the recent update, alot of fighter now have moves that can accurately hit squatting opponents, so be cautious. If only the last kick hit on hi counter hit, then it will cause a bounce allowing you to execute a follow up combo.
☆6KK4K- This mix up adds in a 29i twirling high kick that's quite similar to the final kick of the PPK string. The kick GBs and leaves you at -2 on block, and launches on normal hit, also providing the highest launch from a string, but has a long recovery as a weakness. The range is good, and the attack tracks unlike the two mid kicks before it. If done during a CB set up or stun, the launch will be higher, which is a good reward in exchange for the possibility of the second twin mid being held on reaction. The kick leaves you at 35i recovery and can be crouched to avoid it, so be wary...
*6KKK6K- This mix up leads Naotora into a linear 18i frame jumping knee lunge that launches on normal hit. It's risky at -9 on block and 26i recovery, and can easily be held on reaction since all hits up to this are all mid kicks too. Despite the risk, it provides a good launch as a reward, and the whole string avoids lows. The string does not track however. Guaranteed on back turned opponents.
¤6KKK4K- Like her previous string, this is another risky but rewarding string. After the beginning 3 jumping mid kicks, she throws in a 30i axle mid kick with 26i recovery. If it hits, it sends your opponent "sliding" backwards for roughly two seconds, and they'll be vulnerable to follow ups like K6KK, 236KK, or 6K4KK. The string is -11 on block, but throw punishment can be avoided if the final axle kick hits the opponent at just the right distance, but it's tough unless you're opponent is constantly backing away while the string is going on and if only the final kick hits. The string does not track, and the final kick can be used as a force tech.
~BONUS TECH: If you want the K6KK ender to hit after the final final kick to hit, quickly dash forward forward and execute the command just as the opponent is about to flip over. This only works on the lighter and mid weight characters.
*6KKK8K- Another risky string, but it provides high reward if all the attacks hit successfully. This throws in a highly predictable 42i jump flipping mid kick with a recovery of 26i. The kick puts the opponent into a sit down stun, which guarantees a CB if the whole string hits, since it takes a while for the sit down stun to finish. If the string is blocked, you'll get +4 frame advantage thanks to the GB properties , and a slight pushback, and the kick avoids lows during the massive jump. Keep in mind that the string does not track, and is very linear and can be held very easily. The opponent can also stagger/slow escape during the first three kicks kicks to negate the level 2 critical stun, so be cautious. Can also be used as a somewhat impractical force tech when needed.
*6KKKKP- Her 41i mid punch follow up that's basically the same as her punch follow up from the Ii Family Creed stance, sharing the same frames and abilities. Although it mixes things up, the attack is heavily telegraphed and can be held on reaction. It does track however, making it useful in nailing opponents who attempt a sidestep.
~NOTE: A few of the upcoming attacks I will not fully address since they are basically the same as some previous ones with a certain command taken away from it, so frames and properties will still be the same. To make it easy to reference the attack it's derived from, I will list it in the summary. The only main difference is that since the beginning command was is removed, the attack comes out sooner without any fluff, but the frames are still identical. The tracking information is still intact on the move as well, and so is the general range.
☆4K- basically the same as 6PK, except without the mid punch in the string. It's still 12i and has 24i recovery, and is -8 on block(-7 at a distance). The properties remain the same too, and it does not track. Useful for air juggles when the more optimal 6PK is unable to hit due to launch height or opponent weight.
*4KK- Like previously stated, this is basically the same same as 6PKK, except the 6P mid punch is removed. The frames and GB are identical.
☆4K4K- The same as 6P4K but with the mid punch removed. The frames and pushback are identical, and it still leaves you backturned. Can be used as a light force tech.
☆4K2K- The same as 6PK2K, except the mid punch is removed. The frames are identical, and it still leaves you backturned. Can be used as a light force tech. In situations where the slightly more damaging 4K4K will not hit airborne opponents due to juggle height, this is considered the more viable option to use since it ends in a swift low that can hit opponents successfully.
☆8K- Basically the same as the 6K4K command, just without the beginning jump mid kick from the Kawayagi string. It launches on normal hit, and avoids lows due to the jump. Has decent reach and useful as a launching whiff punisher. Also her staple go to launcher after a CB.
*8KK- Basically the same as the 6K4KK command, but the Kawayagi kick is once again removed. Can be used as a force tech. Because the first first kick jumps over lows, the second kick can be used to crush the low kick as a result. If done on hi counter hit and if only the second kicks, it will cause a bounce allowing you to execute a follow up combo, making the move perfect for punishing missed attacks and opponents attempting to attack you while at a distance.
☆9K- Pretty much the same as the KK6K string, but the beginning kicks from the Kurenai kick combo is removed. It still avoids lows, and can be used as a force tech. Also useful as a less risky whiff punisher due to it's reach, and can crush low wake up kicks.
☆9KK- Pretty much the same as the KK6K string, except the beginning high kicks are removed. The follow up kick still avoids lows, and can be used as a force tech, and it still GBs and leaves you backturned. This can also be used as a riskier, but longer range extension whiff punisher, and can also be used to crush low wake up kicks. Although it can be held if the first attack is blocked, the opponent must be aware that you can indeed free cancel and bait a hold, or you that you can brutally crush a throw if they attempt to do one, thinking you were going to free cancel.
☆2K- A simple 14i low kick that has good reach and is good for mixing up CB set ups and quickly damaging opponents who favor guarding high and mids. It leaves you at -4 on normal hit and gives you +1 frame advantage when performed on a backturned opponent. If done on counter hit, you'll get an even better +16, and if done on high counter hit to a backturned foe, it'll put them in a bad stun and give you +31 on frame advantage. If done twice in a row on counter hit, it'll knock them down. The move is unsafe at -9 on block and 28i, but throw punishment can be avoided by doing the attack at a slight distance, thanks to it's good reach. It can be used as a light force tech, but it does not track. Keep in mind that only 4K and 6P are the only follow up options fast enough to continue the stun in a CB or general stun set up.
☆3K- A good spacing 15i mid kick with 25i recovery. Having great reach, it can be used as a way to punish whiffed attacks and to attack the opponent from a distance. You'll get +4 frame advantage on normal hit, and +24 on counter hit, along with a longer and better stun. The kick also provides +15 against backturned opponents. Although unsafe at -8, the range allows you to use it from a safer and farther distance, allowing you to avoid some throws. The kick does not track.
☆236K- Pretty much the same as her KKK6K string, except without the beginning triple kicks added on. The start up is slightly longer at 30i, but other than that the string is almost identical. It's great as a whiff punisher because of the traveling distance, and can be be used after attacks like 4H+K. The attack does track, and it avoids lows, but be cautious as the attack is -35 on block and is quite risky to throw out without thought.
*236KK- Identical to the KKK6KK string, except without the beginning triple kicks from Kurenai. It launches on normal hit, and wallsplats if done near a wall, along with the other previously addressed properties.
~PSST!: Promise me....you won't tell anyone, but the 236K attack can be done while running! Just press K after running some distance.
~BONUS TECH: Is the female Tengu giving you trouble with her 9P and flying forward shenanigans? Quickly turn their entertainment into an unsatisfying dismissal with the 236K attack which will shut down her attempts to move in on and throw you! Have mercy...
~BONUS TECH: Although the move is unsafe on block, you're not completely helpless if it is guarded. Unless your opponent actually guards BOTH hits, they may have to make a guess: Either they attempt a hold to stop the second kick, or they attempt a throw if they believe you will not finish the string. If they throw out a hold and you didn't finish, you can simply throw them for a hi counter damage throw of your choice. If they decide to throw and if you DO finish the string, they'll instead be launched higher on counter hit! The same can be applied if it actually hits, since you are left at -4 if only the first spiral kick hits, and you'll be at an advantage if you're opponent is naive enough to attempt a hold, which is helpful against characters who possess an expert kick hold!
☆P+K- This is her character specific critical burst. It's 20i forward push mid punch attack with 26i recovery that stuns the opponent on normal hit, and they'll fall to the ground unless they make guess or hold to get out of it. It's -9 when blocked, so try not to throw this attack out in a neutral situation, instead use it during CB set ups when trying to CB your opponent. The attack doesn't have the best stun however, and the opponent can stagger/slow escape to avoid additional critical level stun. The attack does not track.
*4P+K- Her mid punch power blow in it's normal state. It can be charged up to 60i, and can be released as soon as 25i, with the damage depending on how long you charged it. Regardless of how long it is charged, it'll always have a 38i recovery, and be -14 when blocked. The attack does not track either.
☆4P+K(50% Hp. loss or more;CHARGE!)- Her PB when Naotora has 50% health lost or more. Just like the original regular PB without at least 50% health gone, it can be charged, but you need to charge it at least 40i before it can actually initiate the actual PB attack. If blocked when charged at least 40i, it'll gain GB properties and give you +11 frame advantage on block. If you ever want to cancel out of the PB to fool opponents and to get a reaction, simply use 22 or 88 to sidestep out of it. Remember to use it only when safe or after a CB(Only halfway in a CB, since the opponent will fall over before the whole thing can come out), if it's held during the charged PB phase, it'll be treated as a hi counter hold if the opponent successfully held it. This attack does not track.
☆H+K- A 15i thrusting mid knee kick with 26i recovery that launches on normal hit and has great reach. If your opponent is in a level 2 critical stun or if it hits on counter or hi counter hit, it'll launch much higher, give you more juggle options. It also makes a good but risky whiff punisher, but take heed as the attack is -9 on block and does not track. The jump also avoids lows. This is her best launcher after a CB, but it's best to avoid using it unless in open space since it wall splats.
☆6H+K- Pretty much the same as the fifth slanted high kick from the 6KKKKKKK Kawayagi kick string, except faster at 15i and slightly safer on block at -8, but other than that the frames are identical. It provides +25 frame advantage on normal hit and stuns. It spins the opponent to the ground on counter hit, which guarantees her follow ups from this string. Because this is a static string that has no mix ups, you can fool the opponent and bait a hold or just follow up with the same move again and finish the string since two 6H+Ks in a row will spin the opponent to the ground, just like a counter hit....just as long as they do not low hold out of the stun. This move does track. If done from a slight distance, the move will be -7 on block making it semi-safe.
☆6H+KK- Basically the same as the sixth low sweep kick from the 6KKKKKKK Kawayagi string, and has identical frames. This move does track, and can be used as a force tech, and provides +8 on normal hit if done from a distance, and +14 if up close on normal and counter hits. If you hit the opponent however from a distance on counter hit, you'll gain +15, but hi counter hits from a distance and any type of hit to a backturned opponent will make them flip and fall to the ground. If you wish to continue the stun after the sweep, 4K is fast enough to continue it without having to finish the string. A useful attack to use at a distance since the sweep has great range .
*6H+KKK- The same as the seventh hit from the 6KKKKKKK Kawayagi string, except the final wild mid kick is now 32i instead of 33i, and has a 40i recovery instead of 41i. It knocks down still on normal hit and still retains it's GB properties.
☆¤4H+K- The same as the final axle kick from her 6KKK4K Kawayagi mix up string, but is now quicker at 22i, and is less risky since the linear bulk of the move is now removed. It still knocks down on hit, and sends your opponent "sliding" backwards, vulnerable to further attack. The kick is unsafe at -11, and can be throw punished if done up close, but it has great reach and can be done from a moderate distance, allowing you to avoid some neutral throws. If done from mid range however, it'll be -10, while done at max range, it'll be -9 on block. Can also be used as a force tech, and as a somewhat risky but rewarding whiff punisher. This kick does not track. Also can crush wake up kicks, but be careful of your position and timing.
*7H+K/8H+K- Her character specific power launcher in it's normal state: a jumping vertical mid kick. It comes out as soon as 25i and as late as as 40i when fully charged. Unlike the PB, the damage does not change at all no matter how long you charge it, and you'll be at 36i after the kick. The range varies depending on the charge, and it does not track. But, the PL can be used as a force tech. If it hits, keep in mind that your opponent will flip backwards onto their back on the ground, and they are briefly vulnerable to follow up unless they tech up and get back to standing position. This is also her most damaging attack that can be used after CBs near a stage ledge, which is handy when you won't be able to combo afterwards and want to get as much damage as possible before they drop.
☆7H+K/8H+K(50% hp. loss;CHARGE!)- The same as the normal version, except if fully charged, the actual PL will initiate, sending your opponent a very high distance up in the air for a juggle set up. Unlike the PB, charging it does not affect the damage, and it HAS to be fully charged 40i in order to initiate. The attack does not track, and it's recommended to save this for when you get an actual critical burst, not just throwing out of nowhere in the middle of the match and risking serious damage...
~BONUS TECH: After the PL hits and launches the opponent, you can get into the Ii Family Creed stance by pressing/holding the 4 directional input just after the the PL hits. Then use her kick follow up to initiate the throw as they're falling down...do it at just the right time, and avoid doing it too early or too late! This will work on ALL weight classes, even heavyweights, so make this a BnB go to follow up against heavier combatants.
☆2H+K- One of Naotora's better moves that she has in her arsenal. This is basically the low sweep from her PP2K string, but without the linear non tracking punches tacked on and it now stuns on normal hit, although you won't get much from it other than frame advantage. There is no noticeable differences in properties or frames, but the sweep now will knock down on hi counter hit. This is a great low spacing tool with good range that can be used against standing guard opponents, to mix up during a CB set up, and also to condition opponents into looking out for low sweeps and opening them up for high or mid attacks. Can also be used as a force tech. Because she is crouching during the attack, this can also be used as an annoying and damaging way to evade high strikes and standing throws with ease, and what's more it can also be executed while already crouching! Also, if done on counter hit ONLY, you can use 4K to start a stun set up or CB set up, but keep in mind that the 2H+K's stun can be stagger escaped. Take heed as you are still vulnerable to mid attacks, faster low attacks, low throws, and low throw punishment, as well as attacks that can harshly crush lows....
~BONUS TECH: You can ruin any grappler's fun by simply performing 2H+K if they attempt a throw! Since the sweep has Naotora crouching during the attack animation, it'll go under standing throws and be treated as a hi counter hit and knock down your opponent! Now you can show Lisa who's really terrible! ;-)
☆SS~P- A mid punch follow up for when she side steps. The attack is basically the 3P command, except with a very minor increase in range, and it stuns on normal hit, giving her +35 frame advantage, or +15 on backturned opponents. Although useful, the strike is rather a bit slow at 28i, but it still has the same 25i recovery and is still -11 on block. The attack does not track.
☆SS~K- Her second side step attack, which is the same mid knee "kick" as her 4K, only slower at 25i, and no follow ups from the 4K knee can be executed from the side step knee attack. There is a trick that can be done to throw off opponents : The attack can be delayed for 10 more frames, and you can use the traditional 4K attack and it's string follow ups instead since opponents can be tricked into thinking you're doing the delayed side step kick instead. The attack does not track.
~NOTE: As a general rule of thumb, be aware that naotora has a handful of kick attacks that actually deal half of their damage they'd do up close when used at a distance instead. These attacks include the following : 2H+K, back turned 2K, the second hit of 6H+KK, and the last hits of 4K2K, 6PK2K, and PP2K2K(both sweeps).
Backturned/Back-Facing Strikes
-This mini section will briefly address Naotora's backturned strikes. They're all pretty identical to existing moves, so I'll mainly address frame changes and such:
*P- The same as her basic high slap, except with a 21i recovery since she turns back around. Good for quickly turning back around and continuing stuns or strings. Does not track.
☆4P- She turns back around with a swift 14i upward arching mid punch. It gives her +34-+35 frame advantage, and it launches on counter hit or during a stun. It also tracks, but has somewhat average reach.
☆2P- She turns back around using her 14i 2P command move. It has identical frames, but leaves you at -1 on normal hit, and +17 frame advantage on counter hit. Unlike the original 2P command, this actually tracks, and it can be used as a light force tech too, just like the original. This also provides a slight relaunch after you wallsplat with 4K4K or 6PK4K. Because the refloat has undergone a major "nerfing" in the last patch, the refloat doesn't really guarantee anything aside from 6PK4K/6PK2K, and 4K4K/4K2K.
~BONUS TECH: The following follow ups will work on Alpha 152 after the BT 2P refloat: PK, K6KK, PPP, 6K4KK, KK6K, H+K, 6PKK, 4KK, PP2K and 6KKK!
*K- She turns back around with same basic K kick command. The only real major difference is that this will provide you one more additional +1 frame advantage on hits unlike the original in some cases. Also, this version of her kick is unsafe at -13 on block, -12 at a distance, meaning it's punishable if free canceled.
☆¤4K- The same as her 4H+K command, except swifter at 17i frames, and it has shorter range, so avoiding throws isn't as easy. Does not track, but can be used as a force tech although it's somewhat unreliable unless you perform it after 4K2K, 6PK2K, 9KK, or KK6KK.
☆2K- The same as her normal 2H+K command, but swifter at 21i. They both track, and have the same good range.
Notable launchers
-This mini section will list and identify Naotora's launchers:
☆8K- Her staple launcher: A high kick. launches on normal hit but can be ducked and is unsafe. No tracking but has no wallsplat risk. Can also be used in the 6K string by using 6K4K to give it more pseudo range.
☆H+K- Mid kick launcher. Launches on normal hit, can't be ducked but is unsafe, and lacks tracking. Best standalone launcher but wallsplats.
*66P/While running P- Mid punch launcher. Stuns on normal hit, tracks, and can't be ducked as well as having some pushback. However it's the worst of her launchers and doesn't avoid lows.
-This concludes her move set breakdown! Now I will address throws and their abilities in the next section.
Section 6: Naotora's throws explanation
-This next section will now move on to Naotora's other means of getting damage: her throws. Because of her small move set, you need not worry, she doesn't have a lot of throws to memorize, but keep in mind that her throws aren't the best. They seem to favor practicality over actual flash or advantage, but they do efficient damage and ultimately get the job done. Let's start off:
- Her fastest standing throw at 5i and 23i recovery. Naotora basically grabs the back of her opponent's head and clumsily "tackles" them to the ground as she puts her weight on them, making them fall over. The throw leaves you fairly close to your opponent, so you're going to most likely deal with a wake up kick situation unless you quickly back up. This throw can be broken since it's a neutral throw. If done on backturned opponents, she'll instead grab her opponent's head and hop on them to make them fall to the ground with her knees around their head while putting her weight on them. She then quickly gets up and bows politely while she apologizes. This throw can not be broken, and will do slightly more damage.
- Her second fastest throw at 7i and 24i recovery. Grabbing her opponent's hand to pull them in close, she proceeds to kick the snot out of them with her rapid kicks before delivering a mean kick that spins them backwards and makes them fall on the ground. This throw leaves you at +5 frame advantage, and with enough space between the two of you to avoid a wake up kick situation. It will wallsplat if done near a wall, dealing a bit more damage and also will interact with danger zones, making it lethal in stages with those or walls with danger zone properties like fire or electricity. This is generally the go to throw you'll want to use when wanting to punish unsafe moves but wanting a swift throw that can't be broken like her neutral throw.
- A 10i throw with 25i recovery that has Naotora grab her opponent and roughly tackling them to the opposite side of the arena , switching sides in the process. While you will still most likely have to face a wake up kick situation, the throw is good for getting away from danger zones and away from corners, while putting your opponent in the situation instead. Useful as her go to throw punish against very unsafe attacks.
- Her slowest but strongest throw at 12i and 26i recovery, and has great range to boot. Naotora channels her inner Kasumi and jumps on her opponent's shoulders sitting crotch first in their face, before doing a mighty flip that sends her opponent across the screen. Not only does it do great damage and leave you at +8 frame advantage, it'll also send opponents over ledges on stages like "Lost World" to do even more damage, and if done near a wall, it'll send them flying into it, and they'll take a bit more damage. Can also be done on backturned opponents, but she'll instead sit crotch first in the back of their head.
This I regard as her best throw to use when dealing with opponents who like to panic hold in stun, as it's shocking damage output can scare wary opponents into opting to either not hold or even stagger escape.
- Her only low throw, but it's fast at 5i and has 23i recovery. She channels Lisa in this throw by grabbing her crouching foe's shoulders and doing a wild break dancing type maneuver before doing a low flip in the air and sitting violently hard on her opponent's vulnerable face with her legs somewhat spread apart. This can also be done to backturned crouching foes, but instead she'll sit on the back of their head for more damage instead of directly on their face. This is her only low throw in her arsenal so it's going to be your only low throw punish, but it's damage is good to make up for that. Interacts with floors.
-This concludes the throw section! Now time to move on to her holds.
Section 7: Naotora's holds explanation
-This next section will finish off the basics by giving the rundown on all of Naotora's holds and what they do. Naotora does not have any expert holds or defensive holds, it's all just standard basic holds that don't do anything extravagant or game changing, but they ultimately get the job done which is to counter her opponent and get them on the ground so she can have a chance to retaliate. Let us start:
(Against high punch)- Naotora grabs her opponent's hand and flips them unto their back. Very little space is given after the hold, so you'll have the chance of dealing with a wake up situation unless you quickly back up.
(Against jumping high punch)- Naotora grabs her opponent's hand and flips them out of the air to the ground on the opposite side of the arena. Very little space left after the hold.
(Against high kick)- Naotora pushes aside her opponent's kick and quickly goes behind her opponent backwards and drops her body weight on them, causing them to fall and roughly hurting their back. Doesn't do anything spectacular, and you have little to no space between you and your opponent once the hold finished.
(Against jumping high kick)- Naotora grabs her opponent's leg and forces them to the ground with a falcon type push on the opposite side of the arena. Some space is made after the hold ends.
(Against mid punch)- Naotora grabs her opponent's arm and does a cat toss that throws her opponent behind her. It leaves you with good space between you and your opponent, but it will not send them flying off ledges or into walls. Useful as a way to get the needed distance to implement her zoning to keep out opponents more suited
(Against jumping mid punch)- Naotora angrily grabs her opponent's hand and uses her back to harshly toss them to the other side of the arena. Very little space is given after the hold.
(Against mid kick)- Naotora simply tackles her opponent to the ground after grabbing the mid kick, leaving them at a vertical lying angle. Very little space given after the hold.
(Against jumping mid kick)- Grabs her opponent out of the air after grabbing their leg, and then tackles them to the grounds. Very little space is given after the hold.
(Against low punch)- Naotora grabs her opponent's punch and pushes them to the ground, then before they can get up quick enough, she delivers a mean kick to her opponent's vulnerable back. Little to no space given after the hold.
(Against low kick)- Naotora quickly intercepts her opponent's low kick, and pushes them harshly forward while striking a Ii Clan martial arts pose. Little to no space given after hold.
☆This now concludes her holds section! Now for the next section, I will suggest and share some combos that I and some other Naotora enthusiasts have made up and discovered!
Section 8: The ancient Ii Clan combo vault
-This section will cover some possible combos, set ups, and other related stuff to give you a good starter pack of useful tricks and set ups to try. Keep in mind that these combos are not made for flash, Most of them are practical and should be second nature to you after some proper practice, and a few are unique ones I discovered that you won't find likely from the other combo forum....these are for now exclusive to this guide. A few combos are more situational and essentially will give you an idea of what she's capable of combo and damage wise. Naotora's combos aren't at all difficult to pull off but refer to this symbol legend to know what the symbols mean:
> - This will indicate to execute the next command after the move before it.
☆- This star bullet will indicate normal traditional combos.
¤ - This gear bullet will indicate CB set up combos.
[☆] - This will indicate power launcher combos. No specific CB setup is needed, they can be used either by themselves or in your own CB setup. The damage I list will be added to the damage of the CB set up that is used.
~___ Damage~ - Combo damage will be displayed this way.
(CB) - I will put parentheses around word abbreviations to avoid confusion. Please note that some of these combos may be tricky to do, but I assure you that they are possible to do, timing and positioning is key to nailing the more challenging ones. With that being said, I'll start the listing:
☆H+K>K6KK ~62 damage~
☆2P+K~H+K(HiC hit)>K6KK ~87 damage~
☆KK>6KK4K>K6KK/KKKKKKKK(Against lighter opponents) ~97 damage/105 damage~
☆KKKKKK>K6KK(Against light to middleweight) ~88 damage~ ~99 on counter hit~ ~111 on hi counter hit~
¤6KKK8K>P+K(CB!)>H+K>6K4K>K6KK(Can be stagger/slow escaped!) ~126 damage~
☆4H+K>(Dash forward)K6K(works on all weights!) ~62 damage~ ~73 damage on counter hit~ ~84 damage on hi counter hit~
☆(At MAX distance)4H+K>236K~K/(while running)K~K(both full attack) ~48 damage~ ~61 damage on counter hit~ ~72 on hi counter hit~
☆4H+K>236KK (Useful on stages with ledges like "Lost World") ~46 damage~
[☆] (On dangerzone stage somewhat close to edge)8H+K(Charge at 50% hp. loss)~4(Ii family Creed Stance)~K(opponent must fall over ledge)>(After opponent is launched in air from explosion ) 2P+K~K ~227 damage~ ~237 damage on counter hit~ ~247 damage on hi counter hit~
☆(On dangerzone stage in center)KK>6P>4P(opponent must NOT hold hold out of stun)>Quickly 2P+K(as they fall, they must NOT tech up)>(quickly after opponent is launched from floor explosion)~K(opponent must fall over ledge afterwards)>(After opponent is launched high up in air from the explosion) 2P+K~K ~243 damage~ ~254 damage on counter hit~ ~267 damage on hi counter hit~
[☆] 8H+K(Charge at 50% hp. loss)>44(Back dash)>9P~K>KKKKKKKK(Can work on heavyweights, but timing is VERY strict!) ~108 damage~
¤KK>PK>P+K(CB!)>8H+K (Charge at 50% hp. loss)>6H>6K4K>KKKKKKKK(Works on lighter opponents)/KK6KK(Great for heavy weights!) ~154 damage/144 damage~
☆(HiC hit)6H+K>4K4K(Light weights only) ~66 damage~
☆(Alpha 152 only;HiC hit)6H+K>6PKK ~76 damage~
☆(Alpha 152 only;HiC hit)6KKKKK>6PKK ~114 damage~ ~76 damage on normal hit~ ~96 damage on counter hit~
☆(Alpha 152 only)6KKKKK>KK6KK ~91 damage~ ~113 damage on counter hit~ ~138 on hi counter hit~
☆6KK>6KK4K:
*>K6KK ~96 damage~ 115 on counter hit~ ~135 damage on hi counter hit~
*(lightweight or Alpha 152 only)>KKKKKKKK ~104 damage~ ~129 damage on counter hit~ ~157 damage on hi counter hit~
*(Alpha 152 only)>6K4K>KKKKKKKK ~120 damage~ ~149 damage on counter hit~ ~181 damage on hi counter hit~
*(Alpha 152 only)>6H+KKK ~95 damage~ ~119 damage on counter hit~ ~142 damage on hi counter hit~
☆KKKK6K>(during launch)K6K ~91 damage~
☆6H+KK>4K>P>P+K(CB!)>H+K>KK6KK ~116 damage~
☆4H+K>6K4KK(No movement or timing required!) ~50 damage~
☆(From a slight distance)9K>4K4K(Works on all weight classes) ~42 damage~ ~52 damage on counter hit~ ~63 damage on hi counter hit~
☆4H+K>6K4K>4K4K ~56 damage~
☆9P2K>6K4KK ~54 damage~
☆(Near wall, counter hit) 6PK4K(Wall Splat!)>(While backturned)2P>6PK4K/4K4K(vs. lighter opponents) ~100 damage/91 damage~
☆6H+K>6H+KKK ~68 damage~
☆6H+K>H+K>6PK4K ~62 damage~
☆6H+K>4H+K>6K4KK ~66 damage~
☆6H+K>4H+K>236K~K(Full attack) ~64 damage~
☆(Counter hit or higher)H+K>6PK>6PK4K(light and medium weight only) ~77 damage on counter hit~ ~89 damage on hi counter hit)
☆6H+K>4H+K>(Dash forward)K6K OR 6H+K>H+K>K6KK ~78 damage~
☆6KKK4K>(Dash forward!)K6KK/6K4KK(No timing needed) ~85 damage/73 damage~
☆8H+K>(Dash forward)6K4K ~66 damage~
☆(At MAX distance)8H+K>236K~K(Full move) ~62 damage~
☆2P+K~P>K6K/KK6KK ~64 damage~
☆6KKKKP>K6KK ~97 damage~
[☆] (Alpha Only)8H+K(Charge at 50% hp. loss)~4(Ii Family Creed Stance)~P>KKKKKKKK(NOTE: Timing is tricky...) ~114 damage~
*FOLLOW UPS POSSIBLE AFTER THE FINAL KICKS OF 8KK AND 6K4KK(ONLY THE FINAL KICK CAN HIT! HI COUNTER ONLY!!)
[☆] 8KK/6K4KK(Base hi counter damage is 37):
*>6K4KK ~76 damage~
*>6PKK(Won't work on heavyweight) ~71 damage~
*>6PK4K ~70 damage~
*KK6KK(Won't work on heavyweight) ~95 damage~
*>K6KK ~85 damage~
*FOLLOW UPS POSSIBLE AFTER ONLY THE "AUTO" 3i KICK FROM 9K AND KK6K HITS ON HI COUNTER HIT:
[☆] KK6K/9K(Base hi counter damage is 22):
*>6K4KK ~61 damage~
*>6PKK ~56 damage~
*>6PK4K ~55 damage~
*>6PK2K ~52 damage~
*>KK6KK ~80 damage~
*>K6K ~70 damage~
*>6K4K>4K4K(Won't work on heavyweight) ~70 damage~
*POWER LAUNCHER FOLLOW UPS POSSIBLE JUST AFTER II FAMILY CREED STANCE ENDS *
[☆] 8H+K(Charge at 50% hp loss)~4(Ii Family Creed stance):
*6H+KKK ~87 damage~
*6K4K>KKKKKKKK ~117 damage~
*6K4K>KK6KK ~107 damage~
*KK>KK6KK ~105 damage~
*8K>6K4K>PK ~87 damage~
*KKKK6K ~82 damage~
*6K4K>6PKK ~90 damage~
*6PK>6PK>PK ~92 damage~
*6PK>KK6KK ~105 damage~
*6PK>KKKKKKKK ~115 damage~
*NOTE: Remember these are just samples!
-Don't let these combos and set ups be the only ones you use. Experiment, tweak, and make some of your own, Naotora is really easy and straight forward to juggle and combo with, so don't be afraid to go outside the box and make some of your own! I'll add more basic and practical sample combos as time goes on, so don't worry!
Section 9: Naotora's mighty unholdable set ups
-This is another section I wanted to add, at the suggestion of a certain member whom I will formally credit at the end of this section. This section will cover unholdable set ups...what's an unholdable you ask? An unholdable is an attack that can not be held immediately on wake up, meaning your opponent's only option is to defend and guard against the the attack since guards come out instantly at 0i while holds require 1i. In short, your opponent can only guard and will take damage if they throw out a hold. With that being said, here is a list provided by that certain member right here at your leisure:
-Note: Most of these unholdables are from a wall. Keep this in mind please.
Regular unholdables
[☆]Jump>  > (236K is unholdable)
[☆] >  >  (236K is unholdable)
[☆] > run up a little  >  (The kick in 6PK is unholdable)
Wall unholdables
[☆]Any wall splat > (W!) > Ii Family Creed  (Ii Family Creed 2K is unholdable)
[☆]~ (W!) > Ii Family Creed  (Ii Family Creed 2K is unholdable, lightweights only!)
[☆] > ~ (W!) > Ii Family Creed  (Ii Family Creed 2K is unholdable, lightweights only!)
[☆]~ (W!) > Ii Family Creed  (Ii Family Creed P+K is unholdable, middleweights only!)
[☆] > ~ (W!) > Ii Family Creed  (Ii Family Creed P+K is unholdable, middleweights only!)
[☆] (W!) > (The low kick in PP2K is unholdable)
 [☆](W!) > BT  > Jump  (W!) > :[[p+k]]: (Unholdable Power Blow, middleweights only!)
 [☆]>  (W!) >  (The fifth kick in KKKKK is unholdable)
[☆]This is currently the end result, but if any more unholdables are found in the future, you can bet that I'll add them on as soon as I can! The member who was nice enough to provide them also said he may make a video detailing and showing off how they look in action, and I'll add that on this section whenever it comes to fruition. Stay tuned! ;-)
Section 10: Final remarks, credits, and future expansion
-Well, this concludes the Naotora for beginners guide! I hope it was informative, and that it provided some better insight and a good foundation for you to start using her. I had a LOT of fun making this guide, as I enjoy discovering more about my favorite characters and helping others who want to get better in said character too! I also want to thank and credit some people who helped me and assisted me throughout the guide and gave me good critique:
~ @KING JAIMY for not only providing the unholdable set ups, but also reading through and bringing up additional move information that I missed or didn't know about. Also responsible for being a great help in the match up log section, providing good insight on Rig, Marie Rose, ...
~ @Nikotsumi for also bringing up additional move information, and even telling me about a move I didn't know existed XD. Also responsible for the insight on the Ein match up
~ Can't forget @The 4th phase , @DoANoob , @Kirito , @Lady Tengu and @xXSilverSearcherxX! They were also excited about Naotora's release and provided really good tech and information that influenced my view and thoughts on the move set and character.
....And thank you to anyone else I missed who helped influence me or contributed!
-Like any other guide, it's never fully finished and I will expand upon it and add on additional tech and information and refine it further as time goes on and as patches come and go, so don't think this is the end! ;-D Thank you for reading, and remember: FOR THE Ii CLAN! ~
[@] If you need any further help or assistance, just PM me, tag me, or leave a message on my profile page, I'm more than happy to help! :-D
In case you're new to to the Dead or Alive series, Naotora is not a native DOA character. Her home series is Samurai Warriors, where she was quite popular for not only her cute looks, but also her attack abilities that place emphasis on her fast, rapid powerful kicks. She debuted on March 17th, 2016 and is already gaining quite a bit of popularity with several DOA players and is shaking up the online field with her over the top attacks and abilities lifted almost completely from Samurai Warriors.
In this thread, I will cover a number of different areas in her game play, so that you can learn how how to use her move set safely, carefully, mindfully and efficiently. Because move properties are constantly changing and patches and updates come at certain times, I will continue to update this as often as I can. Below is the table of contents so you will know what will be covered and addressed:
Latest guide notes:
°3/18/16 ~ Base guide finished.
°2016 to 2023 ~ Minor to major fixes ranging from typos, unintentional misinformation, and incorrect information.
°Mid to late May 2024 ~ Base guide re-released with major touch ups, minor typo fixes and some improved clarity and reduced vague information to make it more easy to understand. Title also changed to Ultimate for re-release.
° ______ ~ Additional sections to be added.
TABLE OF CONTENTSection 1: Explanation of reading frame data and understanding numerical inputs
Section 2: Naotora's Pros and Cons w/ a basic rundown summary
Section 3: The Ii Family Creed Stance and follow ups
Section 4: Naotora's jump stance and follow ups
Section 5: Naotora's complete move list breakdown w/ basic frame data and situational usage
Section 6: Naotora's throws explanation
Section 7: Naotora's holds explanation
Section 8: The ancient Ii Clan combo vault
Section 9: Naotora's mighty unholdable set ups
Section 10: Final remarks, credits, and future expansion
Section 11: WIP
-Before we start the guide off, if you're a beginner you should know the basics about reading frame data and inputs. I will use actual button macros throughout this guide, but here is a picture that shows you what the directional inputs are numerically:
-Next you should know the basics regarding how to read and interpret frame data. Here is an example: 20(4)25. The first number is the start up frames, which shows how many frames it take for the attack or throw to actually begin. The second number in parentheses is the total active frames during the attack animation, and finally the last number is the recovery, which shows how long it takes for the attack to recover so you can begin another attack. Worth noting is that the longer it takes for an attack to start up, the more likely you are to be jabbed or hit out of it, and the longer it takes for the attack to recover, the more likely you are to get hit or thrown afterwards.
-Another key thing you need to know is MOVE SAFETY. Move safety is how safe or unsafe an attack is on block, and you can see for yourself how unsafe an attack is by enabling the move details in training mode and looking at the move advantage. +1 or better frames means you have a frame advantage, while +0 to -5 is safe, meaning you can not be throw punished after the attack, with the only exception being 5i neutral throws if you are left at -5. -6 to -7 is semi-safe, meaning you can be thrown if an opponent uses a quick throw, but longer framed throws will not get you, and -8 or worse is unsafe, meaning you can be thrown, so watch out when you use her unsafer attacks.
-Throughout this guide, to cut some corners and to eliminate text bulk, I will use the "i" symbol in place of the term "frames'. An example would be 23i, which basically is the same as saying 23 frames. Keep this in mind as you read this guide.
-Finally, another thing I will mention throughout is whether Naotora's attacks track, meaning if your opponent attempts to sidestep it, it will follow them, while if an attack has no tracking, it will not hit when sidestepped. Now that all the basic stuff is covered, let's transition to her pros and cons.
Section 2: Naotora's Pros and Cons w/ a basic rundown summary
-Knowing what your chosen fighter specializes in and struggles in is a key thing I think you should know. This section will show her pros and cons, and I will provide a detailed summary to further explain them:
PROS/STRENGTHS
*Decent speed. Has an 11i high kick which can easily beat out slower attacks, has an 12i mid knee kick, and a 14i low kick. Her punches are decent, having an 11i high, 14i mid, and a 14i low punch. Overall decent neutral that can help her against slower opponents and opponents around her own speed since her 11i will have priority over punches and most mids of the same speed.
*Good walking speed advancing or retreating from her opponent. Also has a great backdash that can be very useful for creating gaps between your opponent. Her jump stance also acts as an alternate approach to move in.
*Good combo damage output. Also has lethal counter hit attack properties that make her well suited for interrupting attacks and landing a solid counter hit. Damage is generally solid overall.
*Easy to learn move set with plenty of
kick mix ups. Overall very low learning curve which can make her very easy to main or even sub since she lacks any complex inputs or stances.
*Decent throw game; Has a 7i punish throw that can interact with walls, and her 10i punish throw can interact easily with floors . Has one of the best 12i punish throws in the game as well as it gives her tremendous distance and lethal damage on hi counter. Overall has throws threatening enough to make it risky to panic hold in stun or to attempt a hold against her when she begins with her more lengthy strings.
*Has a long range tracking 236K attack that easily punishes whiffs and opponents who try to approach. Possibly one of the best ranged moves in the game as it creates an instant 50/50 situation for both players.
*Decent handful of strong tracking moves she can use to blow up sidestep attempts at virtually any distance.
*Great range. Perfect as a spacing/zoning character due to her kicks having reach, allowing her to keep out foes who are lacking in long range or mid range tools to contest her own kit. Can be quite difficult to safely move in on in larger stages.
*Decent guard breaks, having some that are safe on block or give her some advantage, which can be used to make room for her slower attacks as well as to also give her a safe chance to increase her range from the opponent.
*Good Okizemi or wake up game, with her tools becoming alot more threatening when used to pressure opponents who are getting up from a knockdown. Overall becomes alot more difficult to deal with when she has ample room to incorporate her slower but stronger moves on the playing field.
*Move kit is generously littered with quick launchers and knockdowns, making her always a threat once her kicking momentum begins.
*Great environmental combo potential, having very good wall carry and being able to to easily convert juggles into either wall or floor slams depending on the juggle ender used. Can generally be a threat on all stages. Also has a formidable wall splat combo game, getting good damage with very little difficulty.
*Has alot of jumping kick attacks that avoid lows, making her adept at low crushes which is very essential as her highs can be subject to crushes.
*Is the only character in the game to possess a stance transition from her power launcher attack.
*Great whiff punisher, having a variety of tools to punish opponents at mid to far range when not directly in their face.
*Quite a few attacks that are actually safe from a distance that your opponent may have to respect. Her safety and spacing are further enhanced when one is aware of her attacks' various ranges, making knowledge of her tip/max range very optimal.
CONS/WEAKNESSES
-Has a linear and small move set. Less to learn, but also less for the opponent to defend against, as Naotora can become quite predictable if not carefully used.
-Very vulnerable to high crushes as alot of her kit consists of highs kicks with varying speeds and safety. Because of this, she can be rather easy to generally crouch or duck.
*Majority of her mids that launch or stun on hit tend to be unsafe, making them risky to attempt unless after having conditioned your foe to duck which can be tricky. Her safe mids tend to demand a counter hit or crouch, or are telegraphed enough to make them easy to intercept.
-Close quarters is not recommended for Naotora, as she can quickly get overwhelmed by characters who are faster or adept at crushes. At a major disadvantage against opponents who are faster, more counter oriented or pressure based fighters.
-Strings tend to be fairly predictable and easy to hold on reaction. Alot of static strings and quite a couple of 50/50 mix ups in her strings which tend to be highly easy to react to, making free canceling and mind games very integral to avoid being easy to read. Has alot of attacks with long recovery and start up frames, making her easy to interrupt if not used mindfully. Whiffing with her can easily make her a sitting duck.
-Below average stun game due to the stagger escape mechanic which can severely tone down her stuns when her foe is adept at stagger escaping. This also makes it rather risky to use deeper stuns in critical stun unless the player is conditioned to fear throw or quick launch attempts. This forces her in most cases to rely on manual mix ups, resets, and often times quick launches to get less risky damage at the risk of not making full use of the critical stun game. Also lacks lift stuns, making deep stuns almost non existent for her which further weakens her mix up game in stun, and her faint stuns that demand a reaction are lacking and rather slow.
-Mediocre hold damage that doesn't provide much advantage, and has no expert holds. Environmental interaction is also rather limited.
-Somewhat lacking in defensive tools, having very little ways to avoid pressure up close. The tools she does have are rather bare compared to other more defensive characters, meaning Naotora will often have to rely on reads and solid defense to revert the momentum, making her glaringly a sitting duck against faster characters. Also lacks offensive holds or throws with hold properties.
-Mediocre lows as she lacks any really threatening low strikes that can help her open up her foes. Her best lows tend to either be in string or are telegraphed to some degree. She's also rather limited in lows in general, lacking stand alone lows besides the couple that are littered in her strings.
-Guard breaks are generally unreliable to use offensively, as they vary from safe to unsafe depending on the attack. Her positive guard breaks are also often predictable or limited in advantage due to pushback or mediocre positive frame advantage.
-Limitied in mid punch/jab moves and strings, being mostly high kick and middle kick oriented and lacking mid punchs. Her mid punches are also quite mediocre, as they almost all are relatively average in speed at best or require a counter or crouch to make them stun on hit. You'll have to rely more on her high kicks or mid kicks to be able to score easy stuns.
-Overall very 50/50 mix up heavy, and the risk can often overshadow the reward due to her string linearity and lackluster advantage on block. Naotora is going to force you to take risks.
-While she does have some good tracking moves, most of them are unsafe. Most of her tracking moves are also highs, making them risky to use against specific characters who have special command sidesteps that can also evade highs. Moderately risky tracking tools that have generally high reward for their general unsafety.
-To summarize this, Naotora is a good character for beginners who is easy to pick up and has a low learning curve. She has decent speed that makes her faster than average, but not as fast as the likes of Kasumi and Pai. She possesses an 11 frame high kick that can beat out slower attacks at close range, and has great kick strings that have mix up potential to confuse your opponents. She can control space well, and has good range kicks that can be useful at keeping away faster characters, particularly ones who struggle at moving in from range. She also has great options stemming from her K and 6K kick strings that can end in launchers, guard breaks, a knock down, and even a useful(but predictable...) sit down stun for a guaranteed CB! Her damage output is also surprisingly high and she can deal great damage if used to great effect. Finally she has several good launchers that can guarantee her excellent K6K juggle ender and avoid an annoying wall splat, as well as other easy combo conversions to make use of whatever danger zones lie in her wake.
Also noteworthy is that she is blessed with an array of quick launches and knockdowns in her kit, making her a near constant threat at all times once she gets her momentum and mix ups going which can work in her favor immensely when fighting someone reliant on defence to shut her down. She has a standard but effective throw game that can help her easily keep hold reliant foes in check, and her moveset generally has ample over the top moves that grant immense reward when you're willing to take risks to connect them, especially when used when the opponent doesn't expect it!
Alas, Naotora is not completely sunshine and rainbows. She has mediocre hold damage and utility with limited environmental interaction or general evasion, no expert or defensive holds to help her, and she has basic but relatively damaging throws, but no offensive holds. Her moves also are generally telegraphed if not very unsafe as an alternative, some have long recovery and start up frames, and although you can get away with mashing strings against inexperienced players who don't know the match up at first, she's actually somewhat linear and can be held on reaction if the opponent carefully guards and reads you. This doesn't mean she's bad to use however, Naotora can be a viable and tricky combatant once you learn to utilize her delays and various mix ups. With enough practice and proper strategy, she can quickly be one of the most dangerous fighters in the game to deal with, but the player has to be aware of her limits and also of expected habits and patterns that players may expect from Naotora. She's generally seen as a mashy, very spam worthy fighter, but it's up to the player to break the mold and show she's beyond that, only to bring out the opposite when they assume you're going to mix up!
The key to using in her in a match safely and effectively is simple: Make sure you have optimal space for her slower moves, and utilize her kick strings, but avoid mashing just for the hell of it, as this can result in heavy punishment at higher level, where players can look past the mashing and easily read static strings. Also, playing Naotora in a defensive way is recommended since although it may seem like mashing with her is a go to like in her native series, DOA isn't the place for that. Although you can play offensively if that is your preference, she's better played at a mid range distance, especially against faster opponents who can dominate and overwhelm her up close as shes not suited for pure momentum or rushdown. She can do very well whiff punishing and using her longer range attacks to catch the opponent off guard when they try to approach. She can also be used for giving her opponent little chance to defend against her rapid kicks, and punishing them with counter launchers and harsh throw punishes if they guess wrong when trying to hold you, but this method is more risky because of her linearity and ease to interrupt. Utilize her guard breaks against defensive players who favor guarding, and don't be afraid to throw an opponent who is wide open. Finally condition your opponent to always assume you're going to mix up so that you can get away with finishing her full kick strings(or vice versa!), and learn how to accurately zone and space your opponent out so that if they are dominating at close range, you can keep a distance and utilize her Ii clan stance and other spacing tools to keep your opponent away and scared to make a move, in fear of the risky damage you can inflict upon either a hard or even low intellect read as DOA is all about taking risks.
Section 3: The Ii Family Creed Stance and follow ups
-This next section will cover one of two of Naotora's stances: The Ii Family Creed. The input is very easy to do, just input 2P+K and she'll say, "For the Ii Clan!". This stance has six possible follow ups: A flipping wind punch, a damaging sakura blossom kick sequence, a low sweeping kick barrage, a throw, a mid launching kick, and a flinging butt attack. Although the stance is useful because of it's damaging options, it's start up is pretty telegraphed and easy to see coming, and it leaves you at 20 frame recovery, meaning anyone can quickly jab you out of the stance or throw punish you since the stance does not offer anything during it's animation that can evade or negate any attacks. Because of how slow the stance is, it's better to use at a distance so that you can have enough time to unleash your follow ups, and to avoid throw punishment or attack interruption; Using IFC after certain situations like at the end of juggles, force techs, or other moments when the opponent can't retaliate promptly to you entering the stance. It's also worth noting that you can enter the stance before the match starts, so that way you can prepare an attack for the opponent to deal with. Here are her follow ups in greater detail:
- Her signature and possibly most popular follow up from this stance. The start up is lengthy at 35i, making it pretty easy to see coming. It if hits, a damaging kick string will begin, and it finishes by leaving your opponent grounded and at a very safe distance from you, allowing you to avoid retaliation. If it's successfully blocked, you won't have to worry too much since it guard breaks, and the beginning jump before the attack initiated avoids lows, which can crush low wake up kicks and other low attacks if done at the right moment. Although you will avoid neutral throws, the attack still leaves you at -12 when blocked, and opponents can use longer range throws to punish instead. Also be careful: Because the kick is a high, it can be crouched, and you can be punished badly during the recovery. The attack tracks, and it has decent range. Also, if it's done next to a wall, the final hit will slam them back first sitting down into the wall, and they will NOT be able to wake up kick or tech up. This situation will put Naotora in an advantageous situation where the opponent can't rely on wake up kicks to get back into the fight, nor can they immediately stand at their own timing to avoid pressure.I regard this option as being one of her more risky to use since it's very easy to read and use in an actual match without some sort of opportunity to use it such as after a power launcher into IFC.
-Her mid punch follow up that begins with a 41i jump that avoids lows, then transitions into a 10i mid punch attack that summons up a gust of wind to slightly launch the opponent up for a possible follow up if they are light enough. The attack leaves you at -2 when blocked, but it gives enough pushback to allow you to avoid some fighters' neutral throws if you block afterwards, but some like Raidou's can't be avoided. In these cases, an alternative way to avoid being thrown is to quickly back up or crouch, although you risk getting low thrown or thrown by a longer range throw. The attack has great reach, and it also tracks, but it does not have any guard break properties. Don't abuse this follow up too much, as it is highly telegraphed and can be interrupted. It's also worth noting that this can be used as a hard force tech. If the first punch hits, the wind attack can not be avoided or held, making this move a jail type string.(These types of strings will be explained later in the beginning of the move list breakdown section!)- Her low sweeping sakura blossom kick that begins with a swift 14i, and finishes with two additional 7i sweeps, the last one causing a guard break or a knockdown if it hits. If it's blocked, because of it's GB properties it'll leave you at +2 frame advantage, and with enough distance between you and your opponent to avoid neutral throws. Having decent reach and also being able to be used as a force tech(An attack that can force the opponent back up into standing position;can be either a light or heavy FT), it's useful at long range and getting reluctant grounded opponents back into the action. It's 47i recovery makes it very bad to whiff, so avoid this or throw punishment is guaranteed. Also, a rope stun can occur in stages such as "Sweat", but only if the first kick does not hit. The attack does track, and can evade highs since you'll be in a crouching state during the attack, but your opponent can easily evade it if they have an attack that avoids lows.This is overall the option you'll want to use when wanting to apply pressure either on hit via knockdown or on block since both work in your favor, especially when you have your opponent caged near a wall.
- A 21i mid kick that provides a slight launch on hit, and guard breaks on block, but it leaves you at -6 frames(-5 from a slight distance) and has a steep 39i recovery, but the move is luckily safe on block. The string doesn't do much damage wise, as you'll need a hi counter to guarantee a K6KK from it against the lighter fighters(It's possible to use KKKKKKKK on Alpha 152 in this hi counter situation). After the GB, it leaves you at a safe distance to avoid neutral throws and some attacks, and it has decent range to boot. The attack does track, giving you a relatively safe option when unsure about opponents quick to sidestep, as well as also being an answer to special sidesteps some characters may have that can also evade high strikes as well. Will also wallsplat, making it a general way to keep steppers in check near a wall.While not as safe as her slower P option from IFC, this is generally more of a safe go to when wanting a safe mid that's swifter once you have your opponent conditioned to expect her 14i low sweep as a constant threat.
-Her 12i throw option that uses her best throw in her arsenal: 66T! Good for catching opponents off guard and being swift, it does nasty damage, leaves you at a very safe distance from your opponent, and it leaves you in naotora's back turned state, granting access to her array of options, but you can always use the guard button to quickly turn back around. The only major disadvantage the throw has is that it can be interrupted and the range isn't so long, and it can be crouched if your opponent reads you correctly.-Possibly Naotora's worst follow up to use, this is a flying butt attack that takes 15i to start up and leaves you at 53 frame recovery. The attack is very high risk: it has no tracking, leaves you at -47 frames when held (it is considered a mid punch/mid kick strike, so either of the holds will allow the opponent to evade it) and -33 when blocked. Although it does GB, it's only a small one and the opponent can still throw punish you. The move itself has great range, and can be used in case an opponent tries to rush you, since it comes out quite quickly, and it knocks back your opponent on hit. Avoid whiffing. If used in a stage such as "Sweat" that has rope walls, it can cause a rope stun when it hits! If done close to the opponent, it will result in a close hit, making it deal more damage on normal hit, but the damage increase will be nerfed down on counter and hi counter hit.~PSST!- Promise me...you won't tell anyone, but the P+K follow up can also be executed while running! This has the same identical frames, and can cause a rope stun too, just like the original! Try it out sometime! This can be useful option when running in on the opponent.~BONUS TECH- Although Naotora's Ii Family Creed stance follow ups are predictable and some are slow, there's actually a neat thing about the stance: it has very good delay! It's possible to confuse opponents and lower their guard since the follow ups can be delayed for a fairly lengthy period of time, especially when it looks like the stance has ended.-This concludes her Ii Clan Stance section! Now for the next section....
Section 4: Naotora's jump stance and follow ups
-This section will address Naotora's jump stance. It's done by inputting 9P, thus making her do a cute little hop in the process. The jump avoids lows, and can be used as an alternative way for Naotora to quickly cover some distance. Just so you know, it takes Naotora about 3 jumps from across the entire stage to get within striking distance of her opponents. Because there's only two options, one being a tracking high or a bound launch mid, this makes for a passive 50/50 situation that the opponent can easily block, but if used in lengthy stuns during critical stun or when dealing with opponents who are quick to sidestep or crouch, this can work in your favor for opponents who opt to take more active defensive measures when defending besides guarding.
The following below are her two possible follow ups:
- Her simplest follow up in this stance. The attack is basically a jumping 27i high kick with 26i recovery. It stuns on hit, and can be used to confuse opponents during CB set ups, thanks to the sudden jump. The downside is that it can be avoided by simply crouching. It's also -6 on block meaning it's only punishable with a breakable neutral throw, which makes the move safe on block. The attack tracks, and has decent range, but it's weak against special sidesteps that avoid highs as well as linear strikes, and it's especially weak against crouching mids that can evade while also hitting you which lows can't do.- Her second option, which is basically a 30i jumping splits mid kick with 30i recovery. This attack has GB properties, and leaves you at a safe distance to avoid most neutral throws because of the pushback, and you'll have +3 frame advantage. The downside to this attack is that it does not track, so it can be sidestepped if an opponent sees it coming. Not much is guaranteed if it hits, but 6K4KK or 6PK4K are good follow ups to use. The attack also hard force techs, which can prove useful against stubborn adversaries who don't want to stand up right away. Can also cause a bounce on backturned opponents, and can crush low wake up kicks.~BONUS TECH: While in the lab I discovered a use for her jumping stance on grounded opponents. Right as your opponent attempts a wake up mid or low kick and before it can come out completely and hit you, quickly use 9PK or 9P2K(I prefer 9PK because it comes out faster) and presto! You'll be right behind your opponent in Naotora's back turned stance, either before the wake up kick fully finished or just as it ended. Since they're vulnerable and probably won't be able to turn around quick enough, immediately use 6K(Not 4K since you'll have switched sides, assuming you perform this maneuver on the P1 side) then as the opponent slides backwards from the kick, use K4KK(assuming you started the maneuver on the P1 side) to get some decent easy damage. KKKKKKKK is also possible on lighter characters in case of a hi counter hit, although this is somewhat unlikely.~BONUS TECH: Although the jump stance only has two follow up options, it can be used to create mind games as well! If used in CB setups or in neutral against an opponent who favors reading and holding, it's possible to bait a hold reaction from them so you can either get a hit in uninterrupted, or you can go for a hi counter throw punish. Don't underestimate the power of just the jump!Section 5: Naotora's complete moveset breakdown w/ basic frame data and situational usage
-This next section will be fairly massive, and will address all of Naotora's command moves, what they can do and their properties, and frame data so that you can know what moves are safe and unsafe to use. I hope you know numeric inputs by now for directional input, as I will use this extensively in this section. Feel free to refer to the picture explanation whenever you need a refresher. Let's begin!
~NOTE: Throughout this guide, I'll replace the "*" bullet with a "☆" next to certain moves as a way to show you the moves I think you should definitely utilize during a match. This is based on the move's properties and not at all based on appearance or aesthetic. I will also use a "¤" to indicate moves that can cause a "bounce" on backturned opponents. Now back to the guide:*P- Her basic high punch, or shall I say slap. It's swift at 11i, and only has 12i recovery. It's -1 on hit and on block, and it doesn't provide much advantage aside from being used as a poke or inside CB set ups. It does provide +2 frame advantage on CH, and it stuns on Hi counter hit, giving you +37 in this situation. It also provides +12 if done on any counter hit to a back turned opponent. The attack doesn't have alot of range, and doesn't track.
*PP- Basically the same as the last move, but with an additional slap added. The string is now 10i and has 15i recovery, and is -8 on block(-7 from a slight distance.) and -6 on NH, +O on CH, and +34 on Hi counter hit. The second slap has slightly shorter range and also does not track, but you can delay the hit so that you can confuse your opponent and get a counter hit as a result.
Since PP jails on hit or block, it passively puts the opponent into a situation where they'll have to react to a mix up since you'll have a high, mid, or a low to react to. Tick throws, or throwing immediately after is also an option that can be used.
~BONUS TECH: The PP combo string is what you would call a jail string. This type of string is a string that is swift enough that the second strike can not be held, or ducked once the first punch is blocked or if it hits, basically meaning that the second punch is unavoidable if you use it over her PK string, which does not jail since it's slow at 13i, while the P follow up is fast enough since it's only 10i. This does not apply however to hi counter hits when your opponent tries to attempt a critical hold.*PPP- The same as the previous string, except now her 66P command is attached on. The string has 18i and 26i recovery, and is unsafe at -14 frames when blocked. The advantage to using the combo is that the third hit stuns on normal hit, providing you a +34 frame advantage to work with, and it can't be sidestepped since the last hit has tracking properties. It also launches on either counter hit or high counter hit, and can even launch back turned opponents. The attack also has decent range, and can avoid some neutral throws if done at the farthest distance where it can still connect, assuming the first two hits are whiffed or intentionally do not hit.
Risky to use in neutral situations, but is useful as a general quick launch in stun set up, acting as the mid 50/50 mix up launcher vs her PPK which is a slower, but safe high jump launcher.
*PPK- This string is basically the same as the previously one, except the ending punch is replaced with a somewhat slow and predictable jumping 29i high kick, making the string now have 29 start up frames and 35i recovery. Although the string is dangerous if whiffed, the string tracks, has GB properties that leave you at -2 on block(-1 at a slight distance) and at a safe distance, and the final jump kick avoids lows and launches on NH, although counter hit and Hi counter provide a better launch that you can really utilize, including if you perform the string on back turned opponents. The string is pretty linear and can be avoided by simply crouching, and the final jumping kick can be interrupted, so be strategic when throwing the string out, and remember it can also be slightly delayed.
Like PPP, it's an in string launcher, but it's more easy to react to since it's quite slow to compensate it's safety, making it the safe 50/50 option vs using her PPP mid launch.
☆PP2K- The same as the previous string, except now her crouching low sweep 2H+K is the third hit, making the string have 23i start up and 29i recovery. Although good for a mix up, it's -15 on both normal hit and on block, but it stuns in counter and hi counter, but in two different ways: If it's done not so close to an opponent, it'll cause them them to back up slightly stunned, with them bent over slightly as if to grab their injured leg. This will give you +15-+16 frame advantage. If done within close proximity of the opponent, it'll cause them to almost trip over, which will give you +14-+15 frame advantage. If done at all to a back turned opponent assuming you did it without the first two punches that would turn them around, it'll make them fall to the ground outright. Avoid whiffing and performing this string on block and be cautious on normal hit free canceling, as a low throw punish is guaranteed because of the lack of pushback. Aside from that, the sweeping low kick has tracking properties, and the attack has good range, as well as being able to force tech grounded foes.
This string will force the opponent into a hard 50/50 situation since they'll have to guess between a mid or low ender, and since both options track, there's no easy way to escape the string on block. Both give you +2 frames on block as well, so it's a matter of choosing which you want to foe to watch for.
~BONUS TECH: This is related to her her upcoming follow up string PP2K2K. If PP2K is done on counter hit or higher, the PP2K2K follow up will be GUARANTEED due to the slip like stun...even if your opponent attempts to stagger escape, which leaves you with +8-+14 frame advantage to guarantee the final sweep!~ This also comes into play during stuns or stun set ups, if your opponent does not manage to hold the P, PP, or most importantly the first 2K part of the string during stun, the second 2K will be guaranteed!~NOTE: There is a buffering error with this move: if you buffer the 2 directional input during the second slap, the attack will always come out as PPK! Avoid buffering in this command string and press the 2 precisely after the second hit.**PP2KK-This is a possible mix up that stems from the previous string. She finishes the string with a predictable jumping mid to high kick turn around twin barrage. The first mid kick has 32 start up frames and then the attack automatically transitions into her 3i follow up high kick. Even on normal hit, the attack knocks back the opponent an incredible distance, and the first mid kick evades lows due to the jump. The attack also has GB properties that leave you at +2 frame advantage, but the pushback isn't major, so if you're still in neutral or guarding afterwards, the opponent can attempt a throw. Avoid any whiffing at all costs. The attack does track, and has good range. Also avoid using this after the set up 6KK or KK, the final 3i kick will once again whiff on hit leaving you at a nasty -19.
This is the stronger of the two options from the PP2K mix up, but is more risky since it's start up is quite slow, making it prone to holds and even jabs.
☆PP2K2K- The swifter but linear string finisher from the previous two strings addressed above. This ends the string with another twin sweeping low kick. The attack is faster at 20i start up, but has 47i recovery, making it 6 frames more than the previous mix up. If it hits, it'll knock down on normal hit. The attack also has decent range and GB properties that leave you at +2 frame advantage! Like the first 2K sweep, the final sweep does track, but be wary using this as it can be held on reaction due to the linearity. The first sweep can be used as light force tech, and the second one can hard force tech if they hit the grounded opponent in time.
Being a 50/50, compared to her PP2KK, this is swifter than the mid kick ender which makes it easier to use since it can be hard to react to.
☆PK- A basic two part string that begins with her high slap going into her spinning high kick. The string is swift at 13i start up and an acceptable 25i recovery. Although linear and it can be ducked, it's good in CB set ups, and also useful as good juggle ender in situations where the more optimal K6KK isn't able to hit. The second kick doesn't have the best range, but it has good enough reach where you can hit the opponent from afar, and the pushback allows you to avoid most neutral throws, which helps since the string leaves you at -7 on block, -6 if done from a distance making it safe from afar. The second kick always provides a critical stun(+9 frame advantage), albeit short unless on hi counter hit(+24 frame advantage). If done on counter hit and if ONLY the kick hits, the stun will turn into a longer stun with +24 frame advantage, equating it to the stun that the hi counter hit would provide. The string jails on counter hit as well. The string does track, but the kick can cause a wallsplat.
☆6P- A 14i forward thrusting mid palm attack with 22i recovery. This is one of Naotora's quicker attacks, and if done successfully on an opponent's whiff or during their attack, it scores you an easy critical stun that gives you +26 frame advantage on any counter hit, and +18 if done on back turned opponents. Using this move by itself as a way to bait a counter is risky, because not only does the attack leave you at -12 when blocked, but it also lacks range and has to be done up close, and it doesn't have enough pushback to dismiss throw attempts. The attack also does not track. Despite the risks, the attack can be useful in mix ups: because naotora has a lot of mid kicks and high kicks, you can use this to throw off opponents who weren't expecting a mid punch, since she doesn't have alot of them, so use when using her K or 6K strings can be random if the foe assumes you'll continue into the strings. Somewhat limited however tho since stagger escapes from your foe can make using it a bad idea if they can shave down their stun.
~NOTE: Sorry, sorry, SORRY, but the 6P string is a very linear string since you can only mix up after the the second mid kick...please be careful using this string, as it can be held on reaction. I'm sorry!!*6PK- Her 6P command followed up with a mid knee, making the string somewhat shorter at 12i but with a slightly longer 24 frame recovery. Although unsafe at -9 on block(-8 at a distance) and having poor range in comparison to 6P, it provides +5 frame advantage on normal hit and a very brief critical stun, but you'll have to use one of the further 6P follow ups to continue it in time. The knee hitting on counter and hi counter will result in a +16 frame and a stun you can use for any set up or baiting of your choice. The string unfortunately is linear and is partially static meaning you can't mix it up to the other follow up options until after the knee hits, so it can be held on reaction if read quickly. The string also does not track.
*6PKK- Her high kick follow up from her 6PK string. This ends the string with her jumping kick from her PPK string. It's 29i and has 35 frame recovery like before, and it still GBs leaving you at -2(-1 at a slight distance) and a safe distance to avoid most throws. The kick launches when it hits as always, but it has to hit by ITSELF to provide the optimal launch needed for her K6KK to connect, and it has to be counter or high counter hit. Alpha 152 is light enough to avert this: She doesn't require for only the jumping kick to hit at all, and the K6K will connect normally if the full string hits on all level counter hits. KKKKKKKK is also guaranteed on her if only the jumping kick hits her on counter and high counter hit. Back to the subject of the core move, the jumping kick has good range, tracks, and can evade lows, but be wary that the kick can easily be held on reaction due to how delayed it is coming out, and it can also be ducked, and the recovery warrants immediate throw punishment.
*6PK4K- Her 6PK command finished off with a 21i mid chopping axe kick with 25i recovery. Having decent reach and granting +24 frame recovery if it hits, it deters opponents from trying to crouch, and provides a good stun to start up a CB set up, and it has nice delay to back it up. It also leaves you backturned granting you some lethal follow up options. The string still isn't completely safe: It has no tracking, is very linear as all the hits are mids, and it's -8 when guarded against up close, meaning throw punishment on your end in this situation. Because of the slight pushback and range of the axe kick, it'll leave you at -7 if done from a distance, allowing you to avoid some throws and to quickly turn back around to reassess your approach. The move is also useful as a light force tech, but you may opt to use the 4K4K version instead since it's quicker. As a rule of thumb, this is an excellent way to end juggles if you are positive that that the 6P will be quick enough to hit the opponent, and the second knee kick causes a brief refloat which can be used to extend combos for another follow up 6PK4K or 4K4K.
Also a true mid which can help hit foes who have stances that can avoid normal mids.
*6PK2K- Her final option stemming from the 6PK string.This ends the string in a 22i backwards low stomp attack that leaves Naotora backturned. It's a good mix up and can provide a slip like stun during some counter hits, but it lacks tracking and doesn't have a lot of pushback, and leaves you at -7 on block, -6 if done at a distance. If done just out of range and if only the low stomp kick hits, it's possible to avoid some neutral throws, but it can be difficult unless you know exactly that you're just within range for it to hit, while remaining far enough to avoid the throw. It can also be used as a force tech, but 4K2K would be the quicker alternative, and keep in mind that it has good delay. Although you are technically in a "crouching" state during the 2K part, you can be both high or low throw punished so be wary. Can also be used as a juggle ender in times where you are not sure the 4K will hit heavier opponents.
*66P/(While running)P- This is basically the final same upwards mid jab from her PPP string, and it has the same identical frames: 18i start up and 26 for recovery. It provides +34 frame advantage on normal hit, and launches on any counter and backturned opponents. The attack provides enough pushback on block so that you can avoid most neutral throws, and it tracks.
☆4P- A 22i high spinning jab attack. It has short range, -7 frames when blocked, 27i recovery and it only provides a brief stun and +5 frame advantage on normal hit, so it's not really much of a move to use by itself in neutral position or spacing situations. If done on counter hit, your opponent will become stunned and will fall to the ground....but only if they don't hold, meaning they'll have to make a guess in this situation or be forced to fall to the ground. The attack also tracks, and does well being used in CB set ups, but be cautious since it can be avoided by low holding out of the hit during a CB set up, or by ducking if the opponent reacts in time. The move however has to be respected when done up close: if done with just a slight amount of distance from your opponent, the move will be -6 on block, making it safe in this situation!
Overall, this is more suited for used in stun since the risk outside of stun is moderate.
☆8P- Another useful tool for CB set ups and scoring a counter hit. This is a 15i slicing mid jab with a 26i recovery. The move leaves you at -3 on normal hit, but it provides a +23 frame advantage on counter hit. Because it's a mid, it can be used on crouching opponents and even stun them, and it can "bound" the opponent unto to the ground if done twice on counter hit. The move however has average range, has no tracking, and leaves you at -6 on block, -5 if done from a slight distance, meaning it can be punished by quicker throws or neutral throws, but this shouldn't be too major since neutral throws can be broken if timed right, making it a relatively safe move to use at a slight distance. When not wanting to risk using her highs to start a stun or her unsafe mids, this is a useful poke that has little real risk. Being her safest mid on offer, you'll likely be using this as a common strike since there's little risk to using it besides the slightly slow speed and lack of tracking.
☆2P- Naotora's 14i low jab attack with only 21i recovery. When an opponent is overwhelming you with attacks and if you can't get them off of you or build momentum while you're defending, this jab pushes back on counter hit, providing you +3 frame advantage, and enough pushback to help you reassess the situation. Also, the 2P crouches during the hit, and it can be used as a blunt way to dismiss opponent throw attempts, and even as a light force tech. It also has great range, is only -4 when blocked(-3 at a distance), and provides +0 frame advantage on normal hit.
The downside is that the attack does not track, and can be beaten out by faster characters who possess a faster 2P with less start up. The low is also not as formidable since Naotora gains no real advantage on hit when used compared to similar slower low pokes, making it more useful as a general safe poke when trying to open up turtling foes.
☆3P- Another one of Naotora's few mid punch attacks, which is simply a 16i frame upward slice jab. The move is definitely not suited for using in neutral: It leaves you at -11 on hit, 25i frame recovery, and is -11 on block, which is just asking for throw punishment. The move is therefore better suited for carefully interrupting moves and scoring counter hits when making solid reads, and also a way to further mix up CB set ups. It provides +35 frame advantage lift stun on counter hit, and +15 on backturned opponents. If done twice on counter hit, it can launch, and you can even use it as an alternative way to launch stunned opponents who thought you were going to for her P+K CB. The attack does not track, but it has decent reach to make it viable from slight distance. It will also stun crouching opponents on normal hit.
This is Naotora's only real lift stun in her kit excluding launchers that need a counter hit to go beyond that, making this an optimal choice when wanting to to fish for more deeper stun damage.
~NOTE: I'm sorry, but....this next move is going to be broken down into 8 separate moves for the infamous Kurenai kick string, to avoid a massive text wall and less of an eye sore for you. With each additional kick, just assume I'm referring to the added on kick, so that you can get a clear idea of what each kick in the string does. This should help simplify things....or so they tell me...☆K- The first kick in her infamous Kurenai kick string. It has a fast 11i, meaning it can beat out a lot of slower moves and high punches from slower fighters. It stuns briefly on normal hit giving you a small +8 frame advantage, but the stun is elongated on counter hit and provides you a more optimal +25 instead, which is perfect for starting up a CB set up or hold baiting. The attack is now safe at -5 on block(-4 at a slight distance) and now tracks,making it a viable poking tool when baiting for a counter hit. It can also be ducked or low held out of, so be careful when throwing this out at a defensive player.
*KK- A second high kick follow up is added to the base high kick. The follow up kick is slightly slower at 17i start up, but it has a slightly better 23i recovery and is somewhat unsafer on block at -9(-8 at a slight distance). The kick has tracking properties and longer reach than her base kick, and starting from this kick, the entire string will now register as a 8 hit combo if finished since the first kick has stun that the second is fast enough to follow through on. If your opponent blocks the first first kick form before, this will jail meaning they can't hold or attack until after both the kicks finish, they'll also be unable to crouch, assuming you do not delay.
*KKK- A third high kick now added after the second, making the current string now 25i with a 26i recovery. The third hit has great range, and provides a +2 frame advantage on normal hit and +22 on counter hit or during a stun. It also has tracking properties and has the appearance of a slashing mid kick which can throw some people off who don't know the match up. The move is however is -14 when blocked(-13 at a distance), so be cautious free canceling this against defensive players. Also keep in mind that these three high kicks can all be simply crouched, so watch out!
~NOTE: To save space and time, the next three kicks all have 26i recovery. Furthermore they are also all -14 on block(-13 at a slight distance). Keep this in mind!*KKKK- A fourth 20i mid kick is now added, which will harshly dismiss your opponent's efforts to crouch the first three kicks. This kick provides +5 frame advantage on normal hit, and will put your opponent on the lv. 2 critical stun threshold if you did the previous three kicks successfully. +22 frame advantage is given on counter hit or during a stun if it hits, and unless the opponent holds correctly, the kick is unavoidable since it has decent range and tracks.
*KKKKK- A fifth 15i low sweep is now added, which greatly adds on to the string's unpredictability. It provides +11 frame advantage on normal, counter, and high counter hit if all the previous kicks apart of this string were blocked, or if the sweep hits by itself. It knocks down if the opponent is already in the middle of the kick string since all the kicks before it stun, and it can trip backturned opponents if it hit by itself. The attack has great range and tracks, and can also be used on grounded opponents as a somewhat impractical force tech.
*KKKKKK- Another mid spin kick that is the same as the fourth one, but this one is faster at 14i. It provides +3 frame advantage on normal hit(+14 to +15 if the opponent is crouching) and +23 on counter hit(+14 to+15 if crouching) if they both hit by itself(Which is a pain to do since the string by now goes across the entire screen...trust me, it's tricky to get it to hit by itself unless the opponent is backing up consistently ~_~). In the situation that it hits after the previous low sweep briefly stunned them, you'll be at +22 frame advantage in this scenario. The kick also tracks, and has good reach.
*KKKKKKK- For the seventh hit, another quicker 14i low sweep with 22i recovery is thrown in for good measure. It provides +15 advantage on normal hit and counter hit, and if the opponent was already stunned from the previous kicks in the string, it'll knock them down. This sweep is the final kick in the string that tracks, and it has decent range. Can also be used as a somewhat impractical force tech.
☆KKKKKKKK- This now finally adds the last kick in the Kurenai kick string: a hard hitting 23i high kick that knocks the opponent down on hit! It has GB properties and leaves you at +4 frame advantage if the opponent blocks it, and the pushback is good enough to avoid most throws. Although this final kick has ok range, the long traveling distance that the whole string has makes it pretty long range, but be careful of whiffing as it has a 40i recovery times. The kick also does not have tracking abilities, and can be ducked easily if the opponent has blocked the whole string up to this point. This string is important to utilize as it is her most damaging option to use when the opponent is launched, but the opponent has to be high enough and light enough for it to hit when airborne. Avoid using the string when near a wall, as the fourth hit can cause a premature wallsplat that can steal away potential high damage output.
~NOTE: We're not quite done with the Kurenai kick string yet! Now this next part will cover all 9 of her possible mix ups! Like before, assume I'm referring to the added on command, as I've already addressed the core kicks' abilities in the previous part!*K6K- This transitions from her basic high kick into her jumping 20i mid hit. It launches on normal hit, but because of the long 38i recovery involved, you won't be able to do any actual follow ups from it other than her K6KK one I will be addressing shortly. Free canceling this attack on block is not a good idea, as you are left at -25 when blocked, and whiffing is also out of the question as well because of frame recovery involved. The attack also doesn't track, and it has somewhat mediocre range, but the jump involved in the kick can evade lows.
☆K6KK- The full string stemming from the previous command, turning this into a 19i command move. If the the opponent is high enough in the air for the rapid high kicks to hit, the attack turns into a throw command that makes her do a relentless barrage of kicks to them while airborne and she finishes it with a hard flipping kick that sends them back first unto the ground. The command is a good mix up against opponents who are already stunned, and it makes a good juggle ender in situations where KKKKKKKK won't hit due to height or weight. The move has 26i frame recovery if it misses, and leaves you at -34 when blocked, which warrants you throw punishment. The string also does not track, and the reach is good, but it will completely go over the opponent's head if done from a long distance where the K6K won't hit.
*KK6K- A mix up that transitions into her 22i(The second auto part is 3i) 9K mid jumping overhead "cartwheel" attack. The "cartwheel" knocks down on normal hit, and has decent range to allow it to be used at a distance, which is the range I recommend since you can be jabbed out of it during the jumping phase and start up and wind up in a stunned state. The "cartwheel" also avoids lows because of the jump, allowing you to crush low attacks and low wake up kicks if timed correctly. The attack unfortunately does not track, and is -9 when blocked (-8 at a slight distance) and has 25i recovery tacked on. Throw punishment can be avoided if you do the string at a distance, as the pushback will allow you to avoid most neutral throws. The "cartwheel" can also be used as a foce tech against opponents on the ground. If only the 4th "auto" 3i kick hits on hi counter hit, it will cause a bounce allowing you to execute a follow up combo. Furthermore if both the kicks hit on hi counter hit but only by themselves, you can also execute a follow up from that as well, but only from a distance. If only the 3i auto kick hits a crouching opponent, it will result in a stomach grab stun that that provides +25 FA on normal hit! Counter hit will result in a knockdown while a Hi counter will result in a bounce instead.
☆KK6KK- The second follow up from the previous string, that ends the string in a 26i twin "cartwheel". It basically does the same things as the original one does: It evades lows, has great range, force techs, and crushes low attacks. It also GBs, providing +8 frame advantage, a decent pushback, and it puts you in her backturned stance. The string however does not track, and because the "cartwheels" are both mid kicks, it can be held on reaction if your opponent is guarding and reads you.
Very useful as a juggle ender since it hits fairly hard and can easily be used against all weights with little difficulty. It can also be used on guard as a way to pressure opponents on block since the +8 is good, but it can be risky to go for since the string can be held easily or sidestep, making it somewhat risky.
☆KKK6K- This string transitions from her triple high kicks to her Makikaze 236K command move. Instead of the 30i start up that the original command has, this starts up slightly quicker at 26i. This attack is a spiral arrow type drill attack that has excellent reach, being able to travel across the whole stage. Once it hits the opponent, they can not hold out of it until their stun animation ends, or until you execute the additional follow up that'll end the stun prematurely.(NOTE: The longer you avoid executing the follow, the longer the stun and drill attack will last.) You will be left at -5 if it hit by itself, which leaves you vulnerable to neutral throws, but it isn't a major issue since they can be escaped/broken. If the base high kicks hit your opponent and if you execute the 6K part on normal hit or higher, the drill attack will launch them and they'll spin out as they fall to the ground. If only the drill attack hit a backturned opponent, it'll put them in a limbo type stun and they'll be unable to hold to escape the follow up. The attack tracks, and evades lows which can shut down your opponent's low attack attempts. Be wary that the attack is a shocking -35 on block, and leaves you at a 41i recovery, although it travels across the whole screen, so unless your opponent jumps over it, it won't make much of a difference as you can still get throw punished either way.
*KKK6KK- This string adds the final follow up to her drill attack: a 26i frame mid kick. It launches the opponent on normal hit, although you won't be able to use her K6KK juggle ender on heavier opponents unless they're light enough to allow the a counter or hi counter hit to launch them high enough.(Alpha 152 can be due to her feather weight, lighter opponents can too but you have to be precise with the timing and have no delay.) Finally the attack also tracks, but keep in mind that that this follow up kick can be held on reaction since it's a mid, so it may be best to save it for use in juggles rather than during a stun. Another use for for this string is that since the 4th wallsplating kick from the original full no mix up string is replaced with this drill attack, you can use this instead against airborne opponents to carry them across the stage so they can fall off ledges, and you can use the final kick follow up to make them hit the wall it leads them to.(If they're high enough for the final kick to hit)
Generally, KKK6KK is very risky to use on block or hit since you're not at advantage unless the foe panic holds in anticipation for the ender. This is definitely a 50/50 mix up you'll have to commit to.
☆KKK4K- This string ends her triple high kicks with a 22i hard hitting high kick that knocks down on normal hit! It has a number of uses: It can be used as a linear but confusing mix up on opponents who thought you were going to go for one of her mid kick mix ups or who assumed you were going to use the full no mix up Kurenai kick string and they were waiting for the mid kick. It's also viable in juggles as the kick has great pushback and provides a wallsplat in case you are near a wall. It also GBs and leaves you at +4 frame advantage and with enough pushback to avoid most neutral throws. Finally, it tracks, and can provide a rope stun in stages with rope walls such as "Sweat". The only negative things about this string is that it's still linear, and can be crouched or held on reaction. The final kick also lacks range and can whiff, resulting in throw punishment because of the 40i recovery. If the final kick is held successfully, the opponent will not be able to hold it; they will simply move aside leaving you at -25 vulnerable to throw punishment.
*KKKK6K- In this string, her low sweep is replaced with the jumping high kick from her PPK string. It's identical to it in terms of frames, still remaining 29i and having a 35i recovery. It still tracks, GBs leaving you at -2 on block and with a good pushback to avoid most neutral throws, and it launches on normal hit and avoids lows because of the jump. A glaring weakness is that since the attack replaces the LOW sweep from the string with a HIGH jumping kick, the opponent can just simply hold low like before to avoid it, and they can throw punish afterwards because of the steep recovery. Because of this, I regard this as one of her worst mix up options to use....be very cautious when throwing this out at your opponent since it's a rather shallow mix up but is safe compared to the low
~NOTE: That concluded her Kurenai string, but we're not quite finished yet! This next part will address her other major kick string Kawayagi, which is compromised of 7 kicks(8 if you count the auto one that is included with the final kick.) Like I did with the Kurenai kick string, I'll separate each kick follow up for simplicity and to avoid a bulky text wall eye sore. I'll address the mix ups from this string once all 7 kicks are broken down.☆6K- The beginning kick in the string: a 16i forward jumping mid torso kick with 27i recovery. It provides a stun and +21 frame advantage on normal and counter hits, and has good range and evades lows because of the jump. The move however lacks tracking and is -14 upon successful block, and can be throw punished. This is her quickest mid stun starter, but stagger escape can make it rather shallow to use unless you proceed to utilize the full 6K kick string to continue the stun since a successful stagger escape will help avoid mix ups, but not anything tied to the string itself, making it scary as it has a quick launch mix up afterwards that can quickly create a juggle situation.
*6KK- This adds in a 26i flipping overhead mid kick into the mix. This has even longer reach, and also provides +21 on normal and counter hits, and avoids lows too. This one has the same 27i recovery, but is unsafer at -20 on block, and like the first kick, it has no good pushback and does not track. It can be delayed to throw off opponents however, and this hard force techs opponents lying on the ground.
*6KKK- Naotora throws in a twin jumping forward torso mid kick with the same identical move properties and frames as the original 6K.
*6KKKK- Naotora throws another twin flipping overhead mid kick that's the same as the second kick from 6KK. The frames and properties are once again identical. The entire string up to this point is also guaranteed on back turned opponents.
*6KKKKK- Naotora now further switches things up by throwing in a slanted 24i high kick with 24i recovery. The kick provides +25 frame advantage on normal hit, and spins the opponent to the ground on counter hit or if they were stunned by the previous kicks beforehand. The string tracks, but be wary that if an opponent knows the high kick is coming, they can can crouch it on reaction or even hold it.(If they hadn't already held you by now since everything up to this attack was a mid kick...). Also keep in mind that the high kick is -13 on block.
*6KKKKKK- Naotora adds some more spice by throwing in a 20i low sweep with 29i recovery. It provides +14 on normal and counter hit and stuns the opponent by making them fall briefly on their bottom or on their stomach. The sweep tracks, but be careful about free canceling on block since you're left at -15. The sweep can also be used as a somewhat impractical force tech.
*6KKKKKKK- The final hit adds a somewhat telegraphed 33i wild jumping mid kick that automatically transitions into an auto 2 frame high kick. It knocks down on normal hit, tracks, and GBs which leaves you at +2 frame advantage. The pushback doesn't avoid neutral throws, but you can quickly and easily halt your opponent's throw attempts thanks to the frame advantage bestowed to you. The kick also avoids lows and can harshly punish opponents who are naive enough to attempt one.
~NOTE: We're almost done with this kick string! This last bit will finally address all possible follow ups stemming from the Kawayagi kick string. Hang in there for the Ii Clan!☆6K4K- This transitions from her mid kick into a jumping 16i high kick that launches on normal hit and evades lows during the jump. The attack has decent range, but is unsafe at -14 on block, has a 24i recovery, and does not track. K6KK is a good ender for this if it hits, but KKKKKKKK is even better if the opponent is light enough and if done on counter hit.(Alpha 152 is light enough for the Kurenai kick string to work on normal hit)
☆6K4KK- The follow up to the previously addressed string: a downward 20i mid axe kick. Although unsafe at -11 on block and with 26i frame recovery and no tracking, the follow up is useful in situations where no other follow ups are fast enough to hit, or if the opponent isn't launched high enough due to weight. Can also be used as a force tech, and has good range. Take heed, the attack leaves you briefly in a squatting position, and because of the recent update, alot of fighter now have moves that can accurately hit squatting opponents, so be cautious. If only the last kick hit on hi counter hit, then it will cause a bounce allowing you to execute a follow up combo.
☆6KK4K- This mix up adds in a 29i twirling high kick that's quite similar to the final kick of the PPK string. The kick GBs and leaves you at -2 on block, and launches on normal hit, also providing the highest launch from a string, but has a long recovery as a weakness. The range is good, and the attack tracks unlike the two mid kicks before it. If done during a CB set up or stun, the launch will be higher, which is a good reward in exchange for the possibility of the second twin mid being held on reaction. The kick leaves you at 35i recovery and can be crouched to avoid it, so be wary...
*6KKK6K- This mix up leads Naotora into a linear 18i frame jumping knee lunge that launches on normal hit. It's risky at -9 on block and 26i recovery, and can easily be held on reaction since all hits up to this are all mid kicks too. Despite the risk, it provides a good launch as a reward, and the whole string avoids lows. The string does not track however. Guaranteed on back turned opponents.
¤6KKK4K- Like her previous string, this is another risky but rewarding string. After the beginning 3 jumping mid kicks, she throws in a 30i axle mid kick with 26i recovery. If it hits, it sends your opponent "sliding" backwards for roughly two seconds, and they'll be vulnerable to follow ups like K6KK, 236KK, or 6K4KK. The string is -11 on block, but throw punishment can be avoided if the final axle kick hits the opponent at just the right distance, but it's tough unless you're opponent is constantly backing away while the string is going on and if only the final kick hits. The string does not track, and the final kick can be used as a force tech.
~BONUS TECH: If you want the K6KK ender to hit after the final final kick to hit, quickly dash forward forward and execute the command just as the opponent is about to flip over. This only works on the lighter and mid weight characters.*6KKK8K- Another risky string, but it provides high reward if all the attacks hit successfully. This throws in a highly predictable 42i jump flipping mid kick with a recovery of 26i. The kick puts the opponent into a sit down stun, which guarantees a CB if the whole string hits, since it takes a while for the sit down stun to finish. If the string is blocked, you'll get +4 frame advantage thanks to the GB properties , and a slight pushback, and the kick avoids lows during the massive jump. Keep in mind that the string does not track, and is very linear and can be held very easily. The opponent can also stagger/slow escape during the first three kicks kicks to negate the level 2 critical stun, so be cautious. Can also be used as a somewhat impractical force tech when needed.
*6KKKKP- Her 41i mid punch follow up that's basically the same as her punch follow up from the Ii Family Creed stance, sharing the same frames and abilities. Although it mixes things up, the attack is heavily telegraphed and can be held on reaction. It does track however, making it useful in nailing opponents who attempt a sidestep.
~NOTE: A few of the upcoming attacks I will not fully address since they are basically the same as some previous ones with a certain command taken away from it, so frames and properties will still be the same. To make it easy to reference the attack it's derived from, I will list it in the summary. The only main difference is that since the beginning command was is removed, the attack comes out sooner without any fluff, but the frames are still identical. The tracking information is still intact on the move as well, and so is the general range.☆4K- basically the same as 6PK, except without the mid punch in the string. It's still 12i and has 24i recovery, and is -8 on block(-7 at a distance). The properties remain the same too, and it does not track. Useful for air juggles when the more optimal 6PK is unable to hit due to launch height or opponent weight.
*4KK- Like previously stated, this is basically the same same as 6PKK, except the 6P mid punch is removed. The frames and GB are identical.
☆4K4K- The same as 6P4K but with the mid punch removed. The frames and pushback are identical, and it still leaves you backturned. Can be used as a light force tech.
☆4K2K- The same as 6PK2K, except the mid punch is removed. The frames are identical, and it still leaves you backturned. Can be used as a light force tech. In situations where the slightly more damaging 4K4K will not hit airborne opponents due to juggle height, this is considered the more viable option to use since it ends in a swift low that can hit opponents successfully.
☆8K- Basically the same as the 6K4K command, just without the beginning jump mid kick from the Kawayagi string. It launches on normal hit, and avoids lows due to the jump. Has decent reach and useful as a launching whiff punisher. Also her staple go to launcher after a CB.
*8KK- Basically the same as the 6K4KK command, but the Kawayagi kick is once again removed. Can be used as a force tech. Because the first first kick jumps over lows, the second kick can be used to crush the low kick as a result. If done on hi counter hit and if only the second kicks, it will cause a bounce allowing you to execute a follow up combo, making the move perfect for punishing missed attacks and opponents attempting to attack you while at a distance.
☆9K- Pretty much the same as the KK6K string, but the beginning kicks from the Kurenai kick combo is removed. It still avoids lows, and can be used as a force tech. Also useful as a less risky whiff punisher due to it's reach, and can crush low wake up kicks.
☆9KK- Pretty much the same as the KK6K string, except the beginning high kicks are removed. The follow up kick still avoids lows, and can be used as a force tech, and it still GBs and leaves you backturned. This can also be used as a riskier, but longer range extension whiff punisher, and can also be used to crush low wake up kicks. Although it can be held if the first attack is blocked, the opponent must be aware that you can indeed free cancel and bait a hold, or you that you can brutally crush a throw if they attempt to do one, thinking you were going to free cancel.
☆2K- A simple 14i low kick that has good reach and is good for mixing up CB set ups and quickly damaging opponents who favor guarding high and mids. It leaves you at -4 on normal hit and gives you +1 frame advantage when performed on a backturned opponent. If done on counter hit, you'll get an even better +16, and if done on high counter hit to a backturned foe, it'll put them in a bad stun and give you +31 on frame advantage. If done twice in a row on counter hit, it'll knock them down. The move is unsafe at -9 on block and 28i, but throw punishment can be avoided by doing the attack at a slight distance, thanks to it's good reach. It can be used as a light force tech, but it does not track. Keep in mind that only 4K and 6P are the only follow up options fast enough to continue the stun in a CB or general stun set up.
☆3K- A good spacing 15i mid kick with 25i recovery. Having great reach, it can be used as a way to punish whiffed attacks and to attack the opponent from a distance. You'll get +4 frame advantage on normal hit, and +24 on counter hit, along with a longer and better stun. The kick also provides +15 against backturned opponents. Although unsafe at -8, the range allows you to use it from a safer and farther distance, allowing you to avoid some throws. The kick does not track.
☆236K- Pretty much the same as her KKK6K string, except without the beginning triple kicks added on. The start up is slightly longer at 30i, but other than that the string is almost identical. It's great as a whiff punisher because of the traveling distance, and can be be used after attacks like 4H+K. The attack does track, and it avoids lows, but be cautious as the attack is -35 on block and is quite risky to throw out without thought.
*236KK- Identical to the KKK6KK string, except without the beginning triple kicks from Kurenai. It launches on normal hit, and wallsplats if done near a wall, along with the other previously addressed properties.
~PSST!: Promise me....you won't tell anyone, but the 236K attack can be done while running! Just press K after running some distance.~BONUS TECH: Is the female Tengu giving you trouble with her 9P and flying forward shenanigans? Quickly turn their entertainment into an unsatisfying dismissal with the 236K attack which will shut down her attempts to move in on and throw you! Have mercy...~BONUS TECH: Although the move is unsafe on block, you're not completely helpless if it is guarded. Unless your opponent actually guards BOTH hits, they may have to make a guess: Either they attempt a hold to stop the second kick, or they attempt a throw if they believe you will not finish the string. If they throw out a hold and you didn't finish, you can simply throw them for a hi counter damage throw of your choice. If they decide to throw and if you DO finish the string, they'll instead be launched higher on counter hit! The same can be applied if it actually hits, since you are left at -4 if only the first spiral kick hits, and you'll be at an advantage if you're opponent is naive enough to attempt a hold, which is helpful against characters who possess an expert kick hold!☆P+K- This is her character specific critical burst. It's 20i forward push mid punch attack with 26i recovery that stuns the opponent on normal hit, and they'll fall to the ground unless they make guess or hold to get out of it. It's -9 when blocked, so try not to throw this attack out in a neutral situation, instead use it during CB set ups when trying to CB your opponent. The attack doesn't have the best stun however, and the opponent can stagger/slow escape to avoid additional critical level stun. The attack does not track.
*4P+K- Her mid punch power blow in it's normal state. It can be charged up to 60i, and can be released as soon as 25i, with the damage depending on how long you charged it. Regardless of how long it is charged, it'll always have a 38i recovery, and be -14 when blocked. The attack does not track either.
☆4P+K(50% Hp. loss or more;CHARGE!)- Her PB when Naotora has 50% health lost or more. Just like the original regular PB without at least 50% health gone, it can be charged, but you need to charge it at least 40i before it can actually initiate the actual PB attack. If blocked when charged at least 40i, it'll gain GB properties and give you +11 frame advantage on block. If you ever want to cancel out of the PB to fool opponents and to get a reaction, simply use 22 or 88 to sidestep out of it. Remember to use it only when safe or after a CB(Only halfway in a CB, since the opponent will fall over before the whole thing can come out), if it's held during the charged PB phase, it'll be treated as a hi counter hold if the opponent successfully held it. This attack does not track.
☆H+K- A 15i thrusting mid knee kick with 26i recovery that launches on normal hit and has great reach. If your opponent is in a level 2 critical stun or if it hits on counter or hi counter hit, it'll launch much higher, give you more juggle options. It also makes a good but risky whiff punisher, but take heed as the attack is -9 on block and does not track. The jump also avoids lows. This is her best launcher after a CB, but it's best to avoid using it unless in open space since it wall splats.
☆6H+K- Pretty much the same as the fifth slanted high kick from the 6KKKKKKK Kawayagi kick string, except faster at 15i and slightly safer on block at -8, but other than that the frames are identical. It provides +25 frame advantage on normal hit and stuns. It spins the opponent to the ground on counter hit, which guarantees her follow ups from this string. Because this is a static string that has no mix ups, you can fool the opponent and bait a hold or just follow up with the same move again and finish the string since two 6H+Ks in a row will spin the opponent to the ground, just like a counter hit....just as long as they do not low hold out of the stun. This move does track. If done from a slight distance, the move will be -7 on block making it semi-safe.
☆6H+KK- Basically the same as the sixth low sweep kick from the 6KKKKKKK Kawayagi string, and has identical frames. This move does track, and can be used as a force tech, and provides +8 on normal hit if done from a distance, and +14 if up close on normal and counter hits. If you hit the opponent however from a distance on counter hit, you'll gain +15, but hi counter hits from a distance and any type of hit to a backturned opponent will make them flip and fall to the ground. If you wish to continue the stun after the sweep, 4K is fast enough to continue it without having to finish the string. A useful attack to use at a distance since the sweep has great range .
*6H+KKK- The same as the seventh hit from the 6KKKKKKK Kawayagi string, except the final wild mid kick is now 32i instead of 33i, and has a 40i recovery instead of 41i. It knocks down still on normal hit and still retains it's GB properties.
☆¤4H+K- The same as the final axle kick from her 6KKK4K Kawayagi mix up string, but is now quicker at 22i, and is less risky since the linear bulk of the move is now removed. It still knocks down on hit, and sends your opponent "sliding" backwards, vulnerable to further attack. The kick is unsafe at -11, and can be throw punished if done up close, but it has great reach and can be done from a moderate distance, allowing you to avoid some neutral throws. If done from mid range however, it'll be -10, while done at max range, it'll be -9 on block. Can also be used as a force tech, and as a somewhat risky but rewarding whiff punisher. This kick does not track. Also can crush wake up kicks, but be careful of your position and timing.
*7H+K/8H+K- Her character specific power launcher in it's normal state: a jumping vertical mid kick. It comes out as soon as 25i and as late as as 40i when fully charged. Unlike the PB, the damage does not change at all no matter how long you charge it, and you'll be at 36i after the kick. The range varies depending on the charge, and it does not track. But, the PL can be used as a force tech. If it hits, keep in mind that your opponent will flip backwards onto their back on the ground, and they are briefly vulnerable to follow up unless they tech up and get back to standing position. This is also her most damaging attack that can be used after CBs near a stage ledge, which is handy when you won't be able to combo afterwards and want to get as much damage as possible before they drop.
☆7H+K/8H+K(50% hp. loss;CHARGE!)- The same as the normal version, except if fully charged, the actual PL will initiate, sending your opponent a very high distance up in the air for a juggle set up. Unlike the PB, charging it does not affect the damage, and it HAS to be fully charged 40i in order to initiate. The attack does not track, and it's recommended to save this for when you get an actual critical burst, not just throwing out of nowhere in the middle of the match and risking serious damage...
~BONUS TECH: After the PL hits and launches the opponent, you can get into the Ii Family Creed stance by pressing/holding the 4 directional input just after the the PL hits. Then use her kick follow up to initiate the throw as they're falling down...do it at just the right time, and avoid doing it too early or too late! This will work on ALL weight classes, even heavyweights, so make this a BnB go to follow up against heavier combatants.☆2H+K- One of Naotora's better moves that she has in her arsenal. This is basically the low sweep from her PP2K string, but without the linear non tracking punches tacked on and it now stuns on normal hit, although you won't get much from it other than frame advantage. There is no noticeable differences in properties or frames, but the sweep now will knock down on hi counter hit. This is a great low spacing tool with good range that can be used against standing guard opponents, to mix up during a CB set up, and also to condition opponents into looking out for low sweeps and opening them up for high or mid attacks. Can also be used as a force tech. Because she is crouching during the attack, this can also be used as an annoying and damaging way to evade high strikes and standing throws with ease, and what's more it can also be executed while already crouching! Also, if done on counter hit ONLY, you can use 4K to start a stun set up or CB set up, but keep in mind that the 2H+K's stun can be stagger escaped. Take heed as you are still vulnerable to mid attacks, faster low attacks, low throws, and low throw punishment, as well as attacks that can harshly crush lows....
~BONUS TECH: You can ruin any grappler's fun by simply performing 2H+K if they attempt a throw! Since the sweep has Naotora crouching during the attack animation, it'll go under standing throws and be treated as a hi counter hit and knock down your opponent! Now you can show Lisa who's really terrible! ;-)☆SS~P- A mid punch follow up for when she side steps. The attack is basically the 3P command, except with a very minor increase in range, and it stuns on normal hit, giving her +35 frame advantage, or +15 on backturned opponents. Although useful, the strike is rather a bit slow at 28i, but it still has the same 25i recovery and is still -11 on block. The attack does not track.
☆SS~K- Her second side step attack, which is the same mid knee "kick" as her 4K, only slower at 25i, and no follow ups from the 4K knee can be executed from the side step knee attack. There is a trick that can be done to throw off opponents : The attack can be delayed for 10 more frames, and you can use the traditional 4K attack and it's string follow ups instead since opponents can be tricked into thinking you're doing the delayed side step kick instead. The attack does not track.
~NOTE: As a general rule of thumb, be aware that naotora has a handful of kick attacks that actually deal half of their damage they'd do up close when used at a distance instead. These attacks include the following : 2H+K, back turned 2K, the second hit of 6H+KK, and the last hits of 4K2K, 6PK2K, and PP2K2K(both sweeps).Backturned/Back-Facing Strikes
-This mini section will briefly address Naotora's backturned strikes. They're all pretty identical to existing moves, so I'll mainly address frame changes and such:
*P- The same as her basic high slap, except with a 21i recovery since she turns back around. Good for quickly turning back around and continuing stuns or strings. Does not track.
☆4P- She turns back around with a swift 14i upward arching mid punch. It gives her +34-+35 frame advantage, and it launches on counter hit or during a stun. It also tracks, but has somewhat average reach.
☆2P- She turns back around using her 14i 2P command move. It has identical frames, but leaves you at -1 on normal hit, and +17 frame advantage on counter hit. Unlike the original 2P command, this actually tracks, and it can be used as a light force tech too, just like the original. This also provides a slight relaunch after you wallsplat with 4K4K or 6PK4K. Because the refloat has undergone a major "nerfing" in the last patch, the refloat doesn't really guarantee anything aside from 6PK4K/6PK2K, and 4K4K/4K2K.
~BONUS TECH: The following follow ups will work on Alpha 152 after the BT 2P refloat: PK, K6KK, PPP, 6K4KK, KK6K, H+K, 6PKK, 4KK, PP2K and 6KKK!*K- She turns back around with same basic K kick command. The only real major difference is that this will provide you one more additional +1 frame advantage on hits unlike the original in some cases. Also, this version of her kick is unsafe at -13 on block, -12 at a distance, meaning it's punishable if free canceled.
☆¤4K- The same as her 4H+K command, except swifter at 17i frames, and it has shorter range, so avoiding throws isn't as easy. Does not track, but can be used as a force tech although it's somewhat unreliable unless you perform it after 4K2K, 6PK2K, 9KK, or KK6KK.
☆2K- The same as her normal 2H+K command, but swifter at 21i. They both track, and have the same good range.
Notable launchers
-This mini section will list and identify Naotora's launchers:
☆8K- Her staple launcher: A high kick. launches on normal hit but can be ducked and is unsafe. No tracking but has no wallsplat risk. Can also be used in the 6K string by using 6K4K to give it more pseudo range.
☆H+K- Mid kick launcher. Launches on normal hit, can't be ducked but is unsafe, and lacks tracking. Best standalone launcher but wallsplats.
*66P/While running P- Mid punch launcher. Stuns on normal hit, tracks, and can't be ducked as well as having some pushback. However it's the worst of her launchers and doesn't avoid lows.
-This concludes her move set breakdown! Now I will address throws and their abilities in the next section.
Section 6: Naotora's throws explanation
-This next section will now move on to Naotora's other means of getting damage: her throws. Because of her small move set, you need not worry, she doesn't have a lot of throws to memorize, but keep in mind that her throws aren't the best. They seem to favor practicality over actual flash or advantage, but they do efficient damage and ultimately get the job done. Let's start off:
- Her fastest standing throw at 5i and 23i recovery. Naotora basically grabs the back of her opponent's head and clumsily "tackles" them to the ground as she puts her weight on them, making them fall over. The throw leaves you fairly close to your opponent, so you're going to most likely deal with a wake up kick situation unless you quickly back up. This throw can be broken since it's a neutral throw. If done on backturned opponents, she'll instead grab her opponent's head and hop on them to make them fall to the ground with her knees around their head while putting her weight on them. She then quickly gets up and bows politely while she apologizes. This throw can not be broken, and will do slightly more damage.- Her second fastest throw at 7i and 24i recovery. Grabbing her opponent's hand to pull them in close, she proceeds to kick the snot out of them with her rapid kicks before delivering a mean kick that spins them backwards and makes them fall on the ground. This throw leaves you at +5 frame advantage, and with enough space between the two of you to avoid a wake up kick situation. It will wallsplat if done near a wall, dealing a bit more damage and also will interact with danger zones, making it lethal in stages with those or walls with danger zone properties like fire or electricity. This is generally the go to throw you'll want to use when wanting to punish unsafe moves but wanting a swift throw that can't be broken like her neutral throw.- A 10i throw with 25i recovery that has Naotora grab her opponent and roughly tackling them to the opposite side of the arena , switching sides in the process. While you will still most likely have to face a wake up kick situation, the throw is good for getting away from danger zones and away from corners, while putting your opponent in the situation instead. Useful as her go to throw punish against very unsafe attacks. - Her slowest but strongest throw at 12i and 26i recovery, and has great range to boot. Naotora channels her inner Kasumi and jumps on her opponent's shoulders sitting crotch first in their face, before doing a mighty flip that sends her opponent across the screen. Not only does it do great damage and leave you at +8 frame advantage, it'll also send opponents over ledges on stages like "Lost World" to do even more damage, and if done near a wall, it'll send them flying into it, and they'll take a bit more damage. Can also be done on backturned opponents, but she'll instead sit crotch first in the back of their head.This I regard as her best throw to use when dealing with opponents who like to panic hold in stun, as it's shocking damage output can scare wary opponents into opting to either not hold or even stagger escape.
- Her only low throw, but it's fast at 5i and has 23i recovery. She channels Lisa in this throw by grabbing her crouching foe's shoulders and doing a wild break dancing type maneuver before doing a low flip in the air and sitting violently hard on her opponent's vulnerable face with her legs somewhat spread apart. This can also be done to backturned crouching foes, but instead she'll sit on the back of their head for more damage instead of directly on their face. This is her only low throw in her arsenal so it's going to be your only low throw punish, but it's damage is good to make up for that. Interacts with floors. -This concludes the throw section! Now time to move on to her holds.
Section 7: Naotora's holds explanation
-This next section will finish off the basics by giving the rundown on all of Naotora's holds and what they do. Naotora does not have any expert holds or defensive holds, it's all just standard basic holds that don't do anything extravagant or game changing, but they ultimately get the job done which is to counter her opponent and get them on the ground so she can have a chance to retaliate. Let us start:
(Against high punch)- Naotora grabs her opponent's hand and flips them unto their back. Very little space is given after the hold, so you'll have the chance of dealing with a wake up situation unless you quickly back up.(Against jumping high punch)- Naotora grabs her opponent's hand and flips them out of the air to the ground on the opposite side of the arena. Very little space left after the hold.(Against high kick)- Naotora pushes aside her opponent's kick and quickly goes behind her opponent backwards and drops her body weight on them, causing them to fall and roughly hurting their back. Doesn't do anything spectacular, and you have little to no space between you and your opponent once the hold finished. (Against jumping high kick)- Naotora grabs her opponent's leg and forces them to the ground with a falcon type push on the opposite side of the arena. Some space is made after the hold ends.(Against mid punch)- Naotora grabs her opponent's arm and does a cat toss that throws her opponent behind her. It leaves you with good space between you and your opponent, but it will not send them flying off ledges or into walls. Useful as a way to get the needed distance to implement her zoning to keep out opponents more suited (Against jumping mid punch)- Naotora angrily grabs her opponent's hand and uses her back to harshly toss them to the other side of the arena. Very little space is given after the hold.(Against mid kick)- Naotora simply tackles her opponent to the ground after grabbing the mid kick, leaving them at a vertical lying angle. Very little space given after the hold.(Against jumping mid kick)- Grabs her opponent out of the air after grabbing their leg, and then tackles them to the grounds. Very little space is given after the hold.(Against low punch)- Naotora grabs her opponent's punch and pushes them to the ground, then before they can get up quick enough, she delivers a mean kick to her opponent's vulnerable back. Little to no space given after the hold.(Against low kick)- Naotora quickly intercepts her opponent's low kick, and pushes them harshly forward while striking a Ii Clan martial arts pose. Little to no space given after hold.☆This now concludes her holds section! Now for the next section, I will suggest and share some combos that I and some other Naotora enthusiasts have made up and discovered!
Section 8: The ancient Ii Clan combo vault
-This section will cover some possible combos, set ups, and other related stuff to give you a good starter pack of useful tricks and set ups to try. Keep in mind that these combos are not made for flash, Most of them are practical and should be second nature to you after some proper practice, and a few are unique ones I discovered that you won't find likely from the other combo forum....these are for now exclusive to this guide. A few combos are more situational and essentially will give you an idea of what she's capable of combo and damage wise. Naotora's combos aren't at all difficult to pull off but refer to this symbol legend to know what the symbols mean:
> - This will indicate to execute the next command after the move before it.
☆- This star bullet will indicate normal traditional combos.
¤ - This gear bullet will indicate CB set up combos.
[☆] - This will indicate power launcher combos. No specific CB setup is needed, they can be used either by themselves or in your own CB setup. The damage I list will be added to the damage of the CB set up that is used.
~___ Damage~ - Combo damage will be displayed this way.
(CB) - I will put parentheses around word abbreviations to avoid confusion. Please note that some of these combos may be tricky to do, but I assure you that they are possible to do, timing and positioning is key to nailing the more challenging ones. With that being said, I'll start the listing:
☆H+K>K6KK ~62 damage~
☆2P+K~H+K(HiC hit)>K6KK ~87 damage~
☆KK>6KK4K>K6KK/KKKKKKKK(Against lighter opponents) ~97 damage/105 damage~
☆KKKKKK>K6KK(Against light to middleweight) ~88 damage~ ~99 on counter hit~ ~111 on hi counter hit~
¤6KKK8K>P+K(CB!)>H+K>6K4K>K6KK(Can be stagger/slow escaped!) ~126 damage~
☆4H+K>(Dash forward)K6K(works on all weights!) ~62 damage~ ~73 damage on counter hit~ ~84 damage on hi counter hit~
☆(At MAX distance)4H+K>236K~K/(while running)K~K(both full attack) ~48 damage~ ~61 damage on counter hit~ ~72 on hi counter hit~
☆4H+K>236KK (Useful on stages with ledges like "Lost World") ~46 damage~
[☆] (On dangerzone stage somewhat close to edge)8H+K(Charge at 50% hp. loss)~4(Ii family Creed Stance)~K(opponent must fall over ledge)>(After opponent is launched in air from explosion ) 2P+K~K ~227 damage~ ~237 damage on counter hit~ ~247 damage on hi counter hit~
☆(On dangerzone stage in center)KK>6P>4P(opponent must NOT hold hold out of stun)>Quickly 2P+K(as they fall, they must NOT tech up)>(quickly after opponent is launched from floor explosion)~K(opponent must fall over ledge afterwards)>(After opponent is launched high up in air from the explosion) 2P+K~K ~243 damage~ ~254 damage on counter hit~ ~267 damage on hi counter hit~
[☆] 8H+K(Charge at 50% hp. loss)>44(Back dash)>9P~K>KKKKKKKK(Can work on heavyweights, but timing is VERY strict!) ~108 damage~
¤KK>PK>P+K(CB!)>8H+K (Charge at 50% hp. loss)>6H>6K4K>KKKKKKKK(Works on lighter opponents)/KK6KK(Great for heavy weights!) ~154 damage/144 damage~
☆(HiC hit)6H+K>4K4K(Light weights only) ~66 damage~
☆(Alpha 152 only;HiC hit)6H+K>6PKK ~76 damage~
☆(Alpha 152 only;HiC hit)6KKKKK>6PKK ~114 damage~ ~76 damage on normal hit~ ~96 damage on counter hit~
☆(Alpha 152 only)6KKKKK>KK6KK ~91 damage~ ~113 damage on counter hit~ ~138 on hi counter hit~
☆6KK>6KK4K:
*>K6KK ~96 damage~ 115 on counter hit~ ~135 damage on hi counter hit~
*(lightweight or Alpha 152 only)>KKKKKKKK ~104 damage~ ~129 damage on counter hit~ ~157 damage on hi counter hit~
*(Alpha 152 only)>6K4K>KKKKKKKK ~120 damage~ ~149 damage on counter hit~ ~181 damage on hi counter hit~
*(Alpha 152 only)>6H+KKK ~95 damage~ ~119 damage on counter hit~ ~142 damage on hi counter hit~
☆KKKK6K>(during launch)K6K ~91 damage~
☆6H+KK>4K>P>P+K(CB!)>H+K>KK6KK ~116 damage~
☆4H+K>6K4KK(No movement or timing required!) ~50 damage~
☆(From a slight distance)9K>4K4K(Works on all weight classes) ~42 damage~ ~52 damage on counter hit~ ~63 damage on hi counter hit~
☆4H+K>6K4K>4K4K ~56 damage~
☆9P2K>6K4KK ~54 damage~
☆(Near wall, counter hit) 6PK4K(Wall Splat!)>(While backturned)2P>6PK4K/4K4K(vs. lighter opponents) ~100 damage/91 damage~
☆6H+K>6H+KKK ~68 damage~
☆6H+K>H+K>6PK4K ~62 damage~
☆6H+K>4H+K>6K4KK ~66 damage~
☆6H+K>4H+K>236K~K(Full attack) ~64 damage~
☆(Counter hit or higher)H+K>6PK>6PK4K(light and medium weight only) ~77 damage on counter hit~ ~89 damage on hi counter hit)
☆6H+K>4H+K>(Dash forward)K6K OR 6H+K>H+K>K6KK ~78 damage~
☆6KKK4K>(Dash forward!)K6KK/6K4KK(No timing needed) ~85 damage/73 damage~
☆8H+K>(Dash forward)6K4K ~66 damage~
☆(At MAX distance)8H+K>236K~K(Full move) ~62 damage~
☆2P+K~P>K6K/KK6KK ~64 damage~
☆6KKKKP>K6KK ~97 damage~
[☆] (Alpha Only)8H+K(Charge at 50% hp. loss)~4(Ii Family Creed Stance)~P>KKKKKKKK(NOTE: Timing is tricky...) ~114 damage~
*FOLLOW UPS POSSIBLE AFTER THE FINAL KICKS OF 8KK AND 6K4KK(ONLY THE FINAL KICK CAN HIT! HI COUNTER ONLY!!)
[☆] 8KK/6K4KK(Base hi counter damage is 37):
*>6K4KK ~76 damage~
*>6PKK(Won't work on heavyweight) ~71 damage~
*>6PK4K ~70 damage~
*KK6KK(Won't work on heavyweight) ~95 damage~
*>K6KK ~85 damage~
*FOLLOW UPS POSSIBLE AFTER ONLY THE "AUTO" 3i KICK FROM 9K AND KK6K HITS ON HI COUNTER HIT:
[☆] KK6K/9K(Base hi counter damage is 22):
*>6K4KK ~61 damage~
*>6PKK ~56 damage~
*>6PK4K ~55 damage~
*>6PK2K ~52 damage~
*>KK6KK ~80 damage~
*>K6K ~70 damage~
*>6K4K>4K4K(Won't work on heavyweight) ~70 damage~
*POWER LAUNCHER FOLLOW UPS POSSIBLE JUST AFTER II FAMILY CREED STANCE ENDS *
[☆] 8H+K(Charge at 50% hp loss)~4(Ii Family Creed stance):
*6H+KKK ~87 damage~
*6K4K>KKKKKKKK ~117 damage~
*6K4K>KK6KK ~107 damage~
*KK>KK6KK ~105 damage~
*8K>6K4K>PK ~87 damage~
*KKKK6K ~82 damage~
*6K4K>6PKK ~90 damage~
*6PK>6PK>PK ~92 damage~
*6PK>KK6KK ~105 damage~
*6PK>KKKKKKKK ~115 damage~
*NOTE: Remember these are just samples!
-Don't let these combos and set ups be the only ones you use. Experiment, tweak, and make some of your own, Naotora is really easy and straight forward to juggle and combo with, so don't be afraid to go outside the box and make some of your own! I'll add more basic and practical sample combos as time goes on, so don't worry!
Section 9: Naotora's mighty unholdable set ups
-This is another section I wanted to add, at the suggestion of a certain member whom I will formally credit at the end of this section. This section will cover unholdable set ups...what's an unholdable you ask? An unholdable is an attack that can not be held immediately on wake up, meaning your opponent's only option is to defend and guard against the the attack since guards come out instantly at 0i while holds require 1i. In short, your opponent can only guard and will take damage if they throw out a hold. With that being said, here is a list provided by that certain member right here at your leisure:
-Note: Most of these unholdables are from a wall. Keep this in mind please.
Regular unholdables
[☆]Jump
>  > (236K is unholdable)[☆]
 >  >  (236K is unholdable)[☆]
 > run up a little  >  (The kick in 6PK is unholdable)Wall unholdables
[☆]Any wall splat >
 (W!) > Ii Family Creed  (Ii Family Creed 2K is unholdable)[☆]
~ (W!) > Ii Family Creed  (Ii Family Creed 2K is unholdable, lightweights only!)[☆]
 > ~ (W!) > Ii Family Creed  (Ii Family Creed 2K is unholdable, lightweights only!)[☆]
~ (W!) > Ii Family Creed  (Ii Family Creed P+K is unholdable, middleweights only!)[☆]
 > ~ (W!) > Ii Family Creed  (Ii Family Creed P+K is unholdable, middleweights only!)[☆]
 (W!) > (The low kick in PP2K is unholdable) [☆]
(W!) > BT  > Jump  (W!) > :[[p+k]]: (Unholdable Power Blow, middleweights only!) [☆]
>  (W!) >  (The fifth kick in KKKKK is unholdable)[☆]This is currently the end result, but if any more unholdables are found in the future, you can bet that I'll add them on as soon as I can! The member who was nice enough to provide them also said he may make a video detailing and showing off how they look in action, and I'll add that on this section whenever it comes to fruition. Stay tuned! ;-)
Section 10: Final remarks, credits, and future expansion
-Well, this concludes the Naotora for beginners guide! I hope it was informative, and that it provided some better insight and a good foundation for you to start using her. I had a LOT of fun making this guide, as I enjoy discovering more about my favorite characters and helping others who want to get better in said character too! I also want to thank and credit some people who helped me and assisted me throughout the guide and gave me good critique:
~ @KING JAIMY for not only providing the unholdable set ups, but also reading through and bringing up additional move information that I missed or didn't know about. Also responsible for being a great help in the match up log section, providing good insight on Rig, Marie Rose, ...~ @Nikotsumi for also bringing up additional move information, and even telling me about a move I didn't know existed XD. Also responsible for the insight on the Ein match up~ Can't forget @The 4th phase , @DoANoob , @Kirito , @Lady Tengu and @xXSilverSearcherxX! They were also excited about Naotora's release and provided really good tech and information that influenced my view and thoughts on the move set and character.....And thank you to anyone else I missed who helped influence me or contributed!
-Like any other guide, it's never fully finished and I will expand upon it and add on additional tech and information and refine it further as time goes on and as patches come and go, so don't think this is the end! ;-D Thank you for reading, and remember: FOR THE Ii CLAN! ~
[@] If you need any further help or assistance, just PM me, tag me, or leave a message on my profile page, I'm more than happy to help! :-D
Last edited: