PC Modding tutorials

pesbs

New Member
Tutorial Ink reshuffle v4 made by Immi

link: http://rghost.net/7BGmVZw42

Thanks to this new version of ink reshuffle we'll be able to add about 8 hairstyle per character. Things to know: Once you start using this tool you won't be able to use previous method to change hairstyles. So if you use the hair of another character or hayabusa's free slot for example, it won't work anymore. But with this new method, you won't need that anymore.

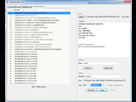
First thing before you start: you need to put the dinput8.dll file in your game's folder. Then, you need to indicate the location of the game.exe file which is in your game's folder as well.

If you're using Hotfix v4, make sure you indicate a normal game.exe to make the software recognize it.

Now, we can begin :


To add a new hair or a face (a make up for example) or even a costume, select "Asset Browser" on the top.


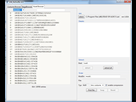
On the upper left corner, select "Obsolete". Remember to always select "obsolete" before swapping any file. These are the files unused by the game so we can use them safely.


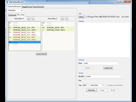
Now just select a random file in the left window and then click on "Pick file" in the back right corner. Pick the TMC file of the haircut you want to add.

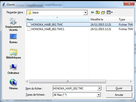
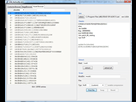
Here I'll add a hair for Honoka.


Before clicking on the "Swap" button, you need to select "tmc hair" next to Pick file. Then, you can click on "Swap".

Now, do the same for the TMCL file. So, you pick a random file, you select your TMCL file, but this time you select "tmcl hair" before you click "swap".


Now, we've swapped the tmc and tmcl of our haircut, we can go back on "Costume Browser" on the upper left corner. Select you character. Here i'll select Honoka. And click on "DLC slots".


In this menu, you can see the hairstyles on the left, and the faces on the right.
Click on the "+" next to "hair slots". Those i've already added are in red.
Right click on the first line you've just added and select "change".

Now, we'll pick the TMC we've just added.


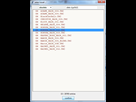
Click on "obsolete" so it'll be easier to find it. But you can find it in the whole list if you want. It'll be in red with the letters OM in front of it.

Click on "confirm" and do the same on the second line you've added with the TMCL file.


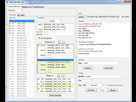
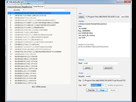
Now, we can go back on "Costumes". Here we have the list of Honoka's costumes.

Click on the first costume of the list. Or any costume you want to add the hair. In the middle of the screen, click on the "+" next to "hair styles".
Click on the new line you've added and right click "change". Select your TMC file and then the TMCL on the second line.

You can do the same on every costume that appears in black, but not the blue one. That means we can't do it here on the DLC. When you swap a hair on a costume, it become red.

If you made a mistake, you can go back to normal by clicking "revert".

To add the hair we've added on the dlcs, use DLC Tool. Open DLC Tool and open your dlc in each pack. Select each costume of Honoka or your character and click "add" on "hair". Since Honoka only has one hair style, if you put hair B2, she'll have the new hair. If it's for Christie, since she has 6 hairstyles, put 7.

Special thanks to Immi for making this tool !

Thank you very much for the tutorial, now I get it.
 

robhal

New Member
But the background is white. If i set the text in white it'll be invisible.
Then why in my end here the background is black like this?
QN27OtX.jpg
 

robhal

New Member
You must have done something wrong. The background is white.
It's been like that since I first join this forum and I don't even touch the forum setting yet.

EDIT: I see, so you are using the FSD Light 2.0 theme, that's why you say your background is white so you need to set your tutorial texts to black. Actually you don't need to set the text color to black because the default text color will automatically change depend on your forum theme.
So if you use the FSD Light 2.0 theme, the default text color is already black.
And vise-versa, if So if you use the FSD Dark 2.0 theme, the default text color is white.
 
Last edited:

CyberEvil

Master Ninja
Staff member
Administrator
Premium Donor
Dark is the default theme. Use the automatic text color and everyone can read regardless.
 

Matt Ponton

Founder
Staff member
Administrator
Standard Donor
I've corrected @KasumiLove 's two posts. It most likely happens because (s)he sets the first line to red then manually sets the remaining text to black. In the future it's best to type the sentences, then select what sentences you want to change color of and update it there. Then only those sentences are uniquely colored, and the remaining text is default colored.
 

bbb

Well-Known Member
Neck seam removal tutorial.

first we take a mod that needs a neck seam fix.

IatdrlD.jpg


in this example, I use a Rio's Banca Francesa from doa paradise for mila. the costume was built using a kokoro costume due to its similiarities, as a result, there is a neck seam

E8FXOG2.jpg


first thing we are going to do is use the latest version of abc transformer tool found here

https://www.mediafire.com/folder/f2d5z16fv0xm2/DOA5LR

this tool will remove any neck gaps if characters are from different body groups (not in my example) automatically swap the correct mtlcol, and swap the texture. simply drag the costume in the tool, and choose who you are give the costume to, then click transform

Ecze9rc.jpg


for the texture, the tool isn't 100% perfect with them. it will change the skin colour, and keep the painted shadows, but it is close enough that you can just copy and paste the shadow onto a clean skin texture of the character.

then simply drag the tmc into texture tool, select the skin texture, and drag in your edited skin texture (alternatively, if you don't care for shadows, just drag in a clean skin texture)

oSAHXuy.jpg


now if your characters are from different body groups (not in my example), you will need to use bone tool. can be found here

https://www.mediafire.com/folder/9zi2gt8dyllaj/doa5mod

simply drag in your tmc, and any tmc of the character your giving it to. use these settings, then click save.

BTI9LTS.jpg


now the final step is to remove neck normals. you will need blender 2.75A, and all the blender plugins, which can be found the same link as the bone tool.

first import your tmc in blender. select the skin, then enter edit mode. remove doubles and recalc normals, then with vertex selection, select the vertices at the end of the neck

9aULS2d.jpg


now return to object mode, then import the skin mesh/tmc of any unedited costume of the character your giving it to. select it, then enter edit mode and select the vertices of the neck the same way as before (do not remove doubles or recalc normals on this mesh)

return to object mode, then select the reference skin mesh first, then shift+click the skin mesh you are editing. then enter edit mode

1MlBicG.jpg


now click the transfer normals button on the top left. if done correctly, you will see the blue lines on the neck bend down

hHfrDMI.jpg


now return to object mode and export the skin as tmcmesh

with the latest version of polygon tool insert, (which can be found in the same link as bone tool and blender plugins) simply drag your tmc into the tool, then drag your exported tmcmesh.

the latest version of this tool will read the name and auto select the correct mesh. simply change action to replace and click save

g7751YS.jpg


now add the costume via dlc tool/lnk_reshuffle/archive tool, and you should have a perfect neck

MZ8x6ve.jpg


If anything is unclear, let me know
 

coopermon

Well-Known Member
I've been asked if could put my retexturing tutorial here. Hope that's OK.
I've been asked if I could explain through a quick tutorial, how to Re texture through Photoshop so....
Before we start you'll need to have this plugin installed:
https://developer.nvidia.com/nvidia-texture-tools-adobe-photoshop

This is the texture we wish to use:
17194

but there is a problem in that we need the snake skin to be the right size otherwise it will end up looking like this:
17189


So first we're going to create a new snake skin image. If you select all of the snake skin image using the rectangular marquee tool shown:
17190

then select edit menu, copy.
Now select file menu, new. This will create and image the size of which you have just copied so change the size to 10000 and 10000 like this:
17191

Select OK.
So you should now have a blank canvas, select edit menu, paste then select the move tool, pick your texture up and move it to the top left of your blank canvas.
17192

Select edit menu, paste, move tool and place the next texture beside the other one. Now this texture is not uniform so we will have to flip it about to try and make them work better together. Select edit menu, transform, flip horizontal. Now to two texture look a little better together. Do this again until you have this image:
17193

Select layer menu, new, layer via copy. It looks like nothing has changed but now you have two copies of the above image. drag the new one below.
Now due to the original texture not being uniform, they don't quite go together so we'll try and flip the new copy vertically.
Select edit menu, transform, flip vertical. Now we have this:
17195

Now select all of your 8 layers on the right hand side, select layer menu, new, layer via copy. We now have this:
17196

You can carry on doing this to complete the image but this will be enough textures for what we need. Lets leave this image for now.

OK, let open the extracted textures for the costume we want to edit:
17197


As you can see I have also added the tmc, tmcl, c and p files (from another costume, as this one has non) to this folder to create my mod later.
Now this is a simple costume and we can see clearly that L_0.dds is the texture we need to change, so open it.
This is going to be a very easy costume to edit As you can see, the stars and stripes textures are simple rectangles so all we need to do is...
select the rectangular marquee tool and drag it over all of the large stripes texture. To select the small stripes texture and the stars texture, simply hold the shift key whilst dragging over them. You should now have this:
17198

Now go back to your new snake skin image and drag your rectangular marquee tool over the skin texture.
select edit menu, copy merged. Go back to the L_0.dds (stars and stripes) texture and select edit menu, paste special, paste into. You should see this:
17199


Our new snake skin texture is very large inside the L_0.dds image so we will now resize it and move it about until we are happy with it.
Select the move tool. Select edit menu, transform, scale then click the maintain aspect ratio button(just below the 3D menu).
Now resize the snake skin texture until you are happy with it. Mine now looks like this:
17200

As you can see, I haven't quite used all of the texture and I have moved it about to remove as much of the light area as I can.
OK, the new texture is done I will now save it as the new texture so..
Select file menu, save as, change the save as type like this:
17201


Now double click on the L_0.dds file we want to replace.
select dxt5 from the menu and save.
This is now what mine looks like:
17203

You have created a texture file. Now you can install it using the beginners tutorial.
You will also want to replace the L_2.dds file with this texture. I think this is the wet version of the costume so you can play about making a wet version, or do as I do simply have it the same.
This costume is for Tina, if you want to put it on Rachel, You'll want to change the skin textures.
I recommend simply downloading a naked mod and using the skin texture from that to do this.


Texture colour changing

OK, now we are going to change the colour of the shoes and straps. There are a couple of useful tools for doing this.
First lets open our texture file L_0.dds. Now we are going to change the colour of the straps, so we need to select the rectangular marquee tool and drag it over the strap textures as below:
View attachment 17215
It can be very trial and error finding the textures you want, sometimes I paint things bright colours and save them in texture tool, load them in Noesis just to figure out where they are on the costume then simply use edit menu, step backward.

Select Image menu, adjustments, brightness and contrast and I'm going to lower the brightness to -110.
Now select image menu, adjustments, colour balance and move the sliders to get the colour you want.
Now I want my textures to be more yellow and I have pushed my yellow slider as far as it can go, so now I will click OK. There are a few things we can do here, you just have to play around with the different options.
I can go to image menu, adjustments and pick either vibrance, hue/saturation or colour balance to increase the yelllow.
I am going to use colour balance and just increase the yellow.
Now I'm going to save this texture and check it in noesis. I now have this:
View attachment 17216

Ok, now the shoes. First I am going to change the blue part of the shoes.
Select the Polygonal lasso tool shown below:
View attachment 17217

Left click on the top right corner of the shoe base and work your way around the texture by left clicking when you wish to change direction.
You don't have to be perfect as you can see below:
View attachment 17218
Select the rectangular marquee tool, hold shift and drag across the other blue texture.
Now you can change the colours of this part using the tools we used earlier.
Or select image menu, adjustments, replace colour, left click the colour to be changed using the eyedropper tool which is now selected for you.
Left click on any blue part of the texture until the colourless image (blue arrow) is as white as can be. This will take a few clicks.
The fuzziness slider above the image can be used to lessen the amount if you wish.
Now click on the result field (red arrow), a new window appears and here you can select your new colour. I'm going for a brown:
View attachment 17220

Now I am going to edit the last bits of the shoes. First I will use the rectangular marquee tool and the polygonal lasso tool select all of the parts.
Now I don't really need to do this next part but I'm going to so you know how for times you may need it.
Select image menu, adjustments, black & white then click OK in the next window.
This is so I can now image menu, adjustments, colour balance without having to contest with any existing colours.
Now change your colours as you wish and save.

Creating a normal map for your new textures

OK, this is quite easy to make a simple normal map.
With these tools (https://developer.nvidia.com/nvidia-texture-tools-adobe-photoshop) which you already have installed.
Open your new L_0.dds texture file.
Select Filter menu, 3D, normal map and a new window should open:
View attachment 17221
The only things we are going to use here are the Blur and Detail scale sliders. I am going to change blur to 0 and detail scale to 7%. Click OK.
Now select file menu, save as and select L_1.dds. this is the original normal map. Save this as a dxt5 file.
Done.
This will not show up that well in noesis.

Another tip is
Open your new L_0.dds texture file.
Select Filter menu, 3D, normal map
This time make the detail scale slider higher, say 40% and click OK.
Now open the original L_1.dds, use the rectangular marqee tool to select all ok the image.
Select edit menu, copy.
Go back to your new normal map image and paste.
On the right hand side, select the layer folder (blue arrow) then change the opacity slider to say 60%.
View attachment 17222
Now save your new normal map.
I don't think this is really needed for this costume but it does come in handy sometimes. Now you have your snake skin normal map with the creases of the costume from the original normal map.

I hope this helps some of you.
 

synce

Well-Known Member
How do I swap hair? The guide talks about numbers but doesn't say where to input them

Also is it impossible to give Honoka new hair using this method? I've seen pics of her with alt hair but looking at the guide's instructions if I wanted to give Hitomi's short hair to Honoka I would have to use a negative number

86 - 128 = -42

Still no idea where to input it though
 
Last edited:

bbb

Well-Known Member
How do I swap hair? The guide talks about numbers but doesn't say where to input them

Also is it impossible to give Honoka new hair using this method? I've seen pics of her with alt hair but looking at the guide's instructions if I wanted to give Hitomi's short hair to Honoka I would have to use a negative number

86 - 128 = -42

Still no idea where to input it though

that hair guide of mine is useless now, you can do it much better with lnk_reshuffle. check out kasumilove's lnk_reshuffle tutorial
 

synce

Well-Known Member
Thanks, the reshuffle method seems a lot simpler :p But I'm getting weird results. Is this normal or did I forget to do something?

Basically it seems like the hair is too low
 
ALL DOA6 DOA5 DOA4 DOA3 DOA2U DOAD
Top