
Howdy! This is KasumiLover69 once again to assist with the latest addition to our cast, the beautiful, curvy, feisty red clad ninja who has captured a ton of hearts and fans: The legendary Mai Shiranui!!
 In case you do not know of this beautiful femme fatale, she is a very popular sex symbol from the SNK Series who has appeared in the popular 2D fighting game King of Fighters, making her first appearance in the Fatal Fury game in 1992, and has since become one of the most popular and recognizable female characters in the fighting game genre and is SNK's main sex symbol and mascot. She is known for her sensual ninjutsu, fire based attacks, speedy and zoner attack style and her infamous breast jiggle which has garnered some attention over the years, as well as her flirtatious personality and appearance that fits well in the Japanese ideals. Now Mai Shiranui has appeared in DOA5LR, and has already gotten a lot of praise and attention, as well as nearly hundreds of videos and play throughs since her fairly recent release date on console which was September 13th! This written guide will help shed some light and break down her very well versed moveset that has remained true to her 2D roots, as well as introducing beginners to her mechanics and how they can play her, either as a rushdown oriented or zoned oriented practitioner. With that being said, here is her table of contents so you will know what is being covered and addressed:
 TABLE OF CONTENTS
Section 1: Explanation of frame data and understanding numerical inputs
Section 2: Mai Shiranui's Pros and Cons w/ a basic rundown summary
Section 3: The Cancel mechanic breakdown
Section 4: The Forward Jump and Kawasami no Mai breakdown
Section 5: Mai Shiranui's complete move list breakdown w/ frame data and situational usage
Section 6: Mai's throws explanation
Section 7: Mai's holds explanation
Section 8: Mai Shiranui's staple/basic combos have appeared!
Section 9: Closing remarks and acknowledgements
Section 1: Explanation of frame data and understanding numerical inputs
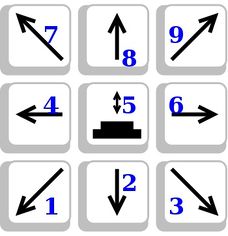
-Before we start this guide off, if you're a beginner or just wish to better understand frame data and inputs, I should help you better understand them so that you will be able to better interpret the guide's contents. I will use actual button macros throughout the guide but since moveset breakdown will use actual numerical input, I provided a picture so that you can know what the directional inputs are numerically:
-Next, you should know the basics in regards to how to read and interpret frame data. I'll use this example: 22(2)27. The first number is the start up frames which is how long it takes for an attack to actually start and come out. the number in parentheses is the active frames, meaning how many frames there are during the actual attack animation. Finally, the last number is the recovery frames, which is how long it takes for an attack to actually recover and fully end so you can proceed with another one. Rule of thumb to know is that attacks with longer start up are more likely to be interrupted by faster strikes and the longer it takes for an attack to recover, the more likely you are to be thrown or struck afterwards.
-Another thing you should definitely know is MOVE SAFETY. Move safety is how advantageous or disadvantageous an attack is on hit or on block. This can be viewed in training and other various modes by toggling the "move details" on in the "fight screen info" option tab in the pause menu. +1 or better means you have frame advantage which allows you to move first. +0 to -6 is considered safe, meaning you can not be throw punished after the attack with the exception of the 5i(the "i" symbol is a shorter term for frame) neutral throws which can be broken by simply pressing the throw button at the right moment. -7 is considered semi-safe, meaning you can be throw punished by neutral throws and 7i throws, but slower framed throws will not catch you. Finally, -8 or worse is considered unsafe, and can be throw punished, so please watch out when using her unsafer attacks.
-In case you were wondering what the "i" symbol stood for, that's just a convenient shortening of the term "frames" and I'll use it throughout the guide to prevent text bulk. So remember, if you see something like 9i, that means 9 frames.
-Last but not least, I will be sure to address whether or not Mai's attacks track. Tracking is a special property that is given to attacks usually with a spin type animation. If your opponent attempts a side step and you perform a tracking move, it will nail them, which discourages opponents from recklessly side stepping from any situation.
-Now that all that stuff is out of the way, we can now seamlessly transition over to her pros and cons. In other words, we'll go over what she excels and struggles in so you can see if she is the right selected character who fits your playstyle!
Section 2: Mai Shiranui's Pros and Cons w/ a basic rundown summary
-Knowing what your character excels and struggles in is something I feel is very know, so this section will go over her pros and cons so you know what to expect while using her. Shortly after that, I will provide a detailed summary to further explain them:
PROS/STRENGTHS
[+] Very fast and mobile
[+] Possesses a 9i punch, making her one of the fastest strikers in the game.
[+] Has an 11i mid punch.
[+] Surprisingly high combo and base damage output.
[+] Easy to learn moveset with good mix ups.
[+] Relatively safe.
[+] Great whiff punisher.
[+] Excellent lows.
[+] Good throw damage.
[+] Good hold damage.
[+] Very good up close, very well suited as a rushdown type character.
[+] Also great at mid range, can also do very well as a spacing/zoner type character.
[+] Has a mid kick Power Blow which can throw off opponents.
[+] Has access to useful(but easily avoidable) projectile. It is called "Kachousen".
[+] Has access to a cancel mechanic that allows her to cancel from a set few attacks which adds to her unpredictability.
[+] Great range attacks and has quite a few with great pushback.
[+] Great environmental combo damage capability and good launchers.
CONS/WEAKNESSES
- Small base moveset which can get predictable if not used carefully.
- Somewhat vulnerable to strike punishment.
- Somewhat lacks tracking ability.
- No offensive holds.
- Aside from her neutral throw, her throws lack environmental interaction.
- Not so good at far range which is where she is weaker at.
-To summarize this, Mai is a very beginner friendly character who is easy to learn and play as. She's amongst one of the fastest characters in the game and has a 9i frame jab making her quick at close range. She also possesses an 11i mid punch, and is a relatively safe fighter with plenty of safe attacks on block and good pushback. Her throws and holds both deal good damage, and she can play either up close and offensive or even at a distance thanks to her excellent range! She has plenty of good lows to keep the opponents on their toes, and is a very good whiff punisher for those who wish to punish opponents for their mistakes. Surprisingly for a striker of her speed, she deals good base damage, and has a high combo damage output if used to great effect, making her a very dangerous contender. She brings the KOF cancel mechanic to the DOA table as well, which allows her to cancel set attacks into her special moves Kachousen, Ryuuenbu, Hissatsu Shinobi-Bachi, or the devastating Kagerou no Mai, quite similarly to alot of other 2D fighting games like Street Fighter. she also has good environmental potential and many ways to take advantage of an opponent slammed into a nearby wall. Her holds are also good at taking advantage of the environment and a few of hers such as her high punch hold can be particularly dangerous near open ledges or nearby hazards and walls.
Although she doesn't have very many weaknesses, she does however suffer from a lack of a large base moveset, and can get predictable if not played carefully and mindfully. She has no offensive holds, and currently has the longest hold recovery out of the whole cast, meaning you must be careful when attempting to hold your opponent. As a 2D style fighter, she also obviously lacks much tracking ability, but this isn't very glaring since she does have a decent amount of moves that do. While not very vulnerable to throw punishment, she is however to strike punishment, and being at a far range from her opponent isn't in her best interest since she doesn't have many attacks aside from Kachousen(which is crouchable and can be free stepped) that particularly scare the opponent into coming closer. Her throws finally lack environmental damage potential, aside from her breakable 5i throw.
How you wish to play Mai is pretty much up to you in terms of playstyle: she's fast and speedy enough to pressure up close, has good range and whiff punishers that allow her to play from a mid range distance, or you can even play as a merger of both a rushdown and a zoner type character. She is also pretty evasive thanks to her attacks that can go under high attacks and crush them and her jump stance allows her to either close the gap or jump back to reassess your approach. Overall, Mai is a very dangerous contender who can be both annoying and deadly to deal with.
Section 3: The Cancel mechanic breakdown
-This next section will cover Mai's main mechanic she brings from the 2D fighting game genre: The cancel mechanic. This is the act of quickly canceling normal move or string into one of her four specials. The following attacks can be cancelled from:, , , , and back turned and .
-These are the following specials she can cancel into and what they can do:
- This cancels the attack into her signature "Kachousen", her high projectile attack that has her hurl a fan at her opponent. The attack is 18i and has 3 starting active frames while it has 44 while the fan is actually traveling. Doing it at long range is most optimal as it gives you 26-46 frame advantage and a brief critical stun, while doing it up close gives you either a frame advantage or disadvantage that greatly varies. If done up close on block, you'll wind up at -22 on block, but the pushback allows you to avoid neutral throw punishment. Overall I deem this her worst cancel move to use by itself since even with the stun, the unknown recovery doesn't allow you to do any follow ups. The fan can also be crouched, free stepped, and normally held if you're bold enough to do it up close. I recommend using this within actual attack strings it can be cancelled from since it acts as a mix up. Can also be used as a good annoying way to waste your opponent's time when fighting a match on the clock and you have the life lead.
- This cancels the attack into her other special known as the fiery "Ryuuenbu"! This attack has her perform a quick mid punch 12i graceful jumping twirl that summons a beautiful stream of fire, before transitioning into the "auto" 11i frame segment. The attack is safe on block at -6 and 28i recovery, and it tracks as well as having jumping properties that can briefly avoid lows. The first 12i part knocks down on normal hit, which guarantees the "auto" 11i part if they're at a high enough height in the air. The second "auto" part has more range than the first part does, and instead of actually knocking down, it stuns if it hits by itself on normal hit, providing +32 frame advantage and an opportunity to continue the stun into a combo; be wary that if it hits on counter hit or higher, it'll knock down however. Overall the best go to if you want to finish a string on block safely without much to fear aside from a possible neutral throw which can be broken.
- This cancels the attack into an acrobatic and agile special known as "Hissatsu Shinobi-Bachi", a move that starts with her doing a forward 20i(can be slightly delayed to make it 23i if done by itself) springing cartwheel mid kick that automatically transitions into a 20i high elbow, leaving you at 29i recovery.The first part will always launch while the second will always knock back and wall splat. The attack has excellent range, being able to cover nearly the entire stage, and thanks to the elbow, it allows you potential environmental damage in case there is a nearby hazard. The downside is that the string doesn't track, is very predictable from long range, and unsafe at -10 on block and the high elbow can be crouched, making it better suited as a whiff punisher if you use it by itself.
- Possibly Mai's most deadly super: "Kagerou no Mai". This cancels the attack into a 28i fire summoning move that launches the opponent into the air on normal hit and is followed by two "auto" 1i fire gusts that launch the opponent higher into the air for a follow up(The attack is considered a mid punch). Viable as both a launcher and a cancel mix up, but be wary that the attack has poor range and must be done up close, otherwise you can be throw punished during the 24i recovery. The downside is that the attack is unsafe at -11 when blocked, does not track, and is somewhat predictable because of the somewhat lengthy start up. It can't actually be held, so the opponent will simply step to the side, leaving you at -27 disadvantage. The launch height varies on whether it was performed on normal hit, counter hit, hi counter hit, or after a CB as a standalone launcher.
-Canceling into her attacks is actually really easy, at the end of the hit or string that you can cancel from, simply quickly input the special you wish to cancel into, it is also possible to delay the cancel a bit as well if you wish to further confuse your opponent! If you don't feel comfortable using the dpad to cancel, the joystick is another option that I myself find much smoother and better when canceling certain attacks.
~MAI SHIRANUI HAS APPEARED: Remember it is also possible to execute her supers by themselves without the need to cancel from the strings listed above! Also, don't feel forced to always cancel to avoid predictability, wait for when you think your opponent will least expect it so you can show them why Mai's the best in Japan!
-This now concludes her canceling overview! We will now proceed into her jumping and it's follow ups.
Section 4: The Forward Jump and Kawasemi no Mai breakdown
-This section will introduce you to another mechanic she brings from KOF: Her forward jump and her backwards jump called "Kawasemi no Mai"! The input for them is simple: and . The first one we will address is . It's very evasive, and allows you to jump closer to your opponent while evading lows, and can also be used to get over to the opposite side of the arena when your opponent is down on the floor. Here are the possible follow ups you may use if you want to get feisty! Also please keep in mind that both her punch and kick follow up are 30i and have 24i recovery:
- Her punch follow up that makes her perform a downward slanted high jab that stuns on normal hit granting her +25 frame advantage on any type of hits. The attack tracks and covers an ok distance thanks to the jump, but can be crouched. It's also safe at -4 on block so throw punishment is a no go.
-Her kick follow up which is a harsh mid knee kick that stuns on normal hit and grants her +25 on any level hit. If done on counter hit, it will cause a wall splat, allowing you to perform a combo for additional damage. Be wary that this is -11 on block and doesn't track, but it has the option to cancel into her follow up if you want to risk it, which will leave you at -6 on block(-5 from a distance) and will knock down on normal hit. This can also be delayed to throw off antsy holders.
- Her most dangerous option from the jumping stance, this will make her perform a downward 38i upper body lunge at her opponent that knocks down on normal hit and wallsplats allowing additional follow ups! The attack does not track and is pretty predictable, but is actually safe and leaves her at -7 on block, -5 if at a distance and -7 up close. A good blunt whiff punisher and a good way to halt opponents who try to move in, as well as a good way to crush opponent low wake up kick attempts. Be cautious, this attack can be either standing or low throw punished...
-Now to address her backwards jump....
- This is similar to her forward jump, except this actually retreats and creates distance to move away from your opponent. If done near a wall, she will briefly grab on to it, allowing you to jump from it by pressing if you wish. When you jump from the wall, you will be able to perform all the follow ups from her forward jump stance, but take heed they'll be somewhat slower because of the prior maneuver. Her punch and kick follow ups will now be 60i and her P+K will now be 54i.
-In conclusion, don't underestimate the power of her jumps, they can be very useful in moving in on or retreating away from aggressive opponents. With that being said it is now time to move into Mai's complete moveset breakdown!
Section 5: Mai Shiranui's complete move list breakdown w/ frame data and situational usage
-This part of the guide will be the longest and will go over all of Mai's moves. There's no need to feel overwhelmed or intimidated, as Mai has a sizable moveset with very simple input and effectiveness. This will use the numerical input rather than macros to save space, so please refer to the above picture so that you can know what each number means pertaining to a direction. Now let's start! Before we begin, I'll let you know that I'll put a "☆" symbol around her attacks I think are definitely her better ones based on move property and not at all on aesthetic or appearance:
☆P- Her basic high punch, which is a swift 9i jab with 13i recovery. Is safe on normal hit and on block at -2 and provides +1 frame advantage on counter hit and +36 and a stun on hi counter hit! Lacks range, doesn't track, and can be crouched. if performed on normal hit or higher to a back turned opponent, it will cause a stun and grant +11 frame advantage.
☆PP- This adds another 9i high jab into the mix, but this is unsafe on normal hit and on block at -9. Has longer reach and provides +34 advantage on counter hit, and because of how swift the string is, it will "jail" the opponent, meaning the opponent is unable to do anything when the string hits unless it is done on high counter hit.
*PPP- This adds in a 15i upwards open fan strike mid punch with 24i recovery. It's unsafe at -10 on hit and on block and doesn't track, but this can't be crouched since it is a mid and it has slightly better range than her previous strike before it. If done on counter hit or higher, it will provide a +36 lift stun, and will launch at the highest stun threshold if done in the right combo strings.
☆PPPP- This ends the string with her "Ryuuenbu" special that was addressed in the third section. It still retains the same frames and properties, but now has slightly longer reach and can be delayed since it is in a string. A viable juggle ender if your opponent is at a high enough height!
*PPPK- Like the previous string this ends the string in a super, this time her "Hissatsu Shinobi-Bachi"! Identical to the original super but has longer reach and is now -11 on block. Can make a viable juggle ender if your opponent is high enough for it to hit and will give you additional environmental damage if done near a wall or hazard.
☆PPP2K- This ends the string with a 23i swift low sweep. The sweep tracks, has decent reach, and it's damage will be a bit higher if done close to the opponent. It will provide +11 on normal hit since it makes your opponent stumble to the side, and will provide +17 trip stun if done on counter hit, allowing you a chance to continue a combo. If done on hi counter hit, it will knock down regardless. Be very careful using this since you'll be left at -15 when blocked(-14 from a distance), and you're left in a squatting position, leaving you vulnerable to both standing and crouching throws... The attack can also be used as a heavy force tech.
*PPK- Ends the string in a swift high kick that stuns on normal hit granting you +36 frame advantage, and will launch if performed during a stun. If done on counter hit or higher, the opponent will be launched, with the height depending on what level counter it was. The string is pretty linear since all hits are highs, and it leaves you at -13 on block and doesn't track, so be cautious when throwing this out there. Perfect next to walls since there is no wallsplat risk.
☆PP2K- This ends her jabs with a 23i low backwards faulting kick that tracks. Has great range and grants +11 on normal hit, and the damage will be halved if done at max distance. If performed on counter hit, it will cause a +17 trip stun that presents a nice combo opportunity, while it will knock down on hi counter hit if done at close range. The string is unsafe at -15, but if it's done at max distance, it's completely possible to evade low throws! Can also be used as a heavy force tech, but only up close; if done from max distance, it will result in a light force tech.
☆PK- Instead of a high jab, this follows up the first jab with a blunt 12i high kick with +10 advantage on normal hit. Any counter hit will provide you with a +25 instead, as well as a stun that can be capitalized on. Has decent range and can wallsplat on counter hit and during stuns, but does not track and is -11 on block, as well as being linear and able to be crouched. The second kick is guaranteed if you do the string on counter hit, but not during stuns.
☆6P- Her 11i mid elbow attack, this attack is unsafe at -13 on normal hit and block, but is useful for scoring a counter hit thanks to the lovely speed. If done on any counter hit, you'll get a +26 advantage for some combo time. Lacks range and doesn't track, but it's speed and follow ups make up for these weaknesses.
*6PP- She ends the strings with another mid punch that involves a swiping horizontal fan jab. A bit slower at 15i but tracks and provides +21 advantage on any counter hit. The only major flaws is that the second jab lacks range and the string is linear since both hits are mid punches. This moves has a cancel capability after the second jab!
☆6PK- This follows the first mid punch up with a scary 20i low thrust kick. The attack doesn't track, has 27i recovery, and leaves you at -14 on normal hit and block, but has great reach and nasty follow ups as compensation. If it hits on any counter hit, you gain +11 advantage and a better type of stun if you choose to go for her mid kick follow up!(Will be addressed shortly.) Also useful as a light force tech, especially due to it's great range.
☆6PKP- This follows the low thrust kick with a 17i swiping open fan mid punch. Provides you +25 advantage on any level hit, great range, and a possible follow up you can hold off on to get a reaction from your opponent! Does not track, but can be used as a light force tech to get grounded opponents back in to the mercy of your fans since the fan swipe is a true mid.
~MAI SHIRANUI HAS APPEARED: Not sure what a true mid is? A true mid is a mid attack that can also hit opponents on the ground, thus making it useful as a force tech!
*6PKPP- Finshes the string with her "Ryuuenbu" super! Has the same frames and properties as the standalone version, with the added bonus of string delay to further throw off hold happy adversaries!
☆6PKK- Mai gets technical by finishing the string with a 17i acrobatic flipping mid kick with 27i recovery. Has good reach, +22 advantage in normal hit situations, and is very useful for finishing juggles or wall combos. If the kick hits on any counter hit, it will result in a crumple fall stun that will cause your opponent to keel over on the ground....UNLESS they hold, putting them in a guess situation where they'll have to make a choice on whether to hold, or take the fall. Wallsplats on normal hit, but unfortunately does not track.
☆4P- A thrusting upward high fan jab with only 15i start up. It provides a blind stun on any level hit that grants you +35 advantage. The attack has a cancel capability, and if it successfully hits, her "Ryuuenbu" and "Hissatsu Shinobi-Bachi" special cancels will be guaranteed! If used in air combos, it has a decent refloat and allows for some crazy combo possibilities if you throw in the right cancel. Unsafe at -13, but the opponent may have to respect the cancel follow ups or else they risk taking counter damage. Also her only single strike besides back turned K that allows her to cancel without the risk of being held from a static(string with only one follow up besides the ability to not finish the string.) Does not track unfortunately.
☆8P- The same as the final fan strike from her 6PKP string, except with less range and quicker start up at 15i.
☆8PP- Like the previous string this is the same as 6PKPP, can be delayed.
☆2P- A 13i low punch poke that involves her poking the opponent with her closed fan. Lacks range and does not track, but it ducks highs and is a good way to surprise opponents. Leaves you at -1 on normal hit and -4 on block, and will pushback the opponent on counter hit and grant you a nifty +4 advantage. A good way to get opponents off you and back to a safe distance to rethink your approach. Can also be used as a light force tech.
*3P- Her mid upwards fan strike from the PPP string, except faster at 13i and is the standalone version. Frames and properties are identical other than that.
☆3PP- Like the previous string, it's from the PPPP string and lets you finish the string with her "Ryuuenbu" cancel. Can be delayed and tracks!
*3PK- derived from the PPP string like the previous string except it uses the "Hissatsu Shinobi-Bachi" mix up instead. Has the same properties as the PPPK and standalone move with the added bonus of delay like the PPPK variant.
☆3P2K- Like the previous two strings, this is once again derived from the PPP string. Has the same frames and properties as the PPP2K string, but can be considered the standalone version. Still tracks and hard force techs!
☆1P- a low crouching closed fan poking jab that with 16i. Has good range and can help her move in on an opponent, especially on counter hit. Although -4 on normal hit and -10 when blocked, it provides +16 advantage on counter hits and is useful in strings since it's possible to continue a set up combo after it, with the added bonus of unpredictability since it's a low. Great as a light force tech thanks to the range, but does not track.
☆66P- An 18i lunging forward mid elbow attack, has great range, and is safe at -5 on block at max distance, -6 on mid , and semi-safe at -7 up close! A useful way to move in on an opponent from a distance, and it provides you +2 advantage on normal and stuns briefly, but you can't follow up on the stun unless you finish the string. If it hits on any counter hit, you'll be given +22 instead and an opportunity to continue a set up combo if you wish, or you can await a reaction from the opponent in case they expect the finished string. Does not track and will wallsplat on counter hit.
*66PK- She finishes off the string with the 23i fiery mid flipping kick known as the second variant of her "Koshu no Mai" attack! Because this is her only follow up from the previous move, it's pretty predictable and easy to see coming, so actually performing it is kinda risky. It will leave you at -14 on block which is just asking for punishment, and it doesn't track either. Because of the range, it's possible to actually use this follow up by itself; If it hits on any level hit, it will result in a launch allowing a juggle, and unlike the attack before it, it does not wallsplat, allowing you a decent opportunity to get some environmental damage in before you aim for the wall or a danger zone nearby! If done on counter hit, the launch will be higher, and even higher on hi counter hit!
☆K- Quite similar to the kick from PK, except with +8 advantage on hit. Other than that the moves are the same in terms of properties and frames. Will wallsplat on counter hit.
*KK- Her second 14i follow up high kick with 24i recovery just like the previous one. Can be delayed and used as a stun and combo extender, but take heed since the string is two consecutive high kicks... grants +8 on normal hit and +25 on counter hit and during stuns. Unsafe at -12 on block...
*KKK- The final 17i high kick in this string, provides +22 advantage on normal and counter hits and wallsplats. Can be delayed and has a cancel capability, but since the string is all highs and very linear and doesn't even track, this is a risky string to attempt a cancel from, be wary...
☆6K- One of my personal favorite moves of Mai: a 13i forward mid chest kick with great reach and is safe at -4 when blocked, -3 at max distance. No matter what type of hit of hit it lands, it'll always give you +4 advantage and push the opponent back a distance. The move has many uses: It can be used when approaching opponents as a sort of mind game, a tool to get the opponent away from you and out you at a optimal range, or even as a sort of reset during a stun(but not at the very end of the stun threshold) so you can keep the opponent standing for some more annoying trickery if you don't want them down on the ground yet. Does not track.
☆4K- A twirling 16i high axle kick with 25i recovery. Grants +24 advantage on normal hit and stuns allowing you attack your opponent the way you see fit; using this on counter hit or during stuns provides +35 and a lift stun for even more possibilities! Wallsplats on counter hit, and tracks, although the attack can be crouched. Be wary of the -7 on block as well..
☆8K- Standalone version of the final high kick from PPK! Same frames and properties, but more useful since it can be done without the two punches.
*2K- Similar to 2P, this is a low 14i low crouch kick with more range than 2P, but also unsafer at -10 on normal hit and -14 on block... Counter hits will result in +13 advantage and a stun that will let you continue your set up combo, or can be used as a way to get an opponent away from you a bit for something else. Has two follow ups that may deter the opponent attempting a throw punish if they anticipated one.
*2KP- Ends the string with her 2P low fan poke attack. Has the same frames and properties, and because of it's safety, it allows you to end the string safely, although the double low can be a bit linear. This string is guaranteed on normal hit.
☆2KP+K- A pretty interesting move: A low 17i crouching mid punch fan strike. Although unsafe at -10, the move has a lot of things going for it! It can avoid and crush highs, and pushes back and grants +3 advantage on normal hit as a way to get opponents to back off of you. Counter hits will result in +23 and stomach grab stun that allows you to continue your assault unlike the normal hit variant. Tracks, but has poor range range as a trade off, forcing this to be used up close to even hit the opponent.
☆3K- This is a 14i vaulting forward mid kick, -3 on normal hit and has great range, while being semi-safe at -7 when blocked, -6 if performed at max distance. Being very versatile, it can be used from a distance to nail a +25 counter hit, a way to continue stuns, and even be chained with 6K for a mid kick mind game loop if you're feeling a bit jovial. Causes a wallsplat on counter hit, but does not track.
☆1KPP- The same as the 6PKPP in terms of frames and properties, but with the 6P mid punch removed in favor of making the low vault kick the base attack for the string. Useful for some low counter hit shenanigans and great in stuns when your opponent least expects a low with follow ups!
☆1KK- The same as the previous one, except the string ends in her technical acrobatic mid kick instead, exactly like 6PKK. Same properties and frames, just more unpredictable thanks to the base low rather than a base mid punch.
☆66K- If you were a fan of Mai's 66P, you're likely gonna love this move! Just like 66P, this is a good ranged approach and whiff punish tool in the firm of a 20i mid jumping lunge kick with 24i recovery. Like 66P, it's safe at max distance at -5 on block, -6 at mid range, and semi-safe at -7 up close. A successful hit will result in +24 advantage and a stun allowing a combo opportunity. A counter hit will result in a crumple stun that will make your opponent keel over unless they hold, forcing them to either risk a hold, fall, or man up and take the damage over a hi counter throw.
*66KK- The final follow up to the attack: the same final high kick from KKK, except slower at 23i. Has a cancel capability, but be wary that the high kick can easily be held on reaction and even ducked. Same properties and frames aside from start up.
*P+K- This is her critical burst: She uses her fans to do a long ranged 20i stun to her opponent. Unsafe at -8 on block and does not track, but provides a +23 stun on normal hit, and a deadly crumple stun on counter hit! An excellent whiff punish as well as a neat way to halt approaching opponents. Wallsplats on normal hit.
☆4P+K- Her power blow in it's docile state: a 31i-60i jump off lunge flip mid kick with 39i recovery. It has excellent reach and is a good way on knocking advancing opponents back. It's -10 on block, but has plenty of pushback on block to completely dismiss a throw attempt, although whiffing isn't a good idea because of the lengthy recovery. Can throw off opponents since she's one of the few characters to possess a mid kick power blow, but be wary that the attack does not track.
~MAI SHIRANUI HAS APPEARED: If you wish to cancel out of your power blow, simply press 2 or 8(up or down) while charging it to make her perform a sidestep. This is useful for testing your opponent's reaction or in case you wish to hold off on the attack for now.
*4P+K(50% or less health, CHARGE!)- Once you've taken enough damage for your health bar to be at 50% or less and to flash red, you will now be able to perform her actual PB for good comeback damage! If your opponent blocks it, you'll gain +13 advantage as well as the same pushback like it was in it's normal state. Although it's better to hold off on this until you have an actual critical burst, if you're feeling vengeful and want to share some pain with your opponent immediately, it's possible to use during stuns and in situations where your opponent is wide open. Be very cautious: if your opponent successfully reads your PB and holds it, you'll take hi counter damage which will seriously hurt what is left of your health bar...
☆2P+K- The same crouching mid from her 2KP+K string, except now a standalone move with the same properties and frames. Useful still in stuns and a good counter when dealing with a high strike.
*3P+K- This is a 16i upwards swiping fan mid punch that provides a +34 lift stun on normal hit. It launches from stun, and counter hits but the launch height will vary depending on how high the stun threshold was and what type of counter was used. Although not her best launcher and it has mediocre range, it's useful as a mix up and does not wallsplat. Lacks tracking and is -12 on block, -11 however if done from a distance.
☆Sidestep~P+K- An attack stemming from her sidestep: Mai brings her iconic posterior in the mix with a 27i lunging butt thrust! The thrust is -3 on block(-4 up close) and puts her in her backturned state granting her acces to her commands from that state. The attack is not exactly holdable, if your opponent does attempt to(because she is using her butt, both mid punch and mid kick holds will successfully evade it) to hold and it works, they'll step to the side to evade it, leaving you at -16 disadvantage. A successful normal hit will grant you +18-19 advantage and a stun to continue your assault, the same advantage will also apply to any counter hit! In the uncommon chance that you perform this to a backturned opponent, it will cause a nasty shove stun that grants +28-29 advantage. This does not track
~MAI SHIRANUI HAS APPEARED: What's wrong? Did you know that if you use my sidestepping butt fling attack on a backturned opponent, 4PP and it's and cancel option will be guaranteed?? I am the best in Japan for a reason!
*Sidestep~P- Another attack stemming from her sidestep. This is the same final mid punch from 6PP, except slower at 25i and it provides you +2 advantage on hit, but will provide the same stun from a set up stun if she performs a counter hit, allowing a follow up! Safer at -11 on block, but does not track and has limited range.
*Sidestep~K- The same as her 4K twirling axle high kick, except with slightly less range and slower at 27i. Same properties and frames other than that.
*H+K- A harsh forward jumping lunge 15i mid knee kick! Doesn't do anything special on normal hit aside from launching the opponent up a height you can't juggle from and leaving them floored. Doesn't track and has pretty short range, but it launches the opponent much higher when performed during a stun or on counter hit, allowing a juggle opportunity. Also wallsplats and evades lows due to the jump, but is -13 from a distance and -14 up close on block as a trade off.
☆6H+K- A 25i leaping forward torso mid kick that evades lows, definitely one of Mai's better moves! A bit slow I'll admit, it has great range and provides a +25 stun on normal hit, while a nasty +24 sitdown stun during stun and on counter hit, guaranteeing 3PP, 6P, 3K, 6K, 2K and 2P! The move doesn't track, but is safe at -5 on block and -4 if performed at a distance. Also useful as a whiff punisher if you want to create some trouble. Causes a wall splat on normal hit.
☆8H+K- Like the previous move, this is also a similar 25i mid kick, except this one has her jump in the air evading lows to deliver a mean overhead kick. It knocks down on normal hit and doesn't allow a tech roll, and it guard breaks giving you +2 advantage. Like 6H+K, you'll get the most out of it on counter hit: when it hits on counter hit, your opponent will be slammed unto the ground and will briefly bounce, giving you the opportunity for a follow up! Does not track, but will wallsplat on normal hit. Also useful as a hard force tech, and also can crush low wake up kicks if timed right.
*7H+K- Her power launcher in it's dormant state: A fiery flipping 25i-40i(can be charged) mid kick with 33i recovery that can evade lows. Unsafe at -16 on block, and somewhat impractical to use outside of CBs. Doesn't track but will wallsplat on normal hit and allows follow ups. If your opponent is about to fall over a ledge and you can't juggle until after the drop, a fully charged 7H+K is a viable option to get the most damage before the drop.
*7H+K(50% or less health. CHARGE)- Her PL in it's dangerous state: if it hits, your opponent will be launched up a consider height, allowing you a chance to execute a creative combo juggle that can possibly surpass the power blow in terms of power! Mist be fully charged in order to actually activate the launch, and I recommend saving this until after you have critical burst the opponent.
☆2H+K- The same final low vault kick from PP2K, just now in standalone form. Has the same properties and frames as the original.
Back-Facing Strikes
☆P- The same as the regular high P jab, just has slightly shorter range.
*4P-The same as 6P, just with slightly shorter range.
*4PP- The same as the final follow up from 6PP. Has a cancel capability!
☆2P- The same as 2P facing forward, just slightly unsafer at -5 instead of -4 on block. A quick and safe way to turn around.
*K- The same as the final high kick from KKK, just faster at 15i instead of 17i. Has a cancel capability!
*4K- The same as her H+K.
☆2K- The same as her 2H+K, just faster at 18i instead of 23i. Has SLIGHTLY better range.
Notable launchers
-This mini section will point out some notable launchers she can use in various conditions:
*3P+K- Mid punch CH launcher. Mediocre launch height and reach but useful for counter hits and can't be crouched aside from Helena's Bokuho true mid duck. Avoid using in CBs.
☆8K- High kick CH launcher. Slightly better launch height and range but is able to be ducked or low held out of. Better for CBs.
☆H+K- Mid kick CH launcher. Useless on NH and has mediocre range but slightly better launch than 3P+K. Teeny bit more damage but be wary....it wallsplats.
*214P+K- Mid punch launcher. Launches on any level hit and tracks as well as dealing the most damage, can also be canceled into by the allowed moves. Lacks range.
☆66PK- The second hit which is a mid kick launcher. Launches on any level hit and has great range and damage although risky. Has and good launch height but the 35i recovery limits some stuff you could do from other launchers.
☆8H+K- Mid kick CH "bounce" launcher. Slow and has low launch but good range and damage to compensate. Wallsplats...
-Phew!! That concludes Mai's move breakdown and what her tools can and can't do! Now we will move on into her throws!
Section 6: Mai's throws explanation
-This section will cover all of Mai's throws and what they do in terms of abilities. This will be a relatively shorter section since Mai doesn't have too many throws. Let's begin:
- Her fastest/neutral throw at 5i: Mai flips atop her opponent's vulnerable shoulders and flips them over before slamming them dramatically into the ground. Although this is her fastest throw, it can be broken; if your opponent escapes it, you'll wind up on the opposite side of the arena with -5 disadvantage.(The fan Mai has in her mouth will amusingly fall out and disappear on the ground). The throw is versatile as it can send opponents immediately over ledges for more damage and into walls and dangerzones! If done to a backturned opponent it will become inescapable and deal slightly more damage. ~N:45 C:56 HC:67~
- Her first version of her second fastest 7i throw. She climbs atop her opponent's head before nimbly grabbing it with her knees and then ankles before flipping them to the floor while winding up in a somewhat compromising pose herself before getting back up. Will deal more damage if you manage to perform this on a backturned opponent. ~N:50 C:62 HC:75~
- The exact same as the previous throw, except she flips the opponent to the opposite side of the arena instead. Start up and damage is the same. ~N:50 C:62 HC:75~
- A longer range dashing throw: Mai gets feisty as she does a nasty upwards lifting fan barrage to her opponent, leaving them face down in the dirt. Can't be executed to backturned opponents and doesn't interact with walls, but it can send opponents over open ledges for more damage. ~N:56 C:68 HC:84~
- Mai's slowest but most damaging throw: she climbs atop her opponent's shoulders suggestively before summoning a fire explosion to send them back first unto the ground. Can be done to backturned opponents for even more damage if you wish! `N:63 C:78 HC:94~
- Her sole 5i low throw: She pushes off her crouching foe's back before doing a brutal knee drop to their spine that leaves them face down on the ground. Can be done to backturned opponents for more damage and leaves you a safe distance away to avoid retaliation. ~N:50 C:62 HC:75~
(to foe in air)- An 8i air throw that can be done on launched foes as a good juggle ender if they're at the right height. Be sure your opponent is at the appropriate height or else it won't connect and you'll be at a disadvantage. Damage will depend on the type of counter you used from the previous attacks prior to executing the throw. ~NH:28 CH:35 HCH:42~
-That finishes off the throw explanation section! Now we will move into her holds!
Section 7: Mai's holds explanation
-This section will now go over the holds that Mai has in her arsenal; she does not possess any expert holds or parries, she only has the normal holds which still puts her at a good standing defense wise. Here they are:
(Vs. high punch)- Mai gracefully interrupts her opponent's jab and performs a deadly spinning fan barrage assault to reel them backwards before sending them on the floor back first. Very versatile: it will wallsplat your opponent into the wall and send them over open ledges and into nearby dangerzones, making it very dangerous. Not much space is given after the hold so be wary.
(Vs. jumping high punch)- Mai quickly intercepts her opponent's high punch and quickly gets them in an elaborate knee head hold before piledriving them head first into the ground and nimbly flipping backwards. Enough space is given for you retreat or move in close to pester them while they're on the ground.
(Vs. high kick)- Mai grabs her opponent's kicking leg before grabbing the one they're standing on and proceeds to twirl them off their feet and unto the ground. Good amount of space given after the hold finishes.
(Vs. jumping high kick)- Same as the regular high kick hold.
(Vs. mid punch)- Mai slaps away her opponent's mid punch by summoning fire that turns them backwards and finishes it one more fire summon to twist them to the ground floor. Good amount of distance after the hold.
(Vs. jumping mid punch)- The same as her high jumping punch hold.
(Vs. mid kick)- Mai uses the final kick from her KKK string to harshly kick back her opponent a good distance. Very versatile as it kicks opponents into wall and dangerzones and even over open ledges!
(Vs. jumping mid kick)- Mai performs an identical version of her in air T throw.
(Vs. low punch)- Mai grabs her opponent's low punch and knocks them clean unto the floor face first with her open fan. Very little space given after hold.
(Vs. low kick)- Mai intercepts her foe's kick and twists herself up in the air before harshly sitting on their abdomen. Very little space is given after the hold.
-That finishes off the hold explanation section! Remember, don't hold just because you can, a missed hold can result in heavy punishment such as a throw punish or continued assault. The aim is to make a good read when you know what's to come and watch carefully so you can stop an opponent in their tracks. With that being said, let's move on to the basic combo section!
Section 8: Mai Shiranui's basic/staple combos have appeared!
-Glad to see you finally made it to this part of the guide! At this point, you've learned quite a bit: Mai's cancels, moveset and tools, her throws, and just recently her holds! Now it's time to put you through the wringer and give you some simple combos to use. The following combos listed are relatively simple to pull off and nothing to difficult, at the end of this section I'll provide you a little something so you can go even further Mai's combos if you wish. Here's a legend so you know what to expect:
[☆]- General combo. No particular set up or CB. May include a launcher and a cancel.
☆- Sample CB set up.
>- This symbol means to perform the command after you have done the previous one.
-Damage will be displayed like so: 20/30/50. First number is normal, second is counter and the final one is high counter.
-I will also make note on whether the combo can work on heavyweight or not!
-I will be using numerical input for now, but don't worry, button macro format will be added soon! This section will be pretty sizable so feel free to get creative and make some say combos of your own!
[☆]4P>8K>3PP>6PKK(Light and mid weight only) ~65/81/98~
>>
[☆]KKK214P+K>T ~89/104/118~
>
[☆]KK>1KK>8K>3PP>6PKK ~90/113/136~
>>>>
[☆]8P>1P>6PP214P+K>3PK ~86/108/128~
>>>
☆4P>2K>6P>3K>P+K(CB!)
>>>>
☆(CH)2H+K>3P>1P>3K>P+K(CB!)
(CH)>>>>
☆66K>6P>1P>3K>P+K(CB!)
>>>>
☆(CH)3K>1KK>4P>P+K
(CH)>>>
[☆](HCH)8K>3PP>6PKK
(HCH)>>
[☆](HCH)8H+K>PPPK/T
(HCH)>/
[☆](HCH)H+K>6PP214P+K
(HCH)>
-And that's the gist of what Mai is capable of, but there's a lot of possible options stemming from her cancels and attacks so feel free to experiment and see what you like! I'll add a few more sample stuff in the near future
~MAI SHIRANUI HAS APPEARED: What's wrong? Still want more of my ample combos?? Don't fret, join the rest of my fans in my combo thread in the quest to find my best most damaging combos in Japan:
Section 9: Closing remarks and acknowledgements
-Well, this concludes my take on Mai's written beginner introductory guide! I hope by now you have a better understanding of her tools, holds, throws, cancel mechanic, and frames. I'm happy to have shared everything I gathered with whomever is reading this. Before we close, I want to thank and acknowledge the following people:
@Force_of_Nature for motivation and for helping me better understand the game mechanics and characters through his bountiful tutorials!
@KING JAIMY for his support, his informative Mai combo video that helped me realize more of her combo potential, and for his fiery devotion for Mai too! Also thank you for correcting that mistake I overlooked at the very beginning! XD
@Nikotsumi for his support, very well done environmental Mai combo video and his fellow interest in Mai!
@RenderingStar or Rendering sensei for playing with me and always inspiring me to improve!
@panicitstylor or Panic sensei for also playing with me and motivating me to find even more for the characters I enjoy playing.
@samuraihachi for his motivation and Mai combo video that helped me when finding out what she could do from certain situations and moves!
@GreatDarkHero For his findings on Mai and being kind enough to give me a detailed rundown of everything he knew about his KOF main in terms of moves, playstyle, and her tools when I was curious about her when she was first teased! This gave me a good idea of how she would likely play in the DOA universe.
.....I'm not sure if I missed anyone, but thank you as well if I missed you!
-This now completely concludes the end of the guide! As always, because patches always come and can quickly change a character's move properties, I'll be sure to update this whenever a particular move is at all modified! Thank you for reading! Oh and I double checked for any mistakes, but if you see an error or something I may have missed, please let me know so I can fix it. Thank you in advance, and RYUUENBU!!
Hey, DOA6 is out now and Mai is in!! If you want to jump into 6 and want to see how Mai has changed, hit the link below to the Mai DOA6 beginner guide! See you there!^.^
TABLE OF CONTENTSSection 1: Explanation of frame data and understanding numerical inputs
Section 2: Mai Shiranui's Pros and Cons w/ a basic rundown summary
Section 3: The Cancel mechanic breakdown
Section 4: The Forward Jump and Kawasami no Mai breakdown
Section 5: Mai Shiranui's complete move list breakdown w/ frame data and situational usage
Section 6: Mai's throws explanation
Section 7: Mai's holds explanation
Section 8: Mai Shiranui's staple/basic combos have appeared!
Section 9: Closing remarks and acknowledgements
-Before we start this guide off, if you're a beginner or just wish to better understand frame data and inputs, I should help you better understand them so that you will be able to better interpret the guide's contents. I will use actual button macros throughout the guide but since moveset breakdown will use actual numerical input, I provided a picture so that you can know what the directional inputs are numerically:
-Next, you should know the basics in regards to how to read and interpret frame data. I'll use this example: 22(2)27. The first number is the start up frames which is how long it takes for an attack to actually start and come out. the number in parentheses is the active frames, meaning how many frames there are during the actual attack animation. Finally, the last number is the recovery frames, which is how long it takes for an attack to actually recover and fully end so you can proceed with another one. Rule of thumb to know is that attacks with longer start up are more likely to be interrupted by faster strikes and the longer it takes for an attack to recover, the more likely you are to be thrown or struck afterwards.
-Another thing you should definitely know is MOVE SAFETY. Move safety is how advantageous or disadvantageous an attack is on hit or on block. This can be viewed in training and other various modes by toggling the "move details" on in the "fight screen info" option tab in the pause menu. +1 or better means you have frame advantage which allows you to move first. +0 to -6 is considered safe, meaning you can not be throw punished after the attack with the exception of the 5i(the "i" symbol is a shorter term for frame) neutral throws which can be broken by simply pressing the throw button at the right moment. -7 is considered semi-safe, meaning you can be throw punished by neutral throws and 7i throws, but slower framed throws will not catch you. Finally, -8 or worse is considered unsafe, and can be throw punished, so please watch out when using her unsafer attacks.
-In case you were wondering what the "i" symbol stood for, that's just a convenient shortening of the term "frames" and I'll use it throughout the guide to prevent text bulk. So remember, if you see something like 9i, that means 9 frames.
-Last but not least, I will be sure to address whether or not Mai's attacks track. Tracking is a special property that is given to attacks usually with a spin type animation. If your opponent attempts a side step and you perform a tracking move, it will nail them, which discourages opponents from recklessly side stepping from any situation.
-Now that all that stuff is out of the way, we can now seamlessly transition over to her pros and cons. In other words, we'll go over what she excels and struggles in so you can see if she is the right selected character who fits your playstyle!
Section 2: Mai Shiranui's Pros and Cons w/ a basic rundown summary
-Knowing what your character excels and struggles in is something I feel is very know, so this section will go over her pros and cons so you know what to expect while using her. Shortly after that, I will provide a detailed summary to further explain them:
PROS/STRENGTHS
[+] Very fast and mobile
[+] Possesses a 9i punch, making her one of the fastest strikers in the game.
[+] Has an 11i mid punch.
[+] Surprisingly high combo and base damage output.
[+] Easy to learn moveset with good mix ups.
[+] Relatively safe.
[+] Great whiff punisher.
[+] Excellent lows.
[+] Good throw damage.
[+] Good hold damage.
[+] Very good up close, very well suited as a rushdown type character.
[+] Also great at mid range, can also do very well as a spacing/zoner type character.
[+] Has a mid kick Power Blow which can throw off opponents.
[+] Has access to useful(but easily avoidable) projectile. It is called "Kachousen".
[+] Has access to a cancel mechanic that allows her to cancel from a set few attacks which adds to her unpredictability.
[+] Great range attacks and has quite a few with great pushback.
[+] Great environmental combo damage capability and good launchers.
CONS/WEAKNESSES
- Small base moveset which can get predictable if not used carefully.
- Somewhat vulnerable to strike punishment.
- Somewhat lacks tracking ability.
- No offensive holds.
- Aside from her neutral throw, her throws lack environmental interaction.
- Not so good at far range which is where she is weaker at.
-To summarize this, Mai is a very beginner friendly character who is easy to learn and play as. She's amongst one of the fastest characters in the game and has a 9i frame jab making her quick at close range. She also possesses an 11i mid punch, and is a relatively safe fighter with plenty of safe attacks on block and good pushback. Her throws and holds both deal good damage, and she can play either up close and offensive or even at a distance thanks to her excellent range! She has plenty of good lows to keep the opponents on their toes, and is a very good whiff punisher for those who wish to punish opponents for their mistakes. Surprisingly for a striker of her speed, she deals good base damage, and has a high combo damage output if used to great effect, making her a very dangerous contender. She brings the KOF cancel mechanic to the DOA table as well, which allows her to cancel set attacks into her special moves Kachousen, Ryuuenbu, Hissatsu Shinobi-Bachi, or the devastating Kagerou no Mai, quite similarly to alot of other 2D fighting games like Street Fighter. she also has good environmental potential and many ways to take advantage of an opponent slammed into a nearby wall. Her holds are also good at taking advantage of the environment and a few of hers such as her high punch hold can be particularly dangerous near open ledges or nearby hazards and walls.
Although she doesn't have very many weaknesses, she does however suffer from a lack of a large base moveset, and can get predictable if not played carefully and mindfully. She has no offensive holds, and currently has the longest hold recovery out of the whole cast, meaning you must be careful when attempting to hold your opponent. As a 2D style fighter, she also obviously lacks much tracking ability, but this isn't very glaring since she does have a decent amount of moves that do. While not very vulnerable to throw punishment, she is however to strike punishment, and being at a far range from her opponent isn't in her best interest since she doesn't have many attacks aside from Kachousen(which is crouchable and can be free stepped) that particularly scare the opponent into coming closer. Her throws finally lack environmental damage potential, aside from her breakable 5i throw.
How you wish to play Mai is pretty much up to you in terms of playstyle: she's fast and speedy enough to pressure up close, has good range and whiff punishers that allow her to play from a mid range distance, or you can even play as a merger of both a rushdown and a zoner type character. She is also pretty evasive thanks to her attacks that can go under high attacks and crush them and her jump stance allows her to either close the gap or jump back to reassess your approach. Overall, Mai is a very dangerous contender who can be both annoying and deadly to deal with.
Section 3: The Cancel mechanic breakdown
-This next section will cover Mai's main mechanic she brings from the 2D fighting game genre: The cancel mechanic. This is the act of quickly canceling normal move or string into one of her four specials. The following attacks can be cancelled from:
, , , , and back turned and .-These are the following specials she can cancel into and what they can do:
- This cancels the attack into her signature "Kachousen", her high projectile attack that has her hurl a fan at her opponent. The attack is 18i and has 3 starting active frames while it has 44 while the fan is actually traveling. Doing it at long range is most optimal as it gives you 26-46 frame advantage and a brief critical stun, while doing it up close gives you either a frame advantage or disadvantage that greatly varies. If done up close on block, you'll wind up at -22 on block, but the pushback allows you to avoid neutral throw punishment. Overall I deem this her worst cancel move to use by itself since even with the stun, the unknown recovery doesn't allow you to do any follow ups. The fan can also be crouched, free stepped, and normally held if you're bold enough to do it up close. I recommend using this within actual attack strings it can be cancelled from since it acts as a mix up. Can also be used as a good annoying way to waste your opponent's time when fighting a match on the clock and you have the life lead.- This cancels the attack into her other special known as the fiery "Ryuuenbu"! This attack has her perform a quick mid punch 12i graceful jumping twirl that summons a beautiful stream of fire, before transitioning into the "auto" 11i frame segment. The attack is safe on block at -6 and 28i recovery, and it tracks as well as having jumping properties that can briefly avoid lows. The first 12i part knocks down on normal hit, which guarantees the "auto" 11i part if they're at a high enough height in the air. The second "auto" part has more range than the first part does, and instead of actually knocking down, it stuns if it hits by itself on normal hit, providing +32 frame advantage and an opportunity to continue the stun into a combo; be wary that if it hits on counter hit or higher, it'll knock down however. Overall the best go to if you want to finish a string on block safely without much to fear aside from a possible neutral throw which can be broken.- This cancels the attack into an acrobatic and agile special known as "Hissatsu Shinobi-Bachi", a move that starts with her doing a forward 20i(can be slightly delayed to make it 23i if done by itself) springing cartwheel mid kick that automatically transitions into a 20i high elbow, leaving you at 29i recovery.The first part will always launch while the second will always knock back and wall splat. The attack has excellent range, being able to cover nearly the entire stage, and thanks to the elbow, it allows you potential environmental damage in case there is a nearby hazard. The downside is that the string doesn't track, is very predictable from long range, and unsafe at -10 on block and the high elbow can be crouched, making it better suited as a whiff punisher if you use it by itself.- Possibly Mai's most deadly super: "Kagerou no Mai". This cancels the attack into a 28i fire summoning move that launches the opponent into the air on normal hit and is followed by two "auto" 1i fire gusts that launch the opponent higher into the air for a follow up(The attack is considered a mid punch). Viable as both a launcher and a cancel mix up, but be wary that the attack has poor range and must be done up close, otherwise you can be throw punished during the 24i recovery. The downside is that the attack is unsafe at -11 when blocked, does not track, and is somewhat predictable because of the somewhat lengthy start up. It can't actually be held, so the opponent will simply step to the side, leaving you at -27 disadvantage. The launch height varies on whether it was performed on normal hit, counter hit, hi counter hit, or after a CB as a standalone launcher.-Canceling into her attacks is actually really easy, at the end of the hit or string that you can cancel from, simply quickly input the special you wish to cancel into, it is also possible to delay the cancel a bit as well if you wish to further confuse your opponent! If you don't feel comfortable using the dpad to cancel, the joystick is another option that I myself find much smoother and better when canceling certain attacks.
~MAI SHIRANUI HAS APPEARED: Remember it is also possible to execute her supers by themselves without the need to cancel from the strings listed above! Also, don't feel forced to always cancel to avoid predictability, wait for when you think your opponent will least expect it so you can show them why Mai's the best in Japan!-This now concludes her canceling overview! We will now proceed into her jumping and it's follow ups.
Section 4: The Forward Jump and Kawasemi no Mai breakdown
-This section will introduce you to another mechanic she brings from KOF: Her forward jump and her backwards jump called "Kawasemi no Mai"! The input for them is simple:
and . The first one we will address is . It's very evasive, and allows you to jump closer to your opponent while evading lows, and can also be used to get over to the opposite side of the arena when your opponent is down on the floor. Here are the possible follow ups you may use if you want to get feisty! Also please keep in mind that both her punch and kick follow up are 30i and have 24i recovery:- Her punch follow up that makes her perform a downward slanted high jab that stuns on normal hit granting her +25 frame advantage on any type of hits. The attack tracks and covers an ok distance thanks to the jump, but can be crouched. It's also safe at -4 on block so throw punishment is a no go.-Her kick follow up which is a harsh mid knee kick that stuns on normal hit and grants her +25 on any level hit. If done on counter hit, it will cause a wall splat, allowing you to perform a combo for additional damage. Be wary that this is -11 on block and doesn't track, but it has the option to cancel into her follow up if you want to risk it, which will leave you at -6 on block(-5 from a distance) and will knock down on normal hit. This can also be delayed to throw off antsy holders.- Her most dangerous option from the jumping stance, this will make her perform a downward 38i upper body lunge at her opponent that knocks down on normal hit and wallsplats allowing additional follow ups! The attack does not track and is pretty predictable, but is actually safe and leaves her at -7 on block, -5 if at a distance and -7 up close. A good blunt whiff punisher and a good way to halt opponents who try to move in, as well as a good way to crush opponent low wake up kick attempts. Be cautious, this attack can be either standing or low throw punished...-Now to address her backwards jump....
- This is similar to her forward jump, except this actually retreats and creates distance to move away from your opponent. If done near a wall, she will briefly grab on to it, allowing you to jump from it by pressing if you wish. When you jump from the wall, you will be able to perform all the follow ups from her forward jump stance, but take heed they'll be somewhat slower because of the prior maneuver. Her punch and kick follow ups will now be 60i and her P+K will now be 54i.-In conclusion, don't underestimate the power of her jumps, they can be very useful in moving in on or retreating away from aggressive opponents. With that being said it is now time to move into Mai's complete moveset breakdown!
Section 5: Mai Shiranui's complete move list breakdown w/ frame data and situational usage
-This part of the guide will be the longest and will go over all of Mai's moves. There's no need to feel overwhelmed or intimidated, as Mai has a sizable moveset with very simple input and effectiveness. This will use the numerical input rather than macros to save space, so please refer to the above picture so that you can know what each number means pertaining to a direction. Now let's start! Before we begin, I'll let you know that I'll put a "☆" symbol around her attacks I think are definitely her better ones based on move property and not at all on aesthetic or appearance:
☆P- Her basic high punch, which is a swift 9i jab with 13i recovery. Is safe on normal hit and on block at -2 and provides +1 frame advantage on counter hit and +36 and a stun on hi counter hit! Lacks range, doesn't track, and can be crouched. if performed on normal hit or higher to a back turned opponent, it will cause a stun and grant +11 frame advantage.
☆PP- This adds another 9i high jab into the mix, but this is unsafe on normal hit and on block at -9. Has longer reach and provides +34 advantage on counter hit, and because of how swift the string is, it will "jail" the opponent, meaning the opponent is unable to do anything when the string hits unless it is done on high counter hit.
*PPP- This adds in a 15i upwards open fan strike mid punch with 24i recovery. It's unsafe at -10 on hit and on block and doesn't track, but this can't be crouched since it is a mid and it has slightly better range than her previous strike before it. If done on counter hit or higher, it will provide a +36 lift stun, and will launch at the highest stun threshold if done in the right combo strings.
☆PPPP- This ends the string with her "Ryuuenbu" special that was addressed in the third section. It still retains the same frames and properties, but now has slightly longer reach and can be delayed since it is in a string. A viable juggle ender if your opponent is at a high enough height!
*PPPK- Like the previous string this ends the string in a super, this time her "Hissatsu Shinobi-Bachi"! Identical to the original super but has longer reach and is now -11 on block. Can make a viable juggle ender if your opponent is high enough for it to hit and will give you additional environmental damage if done near a wall or hazard.
☆PPP2K- This ends the string with a 23i swift low sweep. The sweep tracks, has decent reach, and it's damage will be a bit higher if done close to the opponent. It will provide +11 on normal hit since it makes your opponent stumble to the side, and will provide +17 trip stun if done on counter hit, allowing you a chance to continue a combo. If done on hi counter hit, it will knock down regardless. Be very careful using this since you'll be left at -15 when blocked(-14 from a distance), and you're left in a squatting position, leaving you vulnerable to both standing and crouching throws... The attack can also be used as a heavy force tech.
*PPK- Ends the string in a swift high kick that stuns on normal hit granting you +36 frame advantage, and will launch if performed during a stun. If done on counter hit or higher, the opponent will be launched, with the height depending on what level counter it was. The string is pretty linear since all hits are highs, and it leaves you at -13 on block and doesn't track, so be cautious when throwing this out there. Perfect next to walls since there is no wallsplat risk.
☆PP2K- This ends her jabs with a 23i low backwards faulting kick that tracks. Has great range and grants +11 on normal hit, and the damage will be halved if done at max distance. If performed on counter hit, it will cause a +17 trip stun that presents a nice combo opportunity, while it will knock down on hi counter hit if done at close range. The string is unsafe at -15, but if it's done at max distance, it's completely possible to evade low throws! Can also be used as a heavy force tech, but only up close; if done from max distance, it will result in a light force tech.
☆PK- Instead of a high jab, this follows up the first jab with a blunt 12i high kick with +10 advantage on normal hit. Any counter hit will provide you with a +25 instead, as well as a stun that can be capitalized on. Has decent range and can wallsplat on counter hit and during stuns, but does not track and is -11 on block, as well as being linear and able to be crouched. The second kick is guaranteed if you do the string on counter hit, but not during stuns.
☆6P- Her 11i mid elbow attack, this attack is unsafe at -13 on normal hit and block, but is useful for scoring a counter hit thanks to the lovely speed. If done on any counter hit, you'll get a +26 advantage for some combo time. Lacks range and doesn't track, but it's speed and follow ups make up for these weaknesses.
*6PP- She ends the strings with another mid punch that involves a swiping horizontal fan jab. A bit slower at 15i but tracks and provides +21 advantage on any counter hit. The only major flaws is that the second jab lacks range and the string is linear since both hits are mid punches. This moves has a cancel capability after the second jab!
☆6PK- This follows the first mid punch up with a scary 20i low thrust kick. The attack doesn't track, has 27i recovery, and leaves you at -14 on normal hit and block, but has great reach and nasty follow ups as compensation. If it hits on any counter hit, you gain +11 advantage and a better type of stun if you choose to go for her mid kick follow up!(Will be addressed shortly.) Also useful as a light force tech, especially due to it's great range.
☆6PKP- This follows the low thrust kick with a 17i swiping open fan mid punch. Provides you +25 advantage on any level hit, great range, and a possible follow up you can hold off on to get a reaction from your opponent! Does not track, but can be used as a light force tech to get grounded opponents back in to the mercy of your fans since the fan swipe is a true mid.
~MAI SHIRANUI HAS APPEARED: Not sure what a true mid is? A true mid is a mid attack that can also hit opponents on the ground, thus making it useful as a force tech!*6PKPP- Finshes the string with her "Ryuuenbu" super! Has the same frames and properties as the standalone version, with the added bonus of string delay to further throw off hold happy adversaries!
☆6PKK- Mai gets technical by finishing the string with a 17i acrobatic flipping mid kick with 27i recovery. Has good reach, +22 advantage in normal hit situations, and is very useful for finishing juggles or wall combos. If the kick hits on any counter hit, it will result in a crumple fall stun that will cause your opponent to keel over on the ground....UNLESS they hold, putting them in a guess situation where they'll have to make a choice on whether to hold, or take the fall. Wallsplats on normal hit, but unfortunately does not track.
☆4P- A thrusting upward high fan jab with only 15i start up. It provides a blind stun on any level hit that grants you +35 advantage. The attack has a cancel capability, and if it successfully hits, her "Ryuuenbu" and "Hissatsu Shinobi-Bachi" special cancels will be guaranteed! If used in air combos, it has a decent refloat and allows for some crazy combo possibilities if you throw in the right cancel. Unsafe at -13, but the opponent may have to respect the cancel follow ups or else they risk taking counter damage. Also her only single strike besides back turned K that allows her to cancel without the risk of being held from a static(string with only one follow up besides the ability to not finish the string.) Does not track unfortunately.
☆8P- The same as the final fan strike from her 6PKP string, except with less range and quicker start up at 15i.
☆8PP- Like the previous string this is the same as 6PKPP, can be delayed.
☆2P- A 13i low punch poke that involves her poking the opponent with her closed fan. Lacks range and does not track, but it ducks highs and is a good way to surprise opponents. Leaves you at -1 on normal hit and -4 on block, and will pushback the opponent on counter hit and grant you a nifty +4 advantage. A good way to get opponents off you and back to a safe distance to rethink your approach. Can also be used as a light force tech.
*3P- Her mid upwards fan strike from the PPP string, except faster at 13i and is the standalone version. Frames and properties are identical other than that.
☆3PP- Like the previous string, it's from the PPPP string and lets you finish the string with her "Ryuuenbu" cancel. Can be delayed and tracks!
*3PK- derived from the PPP string like the previous string except it uses the "Hissatsu Shinobi-Bachi" mix up instead. Has the same properties as the PPPK and standalone move with the added bonus of delay like the PPPK variant.
☆3P2K- Like the previous two strings, this is once again derived from the PPP string. Has the same frames and properties as the PPP2K string, but can be considered the standalone version. Still tracks and hard force techs!
☆1P- a low crouching closed fan poking jab that with 16i. Has good range and can help her move in on an opponent, especially on counter hit. Although -4 on normal hit and -10 when blocked, it provides +16 advantage on counter hits and is useful in strings since it's possible to continue a set up combo after it, with the added bonus of unpredictability since it's a low. Great as a light force tech thanks to the range, but does not track.
☆66P- An 18i lunging forward mid elbow attack, has great range, and is safe at -5 on block at max distance, -6 on mid , and semi-safe at -7 up close! A useful way to move in on an opponent from a distance, and it provides you +2 advantage on normal and stuns briefly, but you can't follow up on the stun unless you finish the string. If it hits on any counter hit, you'll be given +22 instead and an opportunity to continue a set up combo if you wish, or you can await a reaction from the opponent in case they expect the finished string. Does not track and will wallsplat on counter hit.
*66PK- She finishes off the string with the 23i fiery mid flipping kick known as the second variant of her "Koshu no Mai" attack! Because this is her only follow up from the previous move, it's pretty predictable and easy to see coming, so actually performing it is kinda risky. It will leave you at -14 on block which is just asking for punishment, and it doesn't track either. Because of the range, it's possible to actually use this follow up by itself; If it hits on any level hit, it will result in a launch allowing a juggle, and unlike the attack before it, it does not wallsplat, allowing you a decent opportunity to get some environmental damage in before you aim for the wall or a danger zone nearby! If done on counter hit, the launch will be higher, and even higher on hi counter hit!
☆K- Quite similar to the kick from PK, except with +8 advantage on hit. Other than that the moves are the same in terms of properties and frames. Will wallsplat on counter hit.
*KK- Her second 14i follow up high kick with 24i recovery just like the previous one. Can be delayed and used as a stun and combo extender, but take heed since the string is two consecutive high kicks... grants +8 on normal hit and +25 on counter hit and during stuns. Unsafe at -12 on block...
*KKK- The final 17i high kick in this string, provides +22 advantage on normal and counter hits and wallsplats. Can be delayed and has a cancel capability, but since the string is all highs and very linear and doesn't even track, this is a risky string to attempt a cancel from, be wary...
☆6K- One of my personal favorite moves of Mai: a 13i forward mid chest kick with great reach and is safe at -4 when blocked, -3 at max distance. No matter what type of hit of hit it lands, it'll always give you +4 advantage and push the opponent back a distance. The move has many uses: It can be used when approaching opponents as a sort of mind game, a tool to get the opponent away from you and out you at a optimal range, or even as a sort of reset during a stun(but not at the very end of the stun threshold) so you can keep the opponent standing for some more annoying trickery if you don't want them down on the ground yet. Does not track.
☆4K- A twirling 16i high axle kick with 25i recovery. Grants +24 advantage on normal hit and stuns allowing you attack your opponent the way you see fit; using this on counter hit or during stuns provides +35 and a lift stun for even more possibilities! Wallsplats on counter hit, and tracks, although the attack can be crouched. Be wary of the -7 on block as well..
☆8K- Standalone version of the final high kick from PPK! Same frames and properties, but more useful since it can be done without the two punches.
*2K- Similar to 2P, this is a low 14i low crouch kick with more range than 2P, but also unsafer at -10 on normal hit and -14 on block... Counter hits will result in +13 advantage and a stun that will let you continue your set up combo, or can be used as a way to get an opponent away from you a bit for something else. Has two follow ups that may deter the opponent attempting a throw punish if they anticipated one.
*2KP- Ends the string with her 2P low fan poke attack. Has the same frames and properties, and because of it's safety, it allows you to end the string safely, although the double low can be a bit linear. This string is guaranteed on normal hit.
☆2KP+K- A pretty interesting move: A low 17i crouching mid punch fan strike. Although unsafe at -10, the move has a lot of things going for it! It can avoid and crush highs, and pushes back and grants +3 advantage on normal hit as a way to get opponents to back off of you. Counter hits will result in +23 and stomach grab stun that allows you to continue your assault unlike the normal hit variant. Tracks, but has poor range range as a trade off, forcing this to be used up close to even hit the opponent.
☆3K- This is a 14i vaulting forward mid kick, -3 on normal hit and has great range, while being semi-safe at -7 when blocked, -6 if performed at max distance. Being very versatile, it can be used from a distance to nail a +25 counter hit, a way to continue stuns, and even be chained with 6K for a mid kick mind game loop if you're feeling a bit jovial. Causes a wallsplat on counter hit, but does not track.
☆1KPP- The same as the 6PKPP in terms of frames and properties, but with the 6P mid punch removed in favor of making the low vault kick the base attack for the string. Useful for some low counter hit shenanigans and great in stuns when your opponent least expects a low with follow ups!
☆1KK- The same as the previous one, except the string ends in her technical acrobatic mid kick instead, exactly like 6PKK. Same properties and frames, just more unpredictable thanks to the base low rather than a base mid punch.
☆66K- If you were a fan of Mai's 66P, you're likely gonna love this move! Just like 66P, this is a good ranged approach and whiff punish tool in the firm of a 20i mid jumping lunge kick with 24i recovery. Like 66P, it's safe at max distance at -5 on block, -6 at mid range, and semi-safe at -7 up close. A successful hit will result in +24 advantage and a stun allowing a combo opportunity. A counter hit will result in a crumple stun that will make your opponent keel over unless they hold, forcing them to either risk a hold, fall, or man up and take the damage over a hi counter throw.
*66KK- The final follow up to the attack: the same final high kick from KKK, except slower at 23i. Has a cancel capability, but be wary that the high kick can easily be held on reaction and even ducked. Same properties and frames aside from start up.
*P+K- This is her critical burst: She uses her fans to do a long ranged 20i stun to her opponent. Unsafe at -8 on block and does not track, but provides a +23 stun on normal hit, and a deadly crumple stun on counter hit! An excellent whiff punish as well as a neat way to halt approaching opponents. Wallsplats on normal hit.
☆4P+K- Her power blow in it's docile state: a 31i-60i jump off lunge flip mid kick with 39i recovery. It has excellent reach and is a good way on knocking advancing opponents back. It's -10 on block, but has plenty of pushback on block to completely dismiss a throw attempt, although whiffing isn't a good idea because of the lengthy recovery. Can throw off opponents since she's one of the few characters to possess a mid kick power blow, but be wary that the attack does not track.
~MAI SHIRANUI HAS APPEARED: If you wish to cancel out of your power blow, simply press 2 or 8(up or down) while charging it to make her perform a sidestep. This is useful for testing your opponent's reaction or in case you wish to hold off on the attack for now.*4P+K(50% or less health, CHARGE!)- Once you've taken enough damage for your health bar to be at 50% or less and to flash red, you will now be able to perform her actual PB for good comeback damage! If your opponent blocks it, you'll gain +13 advantage as well as the same pushback like it was in it's normal state. Although it's better to hold off on this until you have an actual critical burst, if you're feeling vengeful and want to share some pain with your opponent immediately, it's possible to use during stuns and in situations where your opponent is wide open. Be very cautious: if your opponent successfully reads your PB and holds it, you'll take hi counter damage which will seriously hurt what is left of your health bar...
☆2P+K- The same crouching mid from her 2KP+K string, except now a standalone move with the same properties and frames. Useful still in stuns and a good counter when dealing with a high strike.
*3P+K- This is a 16i upwards swiping fan mid punch that provides a +34 lift stun on normal hit. It launches from stun, and counter hits but the launch height will vary depending on how high the stun threshold was and what type of counter was used. Although not her best launcher and it has mediocre range, it's useful as a mix up and does not wallsplat. Lacks tracking and is -12 on block, -11 however if done from a distance.
☆Sidestep~P+K- An attack stemming from her sidestep: Mai brings her iconic posterior in the mix with a 27i lunging butt thrust! The thrust is -3 on block(-4 up close) and puts her in her backturned state granting her acces to her commands from that state. The attack is not exactly holdable, if your opponent does attempt to(because she is using her butt, both mid punch and mid kick holds will successfully evade it) to hold and it works, they'll step to the side to evade it, leaving you at -16 disadvantage. A successful normal hit will grant you +18-19 advantage and a stun to continue your assault, the same advantage will also apply to any counter hit! In the uncommon chance that you perform this to a backturned opponent, it will cause a nasty shove stun that grants +28-29 advantage. This does not track
~MAI SHIRANUI HAS APPEARED: What's wrong? Did you know that if you use my sidestepping butt fling attack on a backturned opponent, 4PP and it's and cancel option will be guaranteed?? I am the best in Japan for a reason!*Sidestep~P- Another attack stemming from her sidestep. This is the same final mid punch from 6PP, except slower at 25i and it provides you +2 advantage on hit, but will provide the same stun from a set up stun if she performs a counter hit, allowing a follow up! Safer at -11 on block, but does not track and has limited range.
*Sidestep~K- The same as her 4K twirling axle high kick, except with slightly less range and slower at 27i. Same properties and frames other than that.
*H+K- A harsh forward jumping lunge 15i mid knee kick! Doesn't do anything special on normal hit aside from launching the opponent up a height you can't juggle from and leaving them floored. Doesn't track and has pretty short range, but it launches the opponent much higher when performed during a stun or on counter hit, allowing a juggle opportunity. Also wallsplats and evades lows due to the jump, but is -13 from a distance and -14 up close on block as a trade off.
☆6H+K- A 25i leaping forward torso mid kick that evades lows, definitely one of Mai's better moves! A bit slow I'll admit, it has great range and provides a +25 stun on normal hit, while a nasty +24 sitdown stun during stun and on counter hit, guaranteeing 3PP, 6P, 3K, 6K, 2K and 2P! The move doesn't track, but is safe at -5 on block and -4 if performed at a distance. Also useful as a whiff punisher if you want to create some trouble. Causes a wall splat on normal hit.
☆8H+K- Like the previous move, this is also a similar 25i mid kick, except this one has her jump in the air evading lows to deliver a mean overhead kick. It knocks down on normal hit and doesn't allow a tech roll, and it guard breaks giving you +2 advantage. Like 6H+K, you'll get the most out of it on counter hit: when it hits on counter hit, your opponent will be slammed unto the ground and will briefly bounce, giving you the opportunity for a follow up! Does not track, but will wallsplat on normal hit. Also useful as a hard force tech, and also can crush low wake up kicks if timed right.
*7H+K- Her power launcher in it's dormant state: A fiery flipping 25i-40i(can be charged) mid kick with 33i recovery that can evade lows. Unsafe at -16 on block, and somewhat impractical to use outside of CBs. Doesn't track but will wallsplat on normal hit and allows follow ups. If your opponent is about to fall over a ledge and you can't juggle until after the drop, a fully charged 7H+K is a viable option to get the most damage before the drop.
*7H+K(50% or less health. CHARGE)- Her PL in it's dangerous state: if it hits, your opponent will be launched up a consider height, allowing you a chance to execute a creative combo juggle that can possibly surpass the power blow in terms of power! Mist be fully charged in order to actually activate the launch, and I recommend saving this until after you have critical burst the opponent.
☆2H+K- The same final low vault kick from PP2K, just now in standalone form. Has the same properties and frames as the original.
Back-Facing Strikes
☆P- The same as the regular high P jab, just has slightly shorter range.
*4P-The same as 6P, just with slightly shorter range.
*4PP- The same as the final follow up from 6PP. Has a cancel capability!
☆2P- The same as 2P facing forward, just slightly unsafer at -5 instead of -4 on block. A quick and safe way to turn around.
*K- The same as the final high kick from KKK, just faster at 15i instead of 17i. Has a cancel capability!
*4K- The same as her H+K.
☆2K- The same as her 2H+K, just faster at 18i instead of 23i. Has SLIGHTLY better range.
Notable launchers
-This mini section will point out some notable launchers she can use in various conditions:
*3P+K- Mid punch CH launcher. Mediocre launch height and reach but useful for counter hits and can't be crouched aside from Helena's Bokuho true mid duck. Avoid using in CBs.
☆8K- High kick CH launcher. Slightly better launch height and range but is able to be ducked or low held out of. Better for CBs.
☆H+K- Mid kick CH launcher. Useless on NH and has mediocre range but slightly better launch than 3P+K. Teeny bit more damage but be wary....it wallsplats.
*214P+K- Mid punch launcher. Launches on any level hit and tracks as well as dealing the most damage, can also be canceled into by the allowed moves. Lacks range.
☆66PK- The second hit which is a mid kick launcher. Launches on any level hit and has great range and damage although risky. Has and good launch height but the 35i recovery limits some stuff you could do from other launchers.
☆8H+K- Mid kick CH "bounce" launcher. Slow and has low launch but good range and damage to compensate. Wallsplats...
-Phew!! That concludes Mai's move breakdown and what her tools can and can't do! Now we will move on into her throws!
Section 6: Mai's throws explanation
-This section will cover all of Mai's throws and what they do in terms of abilities. This will be a relatively shorter section since Mai doesn't have too many throws. Let's begin:
- Her fastest/neutral throw at 5i: Mai flips atop her opponent's vulnerable shoulders and flips them over before slamming them dramatically into the ground. Although this is her fastest throw, it can be broken; if your opponent escapes it, you'll wind up on the opposite side of the arena with -5 disadvantage.(The fan Mai has in her mouth will amusingly fall out and disappear on the ground). The throw is versatile as it can send opponents immediately over ledges for more damage and into walls and dangerzones! If done to a backturned opponent it will become inescapable and deal slightly more damage. ~N:45 C:56 HC:67~- Her first version of her second fastest 7i throw. She climbs atop her opponent's head before nimbly grabbing it with her knees and then ankles before flipping them to the floor while winding up in a somewhat compromising pose herself before getting back up. Will deal more damage if you manage to perform this on a backturned opponent. ~N:50 C:62 HC:75~- The exact same as the previous throw, except she flips the opponent to the opposite side of the arena instead. Start up and damage is the same. ~N:50 C:62 HC:75~- A longer range dashing throw: Mai gets feisty as she does a nasty upwards lifting fan barrage to her opponent, leaving them face down in the dirt. Can't be executed to backturned opponents and doesn't interact with walls, but it can send opponents over open ledges for more damage. ~N:56 C:68 HC:84~- Mai's slowest but most damaging throw: she climbs atop her opponent's shoulders suggestively before summoning a fire explosion to send them back first unto the ground. Can be done to backturned opponents for even more damage if you wish! `N:63 C:78 HC:94~- Her sole 5i low throw: She pushes off her crouching foe's back before doing a brutal knee drop to their spine that leaves them face down on the ground. Can be done to backturned opponents for more damage and leaves you a safe distance away to avoid retaliation. ~N:50 C:62 HC:75~(to foe in air)- An 8i air throw that can be done on launched foes as a good juggle ender if they're at the right height. Be sure your opponent is at the appropriate height or else it won't connect and you'll be at a disadvantage. Damage will depend on the type of counter you used from the previous attacks prior to executing the throw. ~NH:28 CH:35 HCH:42~-That finishes off the throw explanation section! Now we will move into her holds!
Section 7: Mai's holds explanation
-This section will now go over the holds that Mai has in her arsenal; she does not possess any expert holds or parries, she only has the normal holds which still puts her at a good standing defense wise. Here they are:
(Vs. high punch)- Mai gracefully interrupts her opponent's jab and performs a deadly spinning fan barrage assault to reel them backwards before sending them on the floor back first. Very versatile: it will wallsplat your opponent into the wall and send them over open ledges and into nearby dangerzones, making it very dangerous. Not much space is given after the hold so be wary.(Vs. jumping high punch)- Mai quickly intercepts her opponent's high punch and quickly gets them in an elaborate knee head hold before piledriving them head first into the ground and nimbly flipping backwards. Enough space is given for you retreat or move in close to pester them while they're on the ground.(Vs. high kick)- Mai grabs her opponent's kicking leg before grabbing the one they're standing on and proceeds to twirl them off their feet and unto the ground. Good amount of space given after the hold finishes.(Vs. jumping high kick)- Same as the regular high kick hold.(Vs. mid punch)- Mai slaps away her opponent's mid punch by summoning fire that turns them backwards and finishes it one more fire summon to twist them to the ground floor. Good amount of distance after the hold.(Vs. jumping mid punch)- The same as her high jumping punch hold.(Vs. mid kick)- Mai uses the final kick from her KKK string to harshly kick back her opponent a good distance. Very versatile as it kicks opponents into wall and dangerzones and even over open ledges!(Vs. jumping mid kick)- Mai performs an identical version of her in air T throw.(Vs. low punch)- Mai grabs her opponent's low punch and knocks them clean unto the floor face first with her open fan. Very little space given after hold.(Vs. low kick)- Mai intercepts her foe's kick and twists herself up in the air before harshly sitting on their abdomen. Very little space is given after the hold.-That finishes off the hold explanation section! Remember, don't hold just because you can, a missed hold can result in heavy punishment such as a throw punish or continued assault. The aim is to make a good read when you know what's to come and watch carefully so you can stop an opponent in their tracks. With that being said, let's move on to the basic combo section!
Section 8: Mai Shiranui's basic/staple combos have appeared!
-Glad to see you finally made it to this part of the guide! At this point, you've learned quite a bit: Mai's cancels, moveset and tools, her throws, and just recently her holds! Now it's time to put you through the wringer and give you some simple combos to use. The following combos listed are relatively simple to pull off and nothing to difficult, at the end of this section I'll provide you a little something so you can go even further Mai's combos if you wish. Here's a legend so you know what to expect:
[☆]- General combo. No particular set up or CB. May include a launcher and a cancel.
☆- Sample CB set up.
>- This symbol means to perform the command after you have done the previous one.
-Damage will be displayed like so: 20/30/50. First number is normal, second is counter and the final one is high counter.
-I will also make note on whether the combo can work on heavyweight or not!
-I will be using numerical input for now, but don't worry, button macro format will be added soon!
This section will be pretty sizable so feel free to get creative and make some say combos of your own![☆]4P>8K>3PP>6PKK(Light and mid weight only) ~65/81/98~
>>[☆]KKK214P+K>T ~89/104/118~
>[☆]KK>1KK>8K>3PP>6PKK ~90/113/136~
>>>>[☆]8P>1P>6PP214P+K>3PK ~86/108/128~
>>>☆4P>2K>6P>3K>P+K(CB!)
>>>>☆(CH)2H+K>3P>1P>3K>P+K(CB!)
(CH)
>>>>☆66K>6P>1P>3K>P+K(CB!)
>>>>☆(CH)3K>1KK>4P>P+K
(CH)
>>>[☆](HCH)8K>3PP>6PKK
(HCH)
>>[☆](HCH)8H+K>PPPK/T
(HCH)
>/[☆](HCH)H+K>6PP214P+K
(HCH)
>-And that's the gist of what Mai is capable of, but there's a lot of possible options stemming from her cancels and attacks so feel free to experiment and see what you like! I'll add a few more sample stuff in the near future
~MAI SHIRANUI HAS APPEARED: What's wrong? Still want more of my ample combos?? Don't fret, join the rest of my fans in my combo thread in the quest to find my best most damaging combos in Japan:Section 9: Closing remarks and acknowledgements
-Well, this concludes my take on Mai's written beginner introductory guide! I hope by now you have a better understanding of her tools, holds, throws, cancel mechanic, and frames. I'm happy to have shared everything I gathered with whomever is reading this. Before we close, I want to thank and acknowledge the following people:
@Force_of_Nature for motivation and for helping me better understand the game mechanics and characters through his bountiful tutorials!@KING JAIMY for his support, his informative Mai combo video that helped me realize more of her combo potential, and for his fiery devotion for Mai too! Also thank you for correcting that mistake I overlooked at the very beginning! XD@Nikotsumi for his support, very well done environmental Mai combo video and his fellow interest in Mai!@RenderingStar or Rendering sensei for playing with me and always inspiring me to improve!@panicitstylor or Panic sensei for also playing with me and motivating me to find even more for the characters I enjoy playing.@samuraihachi for his motivation and Mai combo video that helped me when finding out what she could do from certain situations and moves!@GreatDarkHero For his findings on Mai and being kind enough to give me a detailed rundown of everything he knew about his KOF main in terms of moves, playstyle, and her tools when I was curious about her when she was first teased! This gave me a good idea of how she would likely play in the DOA universe......I'm not sure if I missed anyone, but thank you as well if I missed you!
-This now completely concludes the end of the guide! As always, because patches always come and can quickly change a character's move properties, I'll be sure to update this whenever a particular move is at all modified! Thank you for reading! Oh and I double checked for any mistakes, but if you see an error or something I may have missed, please let me know so I can fix it. Thank you in advance, and RYUUENBU!!
Hey, DOA6 is out now and Mai is in!! If you want to jump into 6 and want to see how Mai has changed, hit the link below to the Mai DOA6 beginner guide! See you there!^.^
"This is the power of Japan's best. Get it now?" A Mai Shiranui Beginners' Guide | Vanilla Ver.
Hello, this is KasumiLover with another guide I've been silently working on and have been slowly revising and making from the original Mai Shiranui guide in LR! Having been in the original DOA5LR game as its final DLC character, Mai has returned in 6 with more ways to play her and alot more...
www.freestepdodge.com
Last edited: